iPhone Unlocker User Guide

Support Updated on Mar 7, 2025 5:08 PM
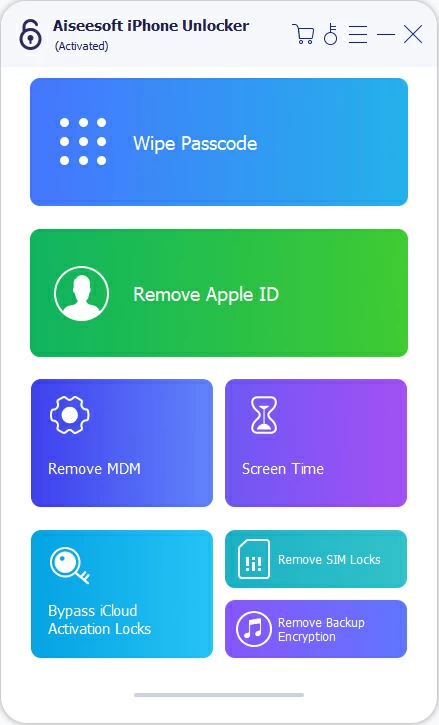
iPhone Unlocker earned its spot on the best iPhone unlocking software list because it's more than lock screen passcode remover. In fact, it's a bit of a one-stop solution with an array of features, including Wipe Passcode, Remove Apple ID, Remove MDM, Reset Screen Time passcode, Remove Backup Encryption Settings, and Bypass iCloud Activation Lock. And the developer continues to grow the product.
This guide involves 4 parts to unlock your device, no matter you forgot the screen passcode, can't remember the Apple ID, passcode set by others unintentionally, the device is remotely managed by a company or university, or you bought a second-hand locked device. These screenshots show how to use the program on a Windows computer, the process is virtually identical on Mac platform.
The first and the foremost thing that you need to do is download the software and install it on your computer. iPhone Unlocker is available for both Windows and Mac.
The installation process is quick and easy.
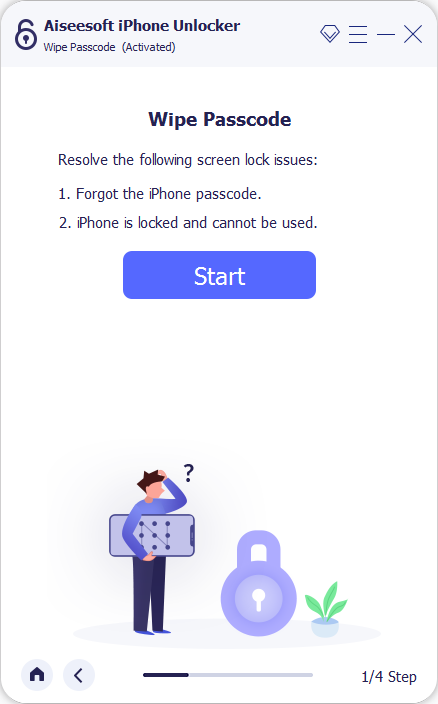
Part 1: Wipe Screen Passcode
Whether you got locked out after entering passcode too many times, forget the passcode, your device is locked or disabled, you see Unavailable or Security Lockout error, or you bought a second-hand locked device, iPhone Unlocker works in all scenarios.
Attention:
- Removing the screen passcode will erase all your data on the device.
- Your device will be updated to the latest iOS version.
Step 1: Launch iPhone Unlocker
Once installed, click the icon on the desktop to open the iPhone Unlocker. Then connect your iPhone (or iPad, iPod) to the computer via a USB cable.
In the main screen, select "Wipe Passcode."
In the next window that opens, click the Start button and move to the next step.
If the device isn't recognized, you'll want to click "Device connected but not recognized" link on the top and follow the onscreen directions to place the phone into recovery mode to build connection between the device and program.
Tip: We also have a handy tutorial where you can look up how to complete entering recovery mode task. Check here.
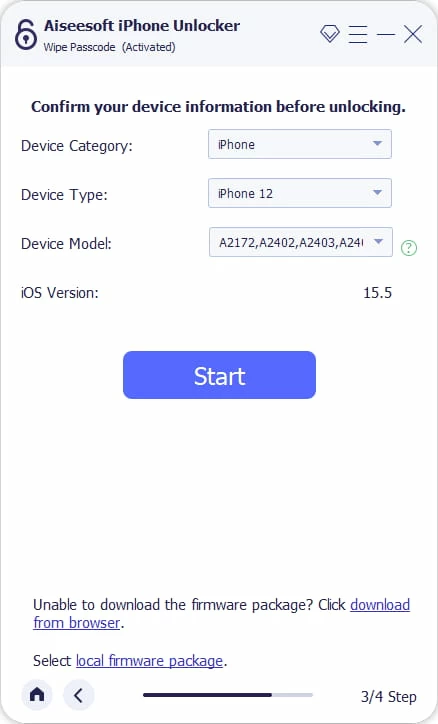
Step 2: Confirm your device information
Once connected, confirm your device information, followed by Start button.
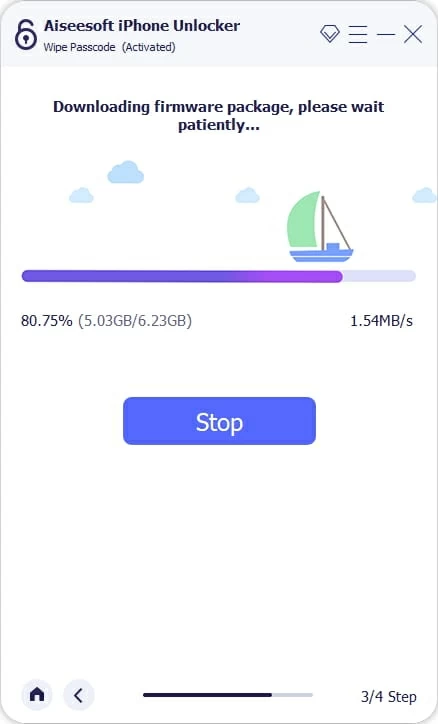
Step 3: Download firmware package
Then, the program will start downloading firmware package. You have to wait for a short bit.
When the firmware package has been downloaded, click Unlock on the window to go on.
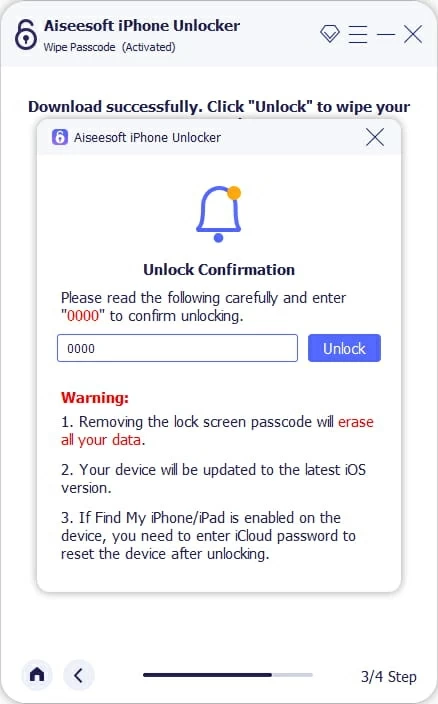
Next, you'll have a screen like this. Read the precautions and then enter 0000 to confirm unlocking.
Step 4: Begin unlocking passcode
Now, press the Unlock button. The utility will start removing the forgotten passcode and reset the device. The process may take a while. Be patient.
After the unlock process, all your data and settings will be erased completely and the device will restart as new.
Part 2: Remove Apple ID
If an iCloud activation lock suddenly appeared on your iPhone, iPad or iPod, follow these steps to bypass it.
Attention:
- Bypassing activation lock will erase all your data.
- Don't use "Erase all content and settings" feature on your device, or it will be linked to the original Apple ID permanently.
- Don't use iTunes to update or restore your device, or it will be blocked from the original Apple ID permanently.
Step 1: Launch iPhone Unlocker
Once installed, click the icon on the desktop to open the iPhone Unlocker. Then connect your iPhone (or iPad, iPod) to the computer via a USB cable. If a message pops up on the device, tap Trust to confirm.
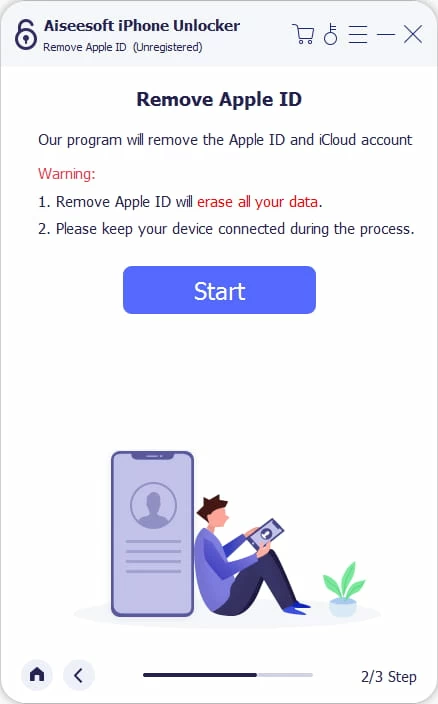
Select the green "Remove Apple ID" option in the window.
Step 2: Begin removing forgotten Apple ID
Now, you should see something like this. Read the warning messages carefully.
Next, click the Start button and let the utility do its things.
When the process is complete, the Apple ID and iCloud account will be removed from your device. Now you can set up your device and log into the App Store with your new Apple ID.
Situation 1. If Find My iPhone/iPad is disabled
If Find My iPhone is already disabled on your device, iPhone Unlocker will directly remove your Apple ID.
Situation 2. If Find My iPhone/iPad is enabled
All your data and settings will be erased permanently after Apple ID removal.
- iPhone/iPad running on iOS 11.4 or later: the Two-Factor Authentication must be enabled on the device to be able to remove Apple ID.
- iPhone/iPad running on iOS 11.3 or earlier: the software can remove Apple ID on the device directly.
Note, DO NOT use Erase All Content and Settings feature or Restore iPhone using iTunes/iCloud after removing Apple ID, which causes you to get stuck in iCloud activation Lock while setting the device up, and it will ask for the original Apple ID to reactivate the device.
Part 3: Remove Screen Time Passcode
You're able to unlock Screen Time passcode and retrieve Restrictions passcode without losing data.
Attention:
- Make sure iTunes has been installed on your computer, and has the latest version.
- Find My iPhone/iPad should be disabled first.
- After unlocking Screen Time passcode, you need to re-set up your device.
Step 1: Launch iPhone Unlocker
Once installed, click the icon on the desktop to open the iPhone Unlocker. Then connect your iPhone (or iPad, iPod) to the computer via a USB cable.
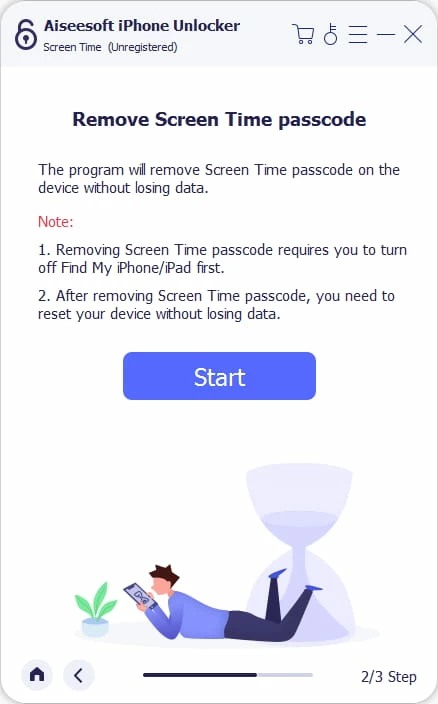
From its interface select "Screen Time."
Step 2: Start removing forgotten Screen Time passcode
Go ahead and click the Start button to begin the Screen Time passcode removing process. This won't take long.
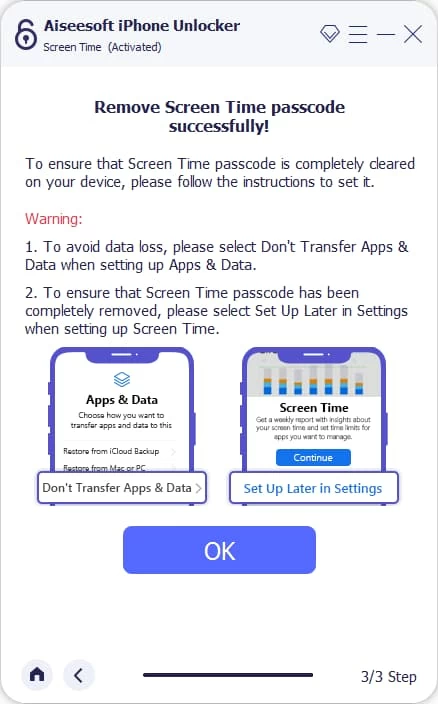
That's about it. You've successfully removed Screen Time passcode from your device.
Please follow the on-screen instructions to re-set up your device.
Part 4: Remove Remote Management
Keep in mind:
- Bypassing Remote Management lock on your iPhone or iPad would reset your device and erase all content and settings.
- To remove local MDM device management profile on your device, please turn off Find My iPhone/iPad. The process won't lose any of your data.
- Once you've bypassed remote management, avoid resetting the device or flashing firmware. Doing so will re-enable the MDM lock. But you can still re-bypass it with the program.
Step 1. Select "Remove MDM" tool
Run the iPhone Unlocker app and select "Remove MDM."
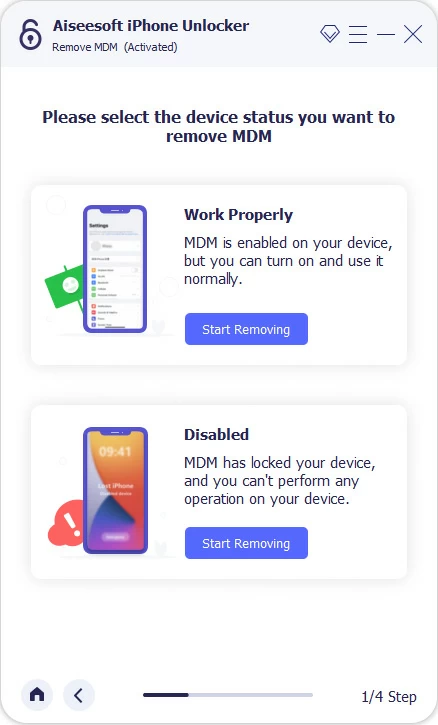
Step 2. Select the device status for MDM removal
The software comes with two modes available to use.
Work Properly: This mode is suitable for a device that can be accessed and you want to remove the local device management profiles (Settings > General > VPN & Device Management).
If that's the case, select this mode, turn off Find My iPhone/iPad, then follow onscreen instructions to complete the MDM removal. No skilled required, no data loss.
Disabled: This mode works for those who are stuck at Remote Management screen after factory reset. This will erase all your data after the process completes.
In this article, we're taking "Disabled" mode for example. Click on it.
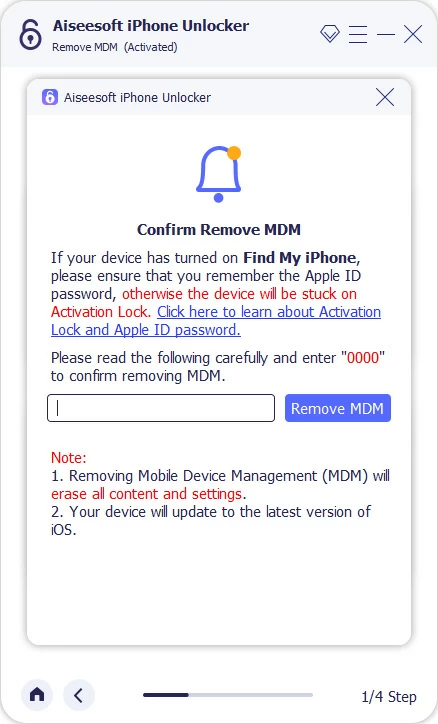
The "Confirm Remove MDM" dialog pops up, read the warning messages carefully.
Enter "0000" to confirm, then click on "Remove MDM" button to proceed.
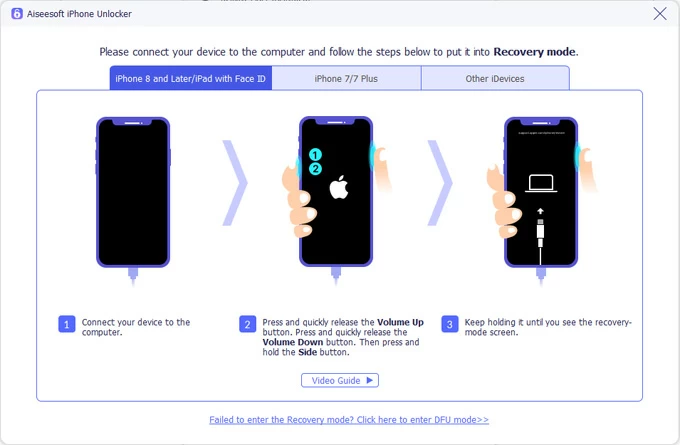
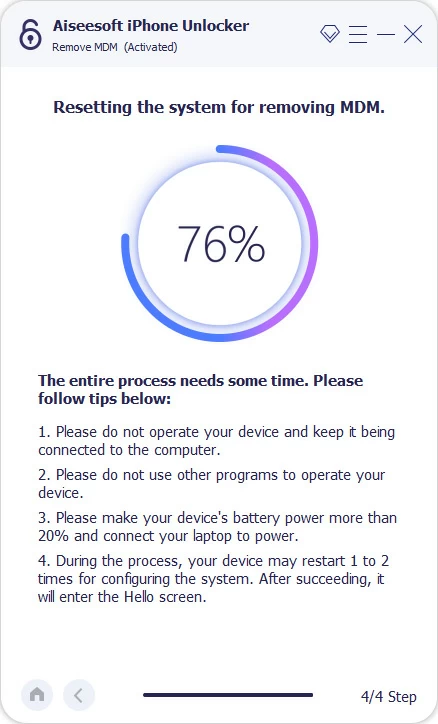
Step 3. Enter Recovery mode
Connect your device to your computer and put it into Recovery mode.
This method will differ depending on what device and model you have. We suggest following the prompts on the screen to finish it. (See image below)
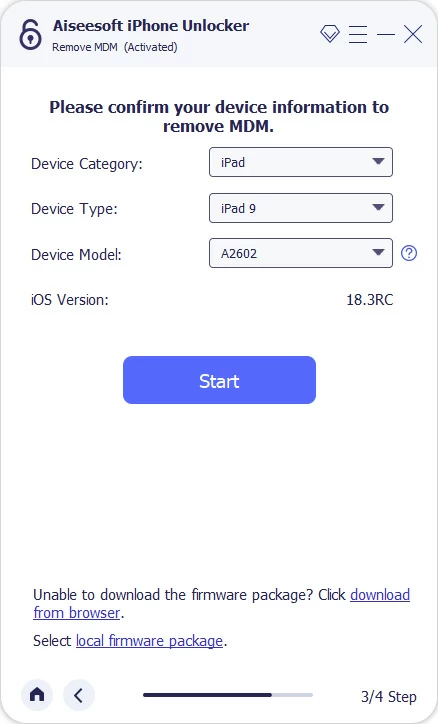
After connected, confirm your device information.
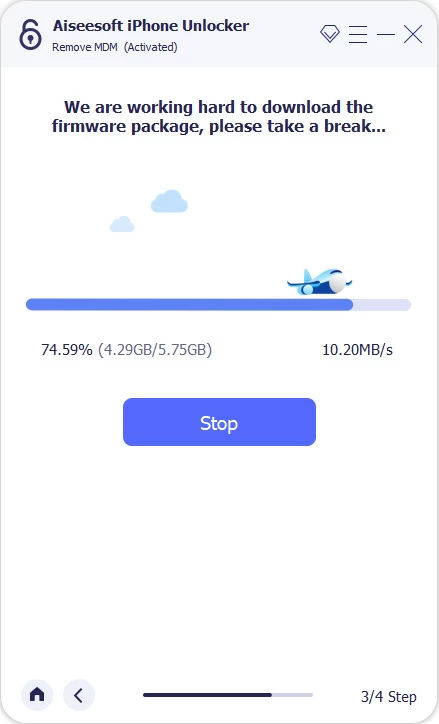
Step 4. Download firmware package
Click "Start" button to begin the proper firmware package for your device.
After the download, it will automatically reset your iPhone or iPad completely.
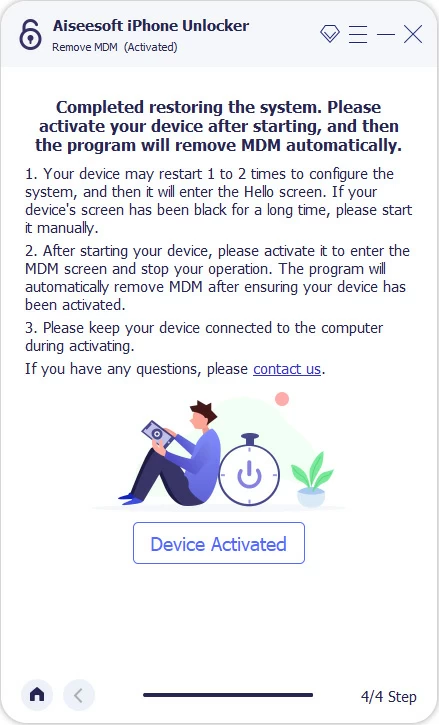
Step 5. Bypass Remote Management
Wait for your device to restart. If it keeps black for a long time, press the Power button to turn it on manually. Then set up the device until you get to the Remote Management screen.
The iPhone Unlocker will automatically detect the lock and remove the Remote Management instantly.
Done! You can now use your device again and access all features without limits