Can QuickTime Convert MOV to MP4 File Format on Mac?
What is QuickTime
Generally, when we talk about QuickTime, it means the QuickTime Player rather than the multimedia development, storage, and playback technology from Apple. QuickTime Player is developed by Apple and is the default player included in the Mac machine out of the box. Also, it is available for Windows operating system. Better still, this media player is distributed free of charge. On account of these advantages, QuickTime Player enjoys great popularity.
Formats Supported by QuickTime
QuickTime Player supports a number of formats, such as QuickTime movie files (MOV), most MPEG-4 files (MP4, M4V, M4A, MP3), MPEG-2, DV Stream, Mjpeg, and some audio files like WAV, AIFF, AAC. However, these formats don't enjoy the fair treating. Among them, MOV, MP4, and M4V are three types of optimal formats.
Potential Problems
From the introductions above, we may probably have a sense of illusion that QuickTime should be the media player out of this world. However, nothing is perfect, with no exception of QuickTime Player. Sometimes, you probably have the issue that QuickTime player cannot open some video files—it may be caused by a corrupted file, or it's possible that the movie file is not compatible with QuickTime Player.
Related Article: How to Play MKV Video File with QuickTime in Mac
Conversion Options
Although Apple QuickTime is indeed a powerful and convenient media player, many of the video & audio files you come across on the web still can't be played in QuickTime. Luckily, this problem is easy to solve — you just convert the file into a more compatible format that QT accepts with a media converter tool. Among the plentiful converter choices, Video Converter for Mac is nearly a perfect pick.
The software does an excellent job of handling a great number of file formats. It can not only convert video format from one to another, but also convert between audio formats or just extract the sound track from a video. And the process is at the lighting-quick conversion speed.
In addition, the program houses basic editing options for trimming, cropping, adding subtitle and watermark within an easy-to-use interface, as well as conversion settings to get control over the output results. You can even select a wide range of device presets which can optimize your file to work on device of your choice automatically.
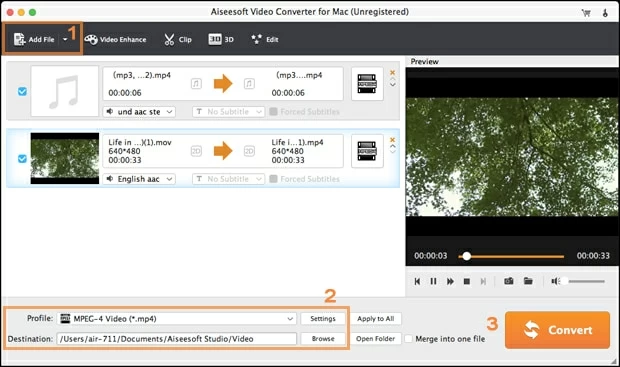
Step 1: Import your footage to the software
Simply click "Add File" button on the top left corner to import your files. Or directly drag and drop them to the interface.

Step 2: Select the output format
Press the arrow in the "Profile" drop-down menu at the left lower of the screen. This should bring you into a panel like the image shown below.
To be able to make the file playable with QuickTime, you should select a format that QuickTime reads such as MP4, MOV, M4V, MP3, AAC, M4A, etc., from "General Video" or "General Audio" category.

Step 3: Start Conversion
Click the "Convert" icon at the bottom right corner to start the conversion process. Be patient.
After the process has finished, you have successfully converted your original files to a QuickTime compatible format directly, without any intermediate formats.
Now, you can play your video & audio files on the QuickTime smoothly.
Enjoy!