Lost Data on iPad. How Do I Get Everything Back?
Data transfer is always planned with you to create copies of files on your phone to computer with some gigs to spare. And transferring music files from iPhone 6s back to MacBook may be a necessity for someone - be it a single song, several or all the tracks, or even the playlist alongside with songs' metadata information like the track's name, album, artist, genre and even added date.
Now comes straight to the point: How to transfer music from iPhone 6s over to MacBook?
It depends. An all-round 3rd-party utility can transfer music on iPhone 6s that is imported from a CD or tracks saved from other sources. But if you intend to put all purchased music from iTunes store or Apple Music into MacBook, the Music app (or iTunes in 10.14 Mojave or earlier) will give you piece of mind. Dive into this post deeper to find more details!
Hire a Do-It-All software - iTransfer
When needed to perform transferring back songs from iPhone 6 to MacBook Pro within a few clicks, several programs raise up their hands - one stands out being iPhone Data Transfer. Through its intuitive interface, you just need to connect your iPhone 6s to MacBook, tell the application which song(s) or playlist(s) to transfer, click the simple "Export to Mac" option and you're good to go.
Just like what it claims, iTransfer is a do-it-all software. It also enables you to extract other aspects of data from your iOS devices (photos, videos, movies, TV shows, etc.) and move into iOS devices, a PC or a Mac without going through iTunes. Considering what you might urgently need, it customizes some time-saver features to assist in backing up photos to mac or transferring data between handsets in one go.
[Also Read: How to transfer photos from iPhone to Mac computer]
Now, click the Download icon and let's start exploring how to use iTransfer to make a transfer.
Step 1: Plug your iPhone 6s into MacBook
Install the program and launch it to get started. Then grab an included lightening cable to hook up your iPhone 6s device with the MacBook.
Once attached well, your iPhone will be recognized in a quick manner and show you the device icon with device name on the window

Step 2: Choose song(s) to migrate
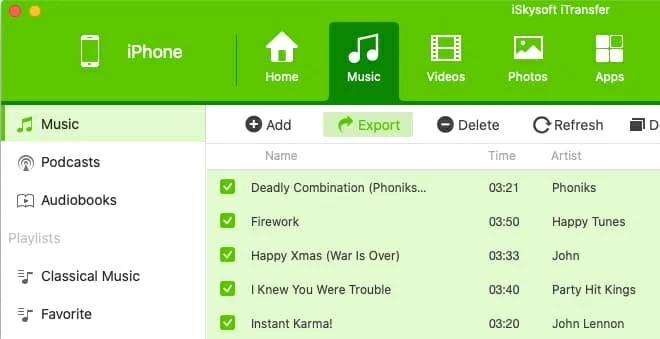
Next, click Music tab at the top of the window. In the resulting screen, all the past and latest music saved on your iPhone 6s will be represented with every single detail on the right. (You can fix mislabeled songs here.)
Go through the songs and select the items you want to import into a MacBook by ticking the boxes next to the them. Also, if needed, press Command-A to select entire music list.

Step 3: Migrate iPhone 6s songs back to MacBook (Pro, Air)
Having done choosing music files to move over, head to the menu bar and hit Export. With output destination confirmed, the program will commence music transfer process automatically.

After the music transfer process completes, your music collection should now store locally on your MacBook machine.
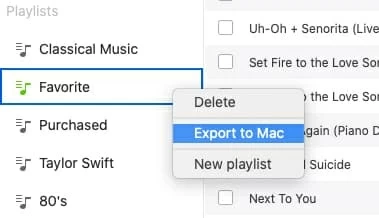
Tips: The software also offers convenience to quickly add the playlist(s) into a MacBook: On the left-hand side, right-click the playlist heading(s), and choose Export to Mac in the drop-down menu,

Transfer purchased music using iTunes (Music app)
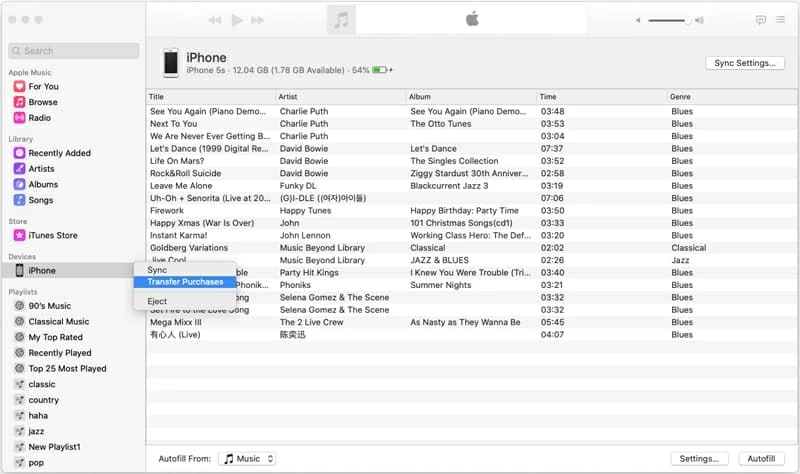
As mentioned at the beginning, Apple's iTunes does supply a quick way - which is also free - to get purchased music transferred from iPhone 6s (Plus) to MacBook. It's matter of syncing your purchased music into iTunes library by hitting the "Transfer Purchases" option, then downloading them on your MacBook's hard drive.
However, you might have already known that the release of macOS 10.15 Catalina has announced the official end of iTunes on the MacBook - fortunately there is a new music management tool called Music app you can resort to. If you're wondering how to use Apple Music app to sync iPhone 6 purchased music to MacBook Air, follow these steps:

On macOS 10.14 or earlier: The process of getting all music out of iPhone 6s Plus and save onto MacBook with iTunes is basically the same as it was when using Music app, except for syncing purchased music in File > Devices > Transfer Purchases from [device name].
Do keep in mind that this "Transfer Purchases" feature works only for songs bought from the iTunes Store.
Sync music from Apple Music wirelessly
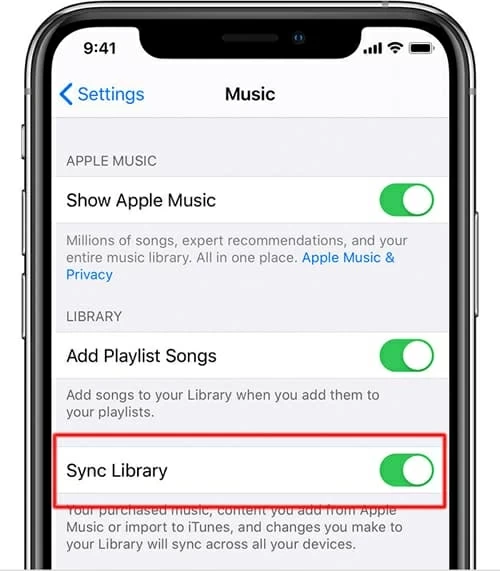
Utilizing an active Apple Music subscription is another to go. Once subscribed, you can turn on the Sync Library both on your device and iTunes (or Music app) to sync the songs across all devices using the same Apple ID. With all these set, adding iPhone 6 tunes into MacBook Pro couldn't be easier any more.
On iPhone 6/ 6s (Plus):
Unlock your device and open Settings, scroll down and tap Music, then turn on Sync Library.

On MacBook (Air/ Pro):

Noted: If you have a large music library, it might take some time to sync your music library to the Music app.