How to Convert TS Files to MOV Format for Mac
Transport stream (.TS) is a communications protocol for audio, video, and data. It is a type of digital container format that encapsulates packetized elementary streams and other data. .TS is specified in MPEG-2 Part 1, Systems (ISO/IEC standard 13818-1). It is also known as ITU-T Rec. H.222.0. Its design goal is to allow multiplexing of digital video and audio and to synchronize the output. Transport stream offers features for error correction for transportation over unreliable media, and is used in broadcast applications such as DVB and ATSC.
Why need TS to FLV Mac Conversion?
There may be lots of reasons you need to convert TS to FLV for Mac:
1. To embed TS files on your own personal web page or profile in a social networking site.
2. Transfer over the Internet video-hosting sites, including YouTube, Google Video
3. other...
The Tool You Need:
Converting TS to FLV on a Mac is simple and quick by using the proper conversion software like Video Converter for Mac. It works well for converting TS videos into a FLV format that takes up less room and is easier to share. If you need other video conversion, don't worry, the app covers a wide range of video and audio formats including TS, MOV, MP4, AVI, 3GP, WMV, AAC, MP3, and has ready presets for playing devices like iPhone, iPad, PSP, android smart phone.
For Windows user, please try Video Converter for Windows here.
Step 1: Add TS videos
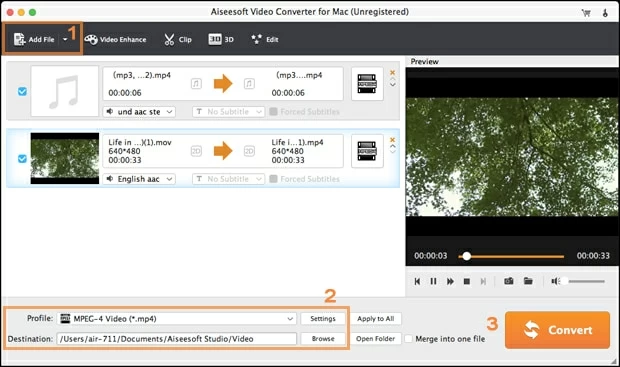
The first step is to select a video (or several) that you want to encode. Drag and drop them to the program or you can also use the "Add File" button to load files into the program window if you like.

Step 2: Select FLV as output format
Select "FLV - Flash Video Format (*.flv)" or "FLV H.264 Video (*.flv)" from the "Profile" drop-down menu located at the lower left corner of the window we highlight in orange color. For an advanced user, you can modify exact settings of output files to suit your specific need under "Settings" panel.
Then click the Browse in "Destination" to choose the location where you would like to save your converted files and set an output filename.

However, be aware that you can choose a preset option on the left panel rather than selecting a specific format. The presets have already got great quality settings.

You can also do some editing before conversion such as trim, crop, add effects, make watermark etc by clicking buttons on the top of the menu.
Step 3: Starting conversion of TS to FLV in Mac
After you have set up all the conversion parameters, simply click the "Convert" button and watch as your system transcodes the TS file into a FLV on Mac OS X. The encoding process will take a while depending on your microprocessor that your computer shipped with, so go and make a sandwich or something.
