How to convert video to iMovie format on Mac
I have a Hauppauge PVR-1212 and it creates .TS files, I have recorded a footage resulting in a 50MB .TS file. All I want to do is change the .ts into a more 'popular' format so I can drop the .TS video into iTunes. would you please suggest me a way to achieve this?
You've obtained a Transport Stream file (.ts) created by the Hauppauge HD-PVR that's either in a format unsupported by an iOS device you intend to play it on or in a file type that your desktop applications on Mac can recognize. If you're looking for what is probably the easiest way to load TS video onto your iPhone, iPad with iTunes, and edit on iMovie or Final Cut Pro, being a good geek and converting the TS to MOV on Mac is definitely the way to go.
QuickTime .mov is the default format for most Apple products like the iPad, iPhone. Converting .ts files to a .mov format on Mac can be very handy with Video Converter for Mac.
This app will convert video files from one format to another, and handles HD 1080p/720p video like a champ. Without having to be familiar with video codecs and settings, the converter lets you drag and drop your video, find your format/preset, and go. Also, the program gives you ability to convert video for ready presets including iPhone, iPad, PS3 (HD support), XBox 360, Android devices, portable media players, so you can seamlessly watch your favorite videos anywhere or any place.
Note Windows user please head over to Video Converter for Windows to convert your TS videos to QuickTime MOV format. Extra feature of the Windows version is the ease it has downloading online videos.
Step 1: Select your input video file
Launch the Mac app and find the .ts file you want to convert.
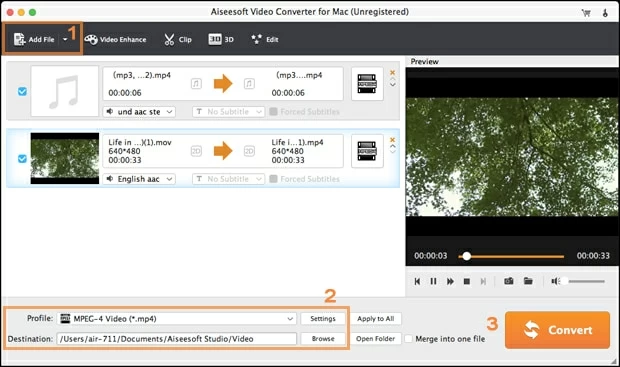
On the top left corner of interface simply hit "Add File" icon on main menu, navigate to your .ts file, select it and click Open.

Step 2: Select an output format from the list of available file types
Click "Profile" drop-down list which we highlighted in yellow in the picture to open the format panel, and then choose MOV as output file.
Next, set the output path in "Destination". Be sure the folder or drive has plenty of space.

The TS to MOV Mac converter gives power user options to tweak encoding settings of video and audio - you can change encoder codec, set resolution, change bitrate and more - it's recommended that you stick with the defaults if you don't know exactly what you're doing.

Alternatively, you can specify a preset depending on the device you want to watch your video on from preset list on the left side, the program will set up all settings for you for the best result.

you can open edit window by clicking the "Edit" icon button to trim, crop, add effects for your output MOV files before conversion.
Step 3: Start conversion
Now that the necessary adjustments are made, you can start transferring .ts to .mov file in Mac. Click the "Convert" button represented on the right bottom, and leave the program to do its thing.
Finished!
Now, go to the local folder you configured earlier and the newly created .mov file should be waiting for you. Test it using QuickTime player or any other video player.
