How to Convert a MP4 to Apple ProRes to Edit in FCPX
If you're a video enthusiast and fond of edit your videos to make them distinctive on a Mac, you then may be likely to use iMovie application to accomplish the task. As a consumer-level video editing program preinstalled in Mac out of the box, iMovie allows film freaks to do all of the basic editing for video clips and does offer advanced options to create Hollywood-style trailers and stunning 4K-resolution movies. See also: Rip a DVD to edit in iMovie.
Feature-rich and marvelous as it though, iMovie is pretty picky about the video format. You can import movies well in DV, HDV, AVCHD, Apple Intermediate Codec, Apple Animation Codec or H.264, but notable MKV (What's it?) is excluded in the supported list. If that's the case, you'll need to convert MKV files to something that iMovie can work with before opening them in iMovie.
Is there a way or utility that can convert MKV to be editable in iMovie application? Absolutely YES! Video Converter for Mac, an utility that stands out from thousands of converters on the market, helps you do it well. It is very quick, and very easy. Apart from converting MKV to iMovie format for editing purpose, it can also handle virtually any video and audio formats with high efficiency. What's more, it comes with built-in device presets for iPhone, iPad, Apple TV, different kinds of Android smartphones and so on, giving users the best possible output result.
If you want to do MKV conversion or any other video conversion tasks on a Windows based computer, please turn to Video Converter for Windows.
Step 1: Load source .mkv file(s)
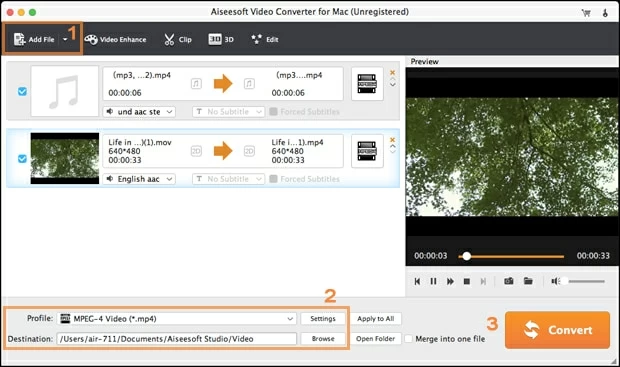
Once launch this MKV to iMovie converter on Mac, click on the "Add File" icon on the upper-left hand corner of the window to navigate to the HD MKV movie files and select one(s) for converting.

Step 2: Select an iMovie-friendly format from "Profile" as output
Click "Profile" icon located on the lower left side of the screen, which will open a panel with an array of exported formats and preset profiles, and iMovie preset is included out there.
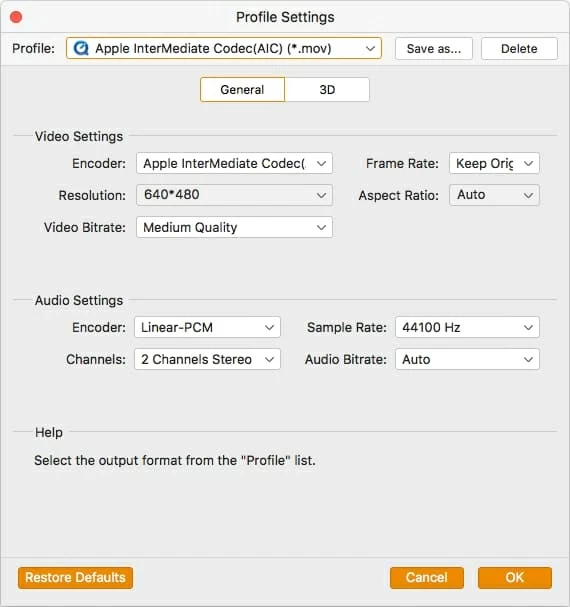
Here just click on "iMovie and Final Cut Express" column and in the extended list choose "Apple InterMediate Codec(AIC) (*.mov)" as the output format.

If you have a need to change encoding parameters, you could click the "Settings" right beside "Profile" and then fine tune them until you're satisfied with the output quality. Generally, this utility will automatically show the optimized video parameter for you. You have no need to worry about what settings are better for iMovie.

Alternatively, select a specific iMovie supporting format type, like "MP4 MPEG-4 Video(*.mp4)" or "H.264/ MPEG-4 AVC Video (*.mp4)" from "General Video" category.

[Our most popular tutorial: How to burn MKV video files to DVD for Mac and Windows]
Step 3: Start MKV to iMovie file conversion
When all the configurations are completed, press "Browse" button (see bottom center) to select where you want to save your converted movie files.
Now, you can hit the big "Convert" button to initiate the conversion from HD MKV to iMovie InterMediate Codec(AIC) (*.mov) file on Mac computer. How long the process would take mainly depends on the amount of MKV videos you imported and the performance of your Mac.
Now you'll have to wait a while. It takes a lot of system resources to convert videos – for big files like a complete Hollywood movies. Hit "Pause" if you need, but it's better to get this over with.

Step 4: Transfer converted videos to iMovie on Mac
Once the process has finished, launch iMovie on your Mac, click "File" on the top menu, choose "Import > Movies" to browse to the folder where your newly-minted MOV footage are saved, then select the files and press "Import" to get them into iMovie. Now, you are able to edit your videos in iMovie as you can.
Similarly, you can sync the files on your iPhone and iPad to create personalized video with iMovie for iOS. Enjoy!