How to Embed a Video from YouTube to Keynote on Mac
The buzz over 4K technology heats up, and an increasing of HDTVs, computer monitors, smartphones, cameras and projectors can display beautiful, 3,840-by-2,160-pixel video. However, 4K is still years away from taking over the mainstream of the digital video world and becoming available to the average consumer.
4K resolution fancied itself as a frankly stunning definition, presenting twice the horizontal and vertical resolution of 1080p and four times more pixels than the regular 720p HD. Despite the great visual quality, there're certain restrictions on 4K playback. For one thing, a smooth streaming of 4K video takes amount of network bandwidth (at least 15-30M); for another, handling 4K natively requires a modern CPU and GPU while the hardware of older device is definitely underpowered.
Suppose you've shot some footage in 4K with your camera and want to play them on an older TV set. If buying a new HDTV that's capable of playing 4K file natively is out of your budget, then it will be nice for you downscale the footage from 4K to something more accessible, 720p for example—the standard high-definition (HD) display resolution of 1280x720 pixels that gains popularity among computers, TVs, portable devices, media players and more.
The web has quite a lot of apps that let you downsize 4K video to 720p without any issues. If you are just looking to make the process easy and quick, Video Converter for Mac (for Windows) would a great simple choice. Just drag and drop 4K videos into the program's window, select an output format and set the resolution to 720p, then click the Convert button to be on your way. It also converts your media collection to pretty much any video & audio you want, and offers several valuable features that other apps lack.
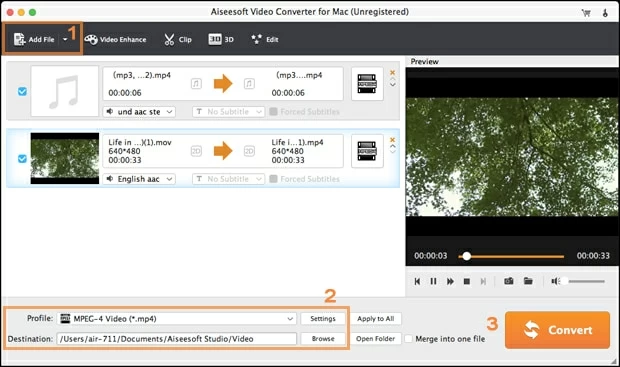
Step 1: Add 4K videos to the program
After you've opened the program, adding a source file is as easy as dragging the 4K file that you want to downscale into 720p from your Mac and dropping it onto the program window. To save time, you're allowed to load a bunch of 4K videos and convert them at one shot.
Alternatively, use the traditional "Add File" button on the toolbar to load the source footage.

Step 2: Set the resolution from 4K to 1280*720
In this step, you'll have to tweak the video parameters including resolution through "Settings" option on the bottom center of the interface.
If you want to stick with the original format of your source files, go to "Profile" drop-down menu on the bottom left corner of the interface and select the same format profile under "General Video" column, or choose to pick another format profile, depending on what you want the output video to be.

Next, you come the most IMPORTANT part: click the "Settings" button to the right side of "Profile" menu to open Profile Settings window. The only option that you need to care about in this window is the resolution. You'll have to set the value to 1280*720 in "Resolution" box. Only in this way can you downscale the 4K files to 720p successfully.
You can configure other necessary settings from the list of available ones as required.

Step 3: Start the process of converting 4K videos to 720p
hit the orange "Convert" button on the bottom right side to initiate the conversion.
How long it takes depends on the length of the 4K videos and your Mac's hardware, be patient. The "Open output folder" option at the bottom of the pop-up status window can be checked if you want the folder that contains the resulting files opened automatically after the conversion is finished.

Once finishes, you'll get a pop-up notification on the screen.
Now, you can open the local folder and play the new created files one by one on your desktop media player to check if it's definitely the one you want.
Enjoy yourself!

How to Convert from M4V File to WebM Format for Webpage
downscale-4k-to-720p-resolution-for-mac.html