How to Convert MKV to AC3 music tack for Mac
Video files with a number of different formats shared on the websites is a great enjoyment and entertainment around people's daily life. At times, you might have got your favorite trailers in .mp4 extension from video-sharing sites, and wanted to converted into .wav to play on a media player with better quality. Anyone may consider that converting a video to another format is a tricky business. Plus, plenty of converting applications boast to fix this problem without any hiccups, making it rather difficult to pick the right one.
What WAV and MP4 Actually are
WAV (Waveform Audio File) is a lossless audio type mainly used on Windows to provide CD-quality sound tracks though Apple also supports this format. Since WAV is an uncompressed file type, audio files in WAV are in large size compared to other lossy formats like MP3. Even though of that, it is frequently used for a specific project like audio recording or editing.
On the other hand, MP4 is certainly the most widely-used format for video and audio streams. You may need to convert MP4 videos to WAV audios so as to retain the better sound quality or play the music tracks on a specific player for a music project.
The Proper Way to Go About Getting MP4 file to export as a WAV File
Most users are experiencing much trouble in converting MP4 videos to WAV, but it doesn't mean there are not a couple of user-friendly and utilitarian conversion applications out there that are worth checking out.
Video Converter for Mac (or For Windows) is the application that we use in this post. It's one of the few standouts among the many robust file converters that facilitates the file format conversions, in an attempt to make things easier for you. There are several features that distinguish it from rest of the software and tools for file format conversion.
It can accept video from almost any source and export it in many common formats as per your needs. A clean and sleek layout leads to the program being simple and intuitive to use: selecting source file, setting output preferences and click Convert button then you're off. In additional, it has an excellent device preset list, professional quality control, basic editing options and the ability to convert multiple files at once.
Step 1: Import MP4 Files
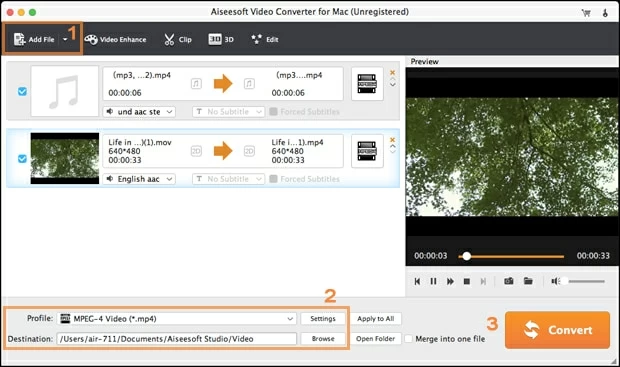
Run the program on Mac and the first thing will be adding MP4 files to your program. Head over to the upper-left corner and press the "Add File" button to load MP4 footage. You can click down the downward arrow > press "Add Folder" to import MP4 files in quantity at a time.
Alternatively, simply drag and drop the MP4 files to the program.

Step 2: Select Output Format: WAV
Move to the lower bottom position, click "Profile" and on the followed drop-down list, scroll to "General Audio" column, then select "WAV – Waveform Audio (*.wav)" on the expanding panel.

You can modify some audio parameters so as to get the best possible results. Press "Settings" over to the right of "Profile" and you are good to adjust. After confirming, click OK and get back to the main window. This is optional.

After done deciding on the output profile and the tweaks, you can preview a clip to check it's definitely the one you want by clicking the Play button hovered on the thumbnail. Assuming you're happy, press on "Browse" button underneath "Settings" to specify a location where you want your final WAV audio file export to.
Step 3: Convert MP4 to WAV in Mac with Minutes
In the last stage, kick-start the quick conversion from MP4 video footage to WAV through hitting "Convert" button on the lower-right corner.
The process is going to take a matter of minutes to complete, depending on the number of files, output parameters or your Mac processor.
The new WAV music file will be saved in a folder on your Mac hard drive. And can now be played anytime anywhere. Enjoy!
