How to Put DVD into Final Cut Pro on Mac OS X
See more about: All-in-one Blu-ray Converter to Convert Blu-ray & DVD & Video & Audio to format you need
DVD, as all kind of optical media, continue to be a very popular media among users and content creators. It has a large storage capacity to hold high quality movie files. You can watch DVD movies on a big widescreen television via regular DVD player, or play them back on your computer. However, there are occasions you want to rip commercial DVDs you own to computer for the purpose of editing DVD footage in Adobe Premiere Pro (CC/ CS6/ CS5/ CS4/ CS3), but you will discover nothing happened when you try to import DVD into Adobe Premiere Pro.
Adobe Premiere Pro is a timeline-based video editing software, it accepts a wide range of formats as an input, including .vob files in video_ts folder of home-made DVDs. But for videos encrypted in commercial DVD, Adobe Premiere Pro doesn't include the software needed to decrypt DVDs and extract file out. The obvious solution is to actually rip the DVD to Adobe Premiere Pro compatible file format. Before we go any further, keep in mind that you have to own the rights yourself of the disc, or obtain the permission from owner.
The current software options for ripping a DVD movie to Adobe Premiere Pro are virtually endless. The most used software for us is DVD Ripper.
It is a dead-easy to use program for ripping video from your DVDdiscs. It can circumvent the copy protection contained on the disc, and then convert the resulting videos to other much more manageable formats—ones playable on an iPad, Apple TV, or PS4, Xbox One. The program even has the advanced options to lets you fine-tune the final look of your movie. A good news is that it has its equivalent version for Mac users - DVD Ripper for Mac to extract DVD content and backup on your Mac.
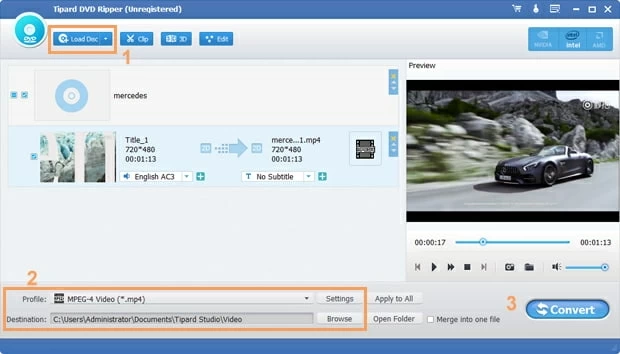
Step 1: Load DVD disc
Click "Load Disc" button in the top left corner of main window. Navigate to your DVD and load the DVD file you need. After that, it shows you all available features in project field and lets you select the title you want.
And if you want to export a continuous single video, it also allow you to combine individual episodes into a complete one by ticking "merge into one file" option beneath the preview window.

Step 2: Configure a Adobe Premiere Pro friendly format as output
Now, you need to choose the output file format. Open the format window by clicking the "Profile" dropdown menu at the lower left corner of the window.
In the window, select "Adobe Preimere/ Sony Vegas" > "WMV (VC-1) Video (*.wmv)" or feel free to choose another format that meets your need. Also, you'll find all specific video/audio formats in "General Video" list.
Note in the window, you'll see a variety of presets categorized in different lists. In most cases, you can just focus on them, which will save you a lot of time.

Once you pick your preset or specific format, check the button that says "Settings" (near "Profile"), there are a few video and audio encoding settings you can fine tune, depending on your needs. This is mainly designed for power users who have a higher request for resulting video, and you can leave it alone.

Step 3: Converting DVD to Adobe Premiere Pro file type
Finally, you should now be ready to run the DVD to Adobe Premiere conversion. Do this by clicking the big "Convert" button on the bottom right of screen, and off you go.

Congratulations! When the conversion completes, you will have successfully ripped the DVD movie to Adobe Premiere Pro file.
Step 4: Import the ripped files to Adobe Premiere Pro
Now, import the new created file into your Adobe Premiere Pro software for editing.
Hopefully this tutorial works for you.