Using Simple Ways to Record Computer Screen from MacOS
Recording a livestream on PC has several advantages. If you don't know how to record live streams on a PC, read this guide to find the easiest ways to do so.

Knowing how to get a live stream recorded on PC can prevent you from missing your favorite live content.
Livestream is different from traditional broadcast media, such as TV and movies. Live streaming is real-time and the content of streaming media is diverse, which means that it's nearly impossible to find the same live stream if you miss your favorite. So, that's why you need to record your favorite or important live streams on the PC to watch them later.
Luckily, you can easily make livestreams recordings on your PC. There are a couple of simple methods to do this, whether you want to save the recorded live broadcast on PC to watch later or generate extra marketing content.
In this article, we'll go through all the information you need regarding recording streaming video on a Windows PC. This guidance outlines the four best ways to record a live stream, including using the built-in screen capture feature on Windows 10/11 or streaming recorders for PCs. Let's dive right in!
Table of Contents
Note:
Microsoft's Xbox Game Bar tool can be used to record streaming video for Windows 10 and Windows 11 PC users. Although, as the name implies, it is mainly used to capture gaming videos, it is also one of the easiest ways to record screen on a Windows computer, even for recording live videos. Aside from being convenient to use, it can assist you in recording livestreams on your PC for free.
Step 1. Launch the live streams or video you want to record on PC.
Step 2. Open Xbox Game Bar. Pressing "Windows Key + G" keyboard shortcut is the simplest way to accomplish that.
But if pressing "Windows Key + G" doesn't work, the Windows 10 Game Bar might not yet be turned on. Head to Gaming in Settings and click on it to make it active. And the option next to "Enable Xbox Game Bar" must then be enabled.

Go to Settings > Gaming on pc to enable Xbox Game Bar and the keyboard shortcut functions.
Step 3. To start recording, find the Capture widget and click on the white circle icon.
Once you start recording, a process bar will appear on the right side of the display showing the recording time, and you can hit the microphone icon to add voice to the live recording.

Select the Capture widget by pressing Windows Key + G to start recording.
Tip: If you have the Game Bar enabled, another alternative is to simply press the Windows Key + Alt + R button combination to automatically start recording.
Step 4. When the live broadcast is over, simply click the "Stop Recording" icon to end it. Or you can press Windows Key + Alt + R again to stop the recording.

Press Windows Key + Alt + R to stop.
Step 5. To view the recording, hit the pop-up window. A pop-up message saying "Game clip recorded" will display after the recording is finished, click on it or use File Explorer to browse the Videos folder's Captures subdirectory to access the recorded livestream video on your PC.

Click "Game clip recorded" to view the recording history.
If you are using a PC with a version lower than Windows 10, AppGeeker Screen Recorder is a wonderful alternative when you want to capture live broadcasts. AppGeeker Screen Recorder is an all-in-one recording software that allows users to do screen recording and video editing at the same time. You can use it to record live stream video and audio without delay on your PC.
With its clean and user-friendly page, you can record streamed live videos on a PC without any skills, making this recorder stand out among similar live recording products.
1. Download and install AppGeeker Screen Recorder on your PC. Then Launch it and select "Video Recorder" to do the streaming recording task.

2. Open the live show and set the recording area. Click on "Custom" and drag to pick a specific display area, or choose "Full" to capture your entire screen.

3. Adjust audio parameters. Activate "Microphone" to catch your voice through your plug-in microphone, or toggle "System Sound" to capture computer audio in recorded livestream video.

4. Click on the "REC" button to begin recording once you're set.
5. Hit the "Stop" button on the taskbar to end the recording. Then you will come to the preview screen to edit or export the live stream video recording on the PC.
![]()
Read later: How to screen record with audio on Mac
If you want to record live-streaming content on PCs, OBS, an accessible open-source recording and streaming software, can be of great help. As a free live video recorder for PC, it can not only record live streams of yourself or others, but also provide streaming services to push live content directly to major platforms, such as YouTube, Facebook, etc.
Here's how to utilize OBS to record live streams from your PC and save the video file.
1. Download and install OBS Studio from the official website. After installation, run OBS on your computer and go through the setup wizard.
2. Set the recording parameters. A scene will have been added and will be displayed in the bottom lefthand corner of the window.
Before you begin recording, you need to add a feed to this scene. And you should select "Display Capture" by clicking the "+" button at the Sources panel.

When a pop-up box displays, create a new name and select "OK." In the following box, check your information, and if you have more than one display, select the one you want to record in this step and then click "OK" once more.

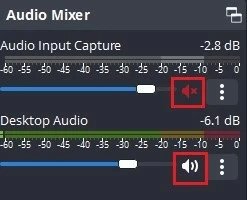
3. Add audio to the live recording video. In the Audio Mixer section, you can choose whether to record sound from the microphone or from your PC, and adjust the volume level.

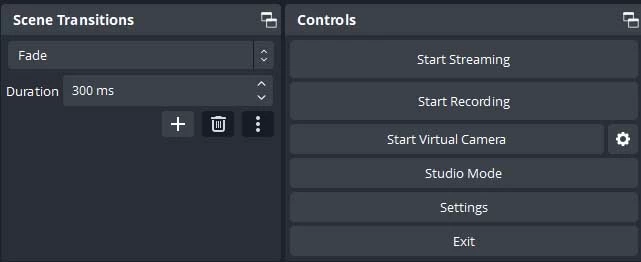
Tip: You can navigate to the Settings on Control Panel and change other recording preferences there, including output format, recording path, etc.
4. To start the recording, simply select "Start Recording" from Control Panel in the bottom right corner.

5. Click "Stop Recording" when the live-streaming is finished. And your preferred livestream video has been recorded and stored in the designated folder on the PC.
Read more: How to record entire desktop on Windows 10
VLC is a free and cross-platform media player known for its versatility and powerful feature set. In addition to playing various audio and video formats, VLC offers the ability to record and livestream screen activities on PCs. Whether you want to play online livestreaming video or perform live stream recordings on your PC, VLC is an excellent tool.
1. Download and install VLC if you don't already have it.
2. Open VLC and go to the "Media"> "Open Capture Device" in the upper left corner.

3. In the Capture Devices tab, select "Screen" as the capture mode, and select your desired frame rate.

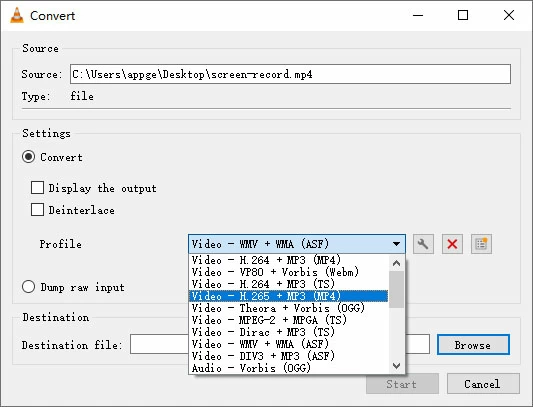
4. Click the small arrow in the right corner and select "Convert" to the next window.
5. Select MP4 from the drop-down menu as video output format in the Profile section.

6. Browse for the file storage location in Destination File section.

7. Hit "Start" in the bottom right corner to start your recording.
8. Click "Stop playback" button to end the recording.

Conclusion
As you may have figured out by now, learning how to record live-streaming video on PC is incredibly simple. We have put together a list of the easiest methods to record a live stream on PC for free. And you can choose the one that works best for you!