How to Record FaceTime Call with Sound - iPhone/ iPad/ Mac
Learn how to record Skype calls on your Mac easily with our step-by-step guide. Whether you want to save an important interview or share a fun moment, we've got you covered.

Don't miss out the opportunity to record important calls in Skype on your Mac.
Skype is a popular communication platform for users to keep in touch with others. Thanks to its built-in recording feature, recording Skype calls on a Mac is now easier than ever. With simple clicks, Mac users can record Skype calls and video sessions within the app and share them directly through another Skype chat. Also, all Skype call recordings can be downloaded and saved locally onto a Mac for the next 30 days, making them accessible whenever needed.
Additionally, there're numerous call recorders and screen recording options available for Mac users to keep a call recording of Skype effortlessly. Among these, the Screen Recorder from AppGeeker stands out for its extensive features, allowing users to make a call in Skype and record the conversation on their Mac with both audio and video together or separately.
Disclaimer: By default, Skype informs all participants in a call when someone starts a recording. However, if you prefer to record your calls in Skype without sending notification, you may opt for a third-party Skype call recorder for your Mac.
Table of Contents:
Updated in 2018, Skype offers a native recording feature on its desktop, mobile and web versions, making it a breeze for Mac owners to record their calls in Skype without hassle. Whether you're looking to capture your audio calls or video sessions for business, education, or other personal purposes, Skype allows you to record your Mac calls with just a couple of mouse clicks.
Also, the recorded calls will be posted to your Skype chat automatically and stored on cloud for up to 30 days. You have the option to download the recording results from your Skype conversation and save them as MP4 files on your Mac. Besides, Skype will inform all participants in the call when someone begins a recording. Here's how:
Step 1. Open Skype on your desktop and make a call.
Step 2. Select the "Record" button at the bottom and let Skype record the call on your Mac.
For some versions of Skype, the "Start recording" option is located in the three-dot menu at the bottom-right corner.
Step 3. A banner at the top will inform every participant in the call whenever you initiate a call recording in your Skype chat.
Step 4. To stop recording, you can either click on the "Stop" button in the menu bar, or end your current call directly.
Be aware that the maximum duration for a single Skype call recording is 24 hours. Any call exceeding this limit will be split into multiple files.
Step 5. The recorded file will be saved automatically in your Skype chat history, and you can access it for playback and download within the following 30 days.

Save time and effort by using the built-in recorder on Skype for Mac to capture important calls.
Step 6. To save the call recording locally, locate it in your Skype chat and click on the three-dot menu > "Save to Downloads." Else, you can choose the "Save as" option to store the recorded file in a different new folder on your computer.
When you use Skype to record calls and video sessions on your Mac, everyone in the call will be given the option to decide whether to save or share the recording.
To share the final recording with other contacts in your Skype, simply click on the "More options" dots next to the video file and select "Forward" to send it from your current chat.
Mac users have no shortage of options when it comes to Skype recorder software for Mac. In contrast to Skype, which only stores your call recordings for up to 30 days, the native app QuickTime on Mac provides the ability to record and save your calls directly. Moreover, QuickTime does not send any notification to the participants during the recording process, making it a more flexible option for capturing a call from Skype on macOS.
With QuickTime activated on your Mac, it is possible to record just the Skype chat window or your entire screen, as well as picking an audio input for your Skype call capture, whether it's your Mac's built-in microphone or an external one.
Once you've finished recording, take a few minutes to edit and save the Skype file on your Mac as needed. Overall, QuickTime offers an effective and free way to record a Skype video call on your Mac. To proceed, follow the steps below:
1. Launch Skype app on your Mac screen.
2. Select "QuickTime Player" in the "Applications" folder, or use the "Command + Shift + 5" shortcut to open it up.
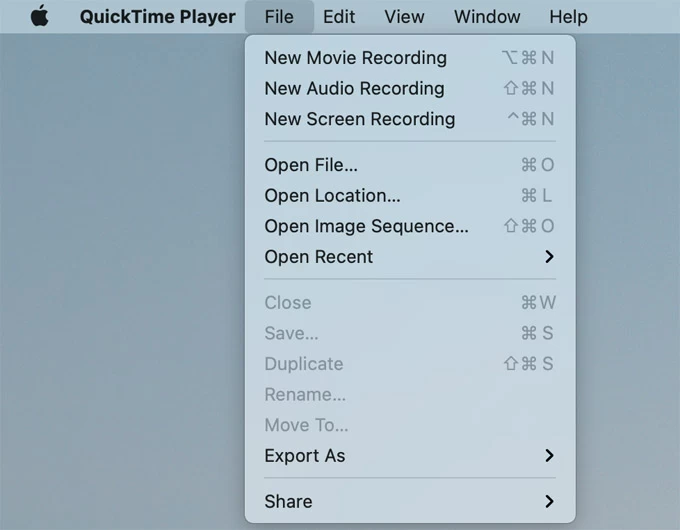
3. Click the "File" tab at the top and select "New Screen Recording" from the drop-down menu. This will open up the "Screen Recording" dashboard.

Enable Screen Recording option in QuickTime for Skype recording during the call.
4. Then choose a certain area you want to record or simply select the full Skype screen.
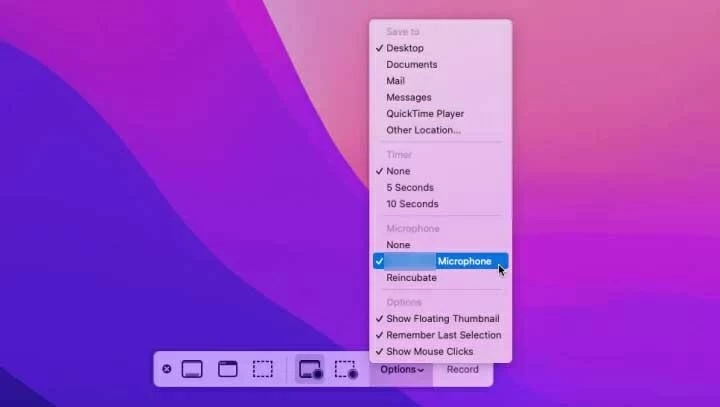
5. Check the pull-down "Options" menu and select input source to record audio from Skype call.

Set up capture area and audio input to record Skype video and audio on Mac desktop.
6. Once everything set up, start a Skype video chat or meeting and click the "Record" tab.
Note: It's important to know that QuickTime isn't able to notify the call participants when you start a recording. To legally keep your Skype records, make sure to get the consent of all parties involved.
7. When the Skype session ends, hit the "Stop" button in the toolbar. QuickTime allows you to preview the result and add basic editing.
8. Save the captured Skype video by selecting "File" and then "Save" at the menu bar.
It's pretty easy to create a call recording in Skype with QuickTime. However, let's face it: sometimes, this default media player on macOS cannot directly record Mac's internal audio without using an additional audio device or plugin. But thankfully, there are other capable Mac call recorders out there available to capture from a Skype call, including the interactive audio. Check out one of the best provided below:
For anyone looking for a reliable tool for Skype session recording, the Screen Recorder from AppGeeker really shines. With its powerful and extensive recording options, everyone can easily record both audio and video from a Skype call on their Mac with quick steps. Not only that, but you can also export and save the Skype recording to your Mac in different formats and qualities as you need.
Here's how to use it on your Mac to get a Skype call recorded:


The recording process is fairly simple and quick. And it boasts an array of other impressive features like real-time pen drawings, scheduled recording and a user-friendly interface, making it an excellent option for both novice and experienced users.
Where does Skype save recorded file?
When you capture a call using Skype's native recorder, the recording result will be saved to your chat where the call started, available for you to play back or share to another Skype conversation. Aside from this, you can download your Skype call recordings and save them to your local storage.
Remember, the Skype will only hold the call recordings in your chat for 30 days, or they will be deleted and cannot be recovered. Also, if your recording is longer than 24 hours, it will be saved in multiple files within your Skype conversation.
Is it legal to record the Skype call without them knowing?
When it comes to recording meetings or study sessions in Skype for potential use, many users may wonder whether it's legal to record calls without other party's knowledge. Well, the answer varies depending on the laws and regulations of the jurisdiction where you and the other participants are located. So to prevent any legal problems, Skype notifies all call participants at the beginning of a recording.
Can you record a Skype call secretly?
Technically, when you record your call using Skype, the app will get everyone notified by default. On the other side, call recorders like QuickTime and AppGeeker Screen Recorder can make local recordings of online calls without informing the call participants.
However, recording a Skype call secretly, without the knowledge or permission of all parties involved, is not recommended and may be illegal in many jurisdictions. So it's important to know your local laws regarding recording an online chat in Skype.
How to Record Zoom Meeting without Permission on Windows & Mac