
How to Record YouTube Videos on Mac
Struggled with setting your OBS up? Want to know how to create a high-quality recording by setting? Look no further! This article will tell you the best OBS settings for recording.
If you want to record screen on Windows 10, OBS Studio is your option. It allows users to capture and broadcast their computer screen or specific windows, record gameplay and stream to various platforms such as Twitch, YouTube, and Facebook Live. But many users don't know what is the best OBS recording settings to improve video quality in OBS Studio.
Relax! In this article, we'll give you a comprehensive introduction to the features of OBS and how the features help you upgrade your recording in OBS so that you can make OBS best recording settings. So, you can take it as a support guide.
Resources
OBS stands for Open Broadcaster Software. It is a free and open-source software used for live streaming and recording videos. But how to improve the overall video quality in OBS Studio, here are some tips to help you optimize every aspect of OBS recording settings in order to achieve the highest video quality.
To enhance the quality of your videos, within this section, you will discover various options that you can use as default to streaming and recording such as record youtube videos from website. Apply the following settings to achieve the best OBS recording performance.
Set video capture parameters
You can adjust video capture parameters by navigating to "Settings" > "Video" and the best settings as follow.
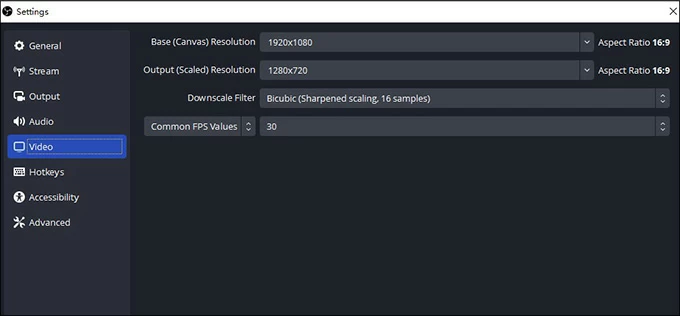
The base (canvas) resolution setting in OBS determines the size of the area you want to capture or stream. If you record in 1080p HD, choose 1920 × 1080.
The common FPS (frames-per-second) setting refers to the number of individual video frames that appear each second. A higher FPS value enhances the smoothness of the video. However, it usually increases the processing demands on your hardware. If you wish your viewers watch your recording without lag, 60 FPS would be the best though it occupies lots of your storage.
The output (scaled) resolution determines the final size of your video, you should match the resolution for your capture (Canvas) to create best quality videos. Making sure your settings suit the platform's upload requirements.
Downsizing the video helps to reduce the file size, making it easier to store and share. Lanczos provides the best quality downsizing, but it is demanding for your computer. If your computer cannot use it, please select Bicubic.
Set your video recording parameters
To choose MP4 video format that is suitable for a wide range of applications, making your video convenient for sharing and playback. Navigate to "Settings" > "Output" > "Recording format". Click the dropdown menu and select "MP4".
Set streaming parameters for your screen recording
Navigate to "Settings" > "Output" > "Output mode" > "Advanced". If you start a streaming in 1080p full HD at 60 FPS, you would better to enter 4,000 in the bitrate, select "veryfast" in the CPU Usage Preset and "X264" in the Encoder.
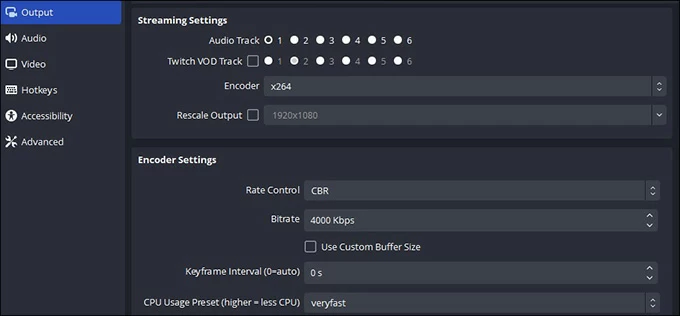
Believed that you have set the best default settings preparing to record your video. But how to optimize the OBS recording settings according to your need? Now we'll introduce some Settings categories and help you make the best OBS settings for recording at the following passage.
As mentions above, setting the Base Resolution to ensure that you are capturing the content in its original quality while the Output (Scaled) Resolution determines the resolution your viewers or audience will see. So, change the settings based on your need and adjust your bitrate to either 30 or 60 FPS.
The higher the sample rate, the more accurate the sound wave representation will be. To make the best OBS recording settings, set 48 kHz in the Sample Rate. Then select the "Stereo" from drop down menu next to the Channels.
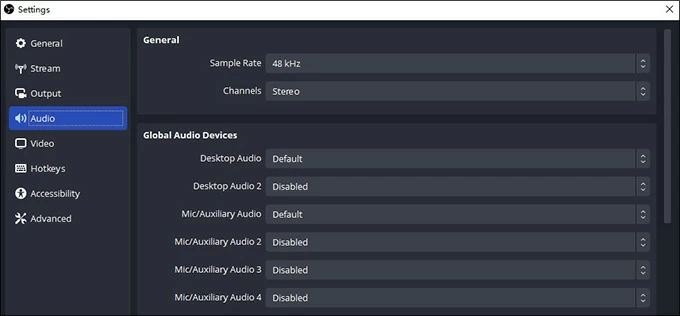
In the Devices section, you can adjust your OBS audio settings to the best. Select the microphone or audio input device you want to use. If you record internal audio on Windows 10, select "Default" from the drop down menu. If you use a external mic, select your mic from Mic/Auxiliary Audio.
Output Settings determines how your recorded or streamed content is showed. It has advanced settings meeting your specific requirements. To do this, go to "Settings" > "Output" > "Advanced".
Encoder helps you converts the data within the video into a particular format. If you have an NVIDIA graphics card, use the NVENC H.264 setting to get the high-quality recording and streaming. Otherwise, the software (x264) encoder is great too.
By adjusting the Rate Control settings in OBS, you can optimize the balance between video quality and file size. If your computer installs NVIDIA graphics and has enough storage, select CQP to get the best quality. If not, CBR is an optimal choice.
Set the Video bitrate based on your streaming platform's recommendations. But the higher bitrate, the bigger the size of the file will be. If you have enough storage and good internet connection, you can set your video bitrate to 8000 for full HD recordings to get a desirable video. If you record a video in 720p, you can decrease bitrate to 6000.
Increasing audio bitrate leads to better sound, but it should be set based on whether you have available disk space, good internet connection and what audio quality you want to have. Generally, if you use full HD to record a video, please set the audio bitrate to 320. If you record a video in 720p, set the audio bitrate to 192.
If the OBS recording setup is too complicated for you, Appgeeker Screen Recorder with its simple interface is a good alternative option. This software doesn't require any technical skills and you can start recording your screen, audio or even webcam with just a few clicks. In addition to the basic recording settings, it also offers recording editing features.
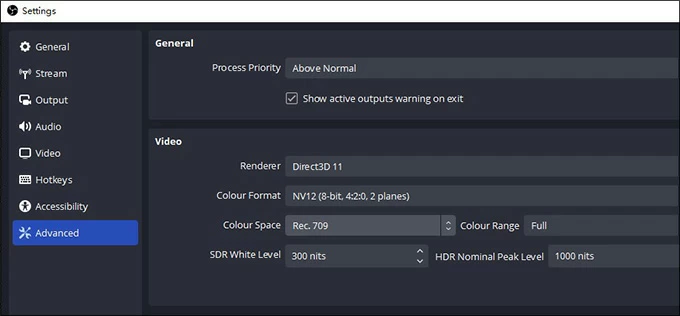
For someone who want to create the best recording in OBS, OBS Studio provides you advanced settings. To make your recording more appealing, please following these steps. Click on the drop down menu next to the Process Priority to select "Above Normal". Set the Renderer to "Direct 3D 11" and adjust the Colour Format to "NV12,709" and Colour Range to "Full".
In addition to the settings above, there are settings for OBS to adapt to certain recording situations, such as game, online conference, streaming so that you can have a better experience on capturing clips on your PC.
Set the Base (Canvas) Resolution to match your game's window. Go to "Settings" > "Video". Then create a Game Capture Source. Right-click on the Sources panel at the interface and go to "Add" > "Game Capture". Name the source and choose specific game window. Click on the game you want to record from the Windows drop-down menu.
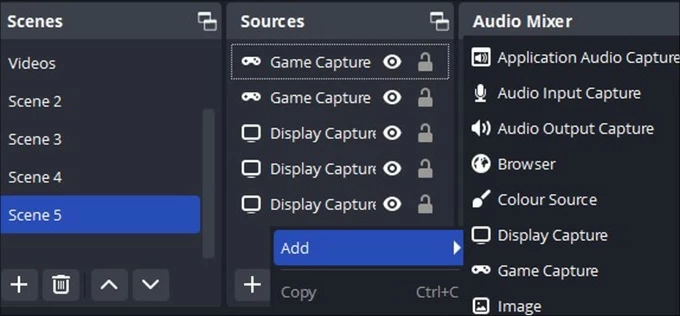
Similarly, match the Base (Canvas) Resolution with your conference's window. Then right-click the Sources panel and select "Add" > "Display Capture". Name the source and choose the display you want to capture. Note that set up your audio devices if you use a mic. Go to the "Settings" > "Audio" > "The base (canvas) resolution".
The above best settings can already be applied to many streaming situations. To ensure the balance between recording quality and file size, here are some tips to help you set your streaming to suit your actual situation.
For 720p video at 30 frames per second, a bitrate between 1,500 to 4,000 kbps is suitable, while for 720p video at 60 frames per second, a bitrate ranging from 2,500 to 5,000 kbps is advised. If recording in 1080p resolution at 30 frames per second, a bitrate of 3,000 to 6,000 kbps is ideal, while for 1080p video at 60 frames per second, a bitrate of 4,500 to 9,000 kbps is recommended.
Many of the best OBS settings above are for high performance computer. If you apply these settings to a low performance computer, it is probably not working well. Drop your resolution to create the smooth recording working best with your computer. Go to "Settings" > "Video" > "The base (canvas) resolution".
Conclusion
As you can see, OBS Studio has many features improving your recording. Finding the best OBS settings for recording is essential for achieving high-quality video recordings. It's important to follow the tips provided in this article so that you can make the best recording settings in OBS.