How to Play a MKV File on an iPad Air/ Pro/ Mini
Assuming that you're working with a Canon HD camcorder, and would like to record life's moment wherever you go. When you shoot a video in .mts format with this digital camera and attempt to open and play it on a Mac, you might probably find that the footage seems to have a hard time. One explanation comes that the video ended in .mts extension is not in the list of Mac-approved files.
To figure out a solution for the MTS playback issue, converting MTS video to a format suitable for Mac is a way to go. If you have tried a number of Mac MTS converters you could find on the web, but the results are often turned out to be either working with quality problems or carrying with extra software or plugin for you to install, you may know that those utilities are just boasting too much.
In this article, we're going to use a program called Video Converter for Mac, which does an excellent job of converting MTS video on Mac. It works in a straightforward interface and isn't bogged down with advertisements or plugins. It converts pretty much any video and audio file you come across and produces a file with little loss in quality. Even better, the program features a wealth of preset outputs for popular devices and players.
Note: the program also comes with PC Version—Video Converter for Windows available for those who want to handle their video conversion tasks in a Windows machine.
The mts conversion process begins with the installation of the Video Converter onto your Mac computer. Afterward, run it on your machine.
Step 1: Import MTS files
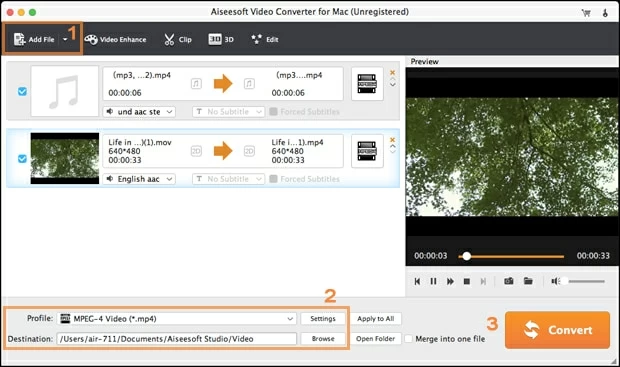
Click "Add File" button in the menu bar to navigate your desired MTS files, and then double-click to add them to the interface. Or, you can simply drag and drop them on the program.

Step 2: Select an output format
In the "Profile" section located in the lower left hand of the interface, click it to open a drop-down panel where you can select output format from. To get .mts usable in Mac, you are appointed to select one among MP4, MOV, and M4V under the "General Video" category.

If you'd like to set more conversion settings, you can click the "Settings" icon to the right side of "Profile" field, then you're free to set a new value towards any option such as codec, frame rate, resolution, aspect ratio, sample rate, bitrate, channel for the output video.
Normally, you will want to maintain the default values as they are good enough for regular users.

If you're watching videos on some designated device, instead of choosing a specific output format and then configuring appropriate settings, there are many of device presets ready for you to choose from.

Step 3: Start MTS converting on Mac
When you're satisfied with your selection, hit the orange "Convert" button at the lower right corner to begin converting MTS files into Mac acceptable format you selected in Step 2.
A window along the status bar opens, showing the progress of MTS conversion. The time varies, depending on the file size of source files. Also, the conversion settings and computer hardware will influence the conversion time.
When status bar move to the 100% mark, the process has finished, and you have successfully converted MTS files on Mac.
