How to Convert an ALAC File with Apple Losselss Converter
You may be familiar with MP4, but not necessarily M4A. Actually, both MP4 and M4A files are MPEG-4 format. In some sense, M4A is exactly identical to MP4 devoid of video part. That is to say, any media player supports the playback of MP4 files, it also plays M4A audios and vice versa.
MP4 is a multimedia format that is the most commonly used to store and share audio as well as video streams over the internet. What if someone (Apple users in particular) prefers to separate the audio files from the whole MP4 video content and transfer the music tracks to their iPhone, iPod or iPad? And which format should be the better choice? Speaking of Apple audio track, M4A is acknowledged to be a privileged audio file format for the playback and safe storage of songs and various tunes on Apple-related devices. Thus, rip the audio tracks from MP4 footage and convert to M4A may be recommended.
Note: M4A can be encoded with ALAC lossless codec keeping all tagging intact and AAC lossy compression. Compared with MP3, M4A AAC audio track produces better sound quality with smaller file size. If you have a need to convert AAC to MP3 for more universal playback on different kinds of media gadgets or applications, then you can check out this AAC to MP3 how-to guide.
Get the Top Results with the Right Tool
Video Converter for Mac is by far one of the most useful converter to use and should feature prominently on your list of options. It accepts a slew of audio and video file types and has the ability to perform the conversion smoothly that comes your way: MKV to MP3, MP4 to AAC, FLAC to ALAC and more. It also comes with several advanced settings that allows users to make deeper control over video and sound quality. Plus, it has a great number of optimal out-of-the-box presets precisely fitted with kinds of different handheld devices and applications. On top of that, batch processing multiple files is incredibly possible and can be done at a high speed manner since it has nothing to do with cyber status.
Step 1: Add MP4 Videos to the Program
Open up the application on Mac. The user interface is quite intuitive and self-explaining with various options for preconfigured settings.
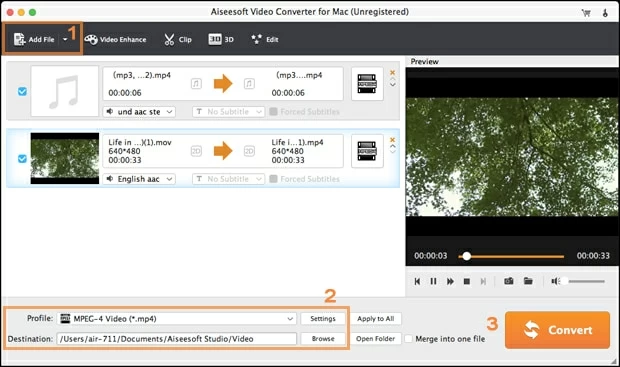
Click "Add File" (see top-left side) and navigate to MP4 videos you want to the program. An even quicker way is directly drag the source files to the left pane of the interface.

Step 2: Set the Output Profile to M4A
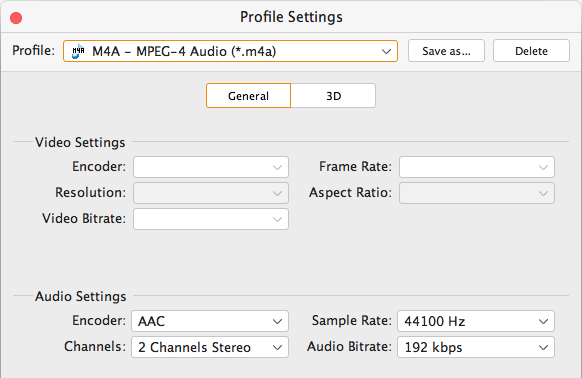
Under "Profile" dropdown menu (on the lower bottom), you have a choice to choose the output format for the resulting files. Turn to "General Audio" column and choose "M4A – MPEG-4 Audio (*.m4a)" from the a bunch of formats for a quick conversion.

Another thing worth noting is that if you're going to picky about audio quality, then you may want to monkey the audio settings under "Settings" tab (near "Profile"). Then in the opening window, you can change the Bitrate, Sample Rate or channels and you're good to go.
Unless audio quality is at the top of your choice, it is advisable to hold on to AAC for the sake of space and compatibility if you listen to the tunes on normal media players.
The good thing about this tool is that it comes with certain pre-defined settings, and is straight-forward to use. So you can leave this part alone.

After all settings, you need to save the final file. Press "Browse" beneath "Settings" to select a destination from the local on Mac. You can also rename the converted sound file in the "Destination" field.
Step 3: Convert MP4 to M4A Instantly on Mac
Click "Convert" and the program will begin the extraction and conversion right away- getting the audio out of MP4 footage and converting to M4A music track.
After the process comes to an end, you can transfer all the converted M4A music files directly to iDevices for full enjoyment on the go or any AAC-compatible media players. To make a perfect backup without iTunes erasing and replacing any existing data, iTransfer may come into play here.
For more information on all things transferring M4A music files or any formatted audio from Mac to iPhone without iTunes, then go straight to this How-to page.
