How to Convert Your M4A Music Collection to MP3 in a Mac
Setting A New Ringtone Is Cool
Whether you upgrade to a new iPhone or drop a bunch of dollars into switching from an old Android device to new iPhone, the first thing that comes into your mind is to set a cool ringtone. In advance, you should have a rough idea of iPhone Ringtone format: M4R.
M4R is a audio format created by Apple Inc, using AAC (Advanced Audio Coding) as compression standard. M4R is exclusively used for ringtone creation on iPhone. Nowadays, many iPhone users are growing tired of their monotonous ringtone and want to use more dynamic songs for ringtone creation. Usually, many songs and tunes are saved as WAV that is known as a lossless audio format. If that's the case, you need to convert WAV audios to M4R. Please read on and you will get what you want.
An Awesome Way to Convert WAV Songs to M4R Ringtone on Mac Platform
If you are looking to put many of your WAV music into iPhone for a new creative ringtone, then this post is written for you.
Video Converter for Mac can convert WAV music tracks to M4R, giving you an access to a great number of audio files to DIY your ringtone in your iPhone. Whether the songs you download are in WAV, MP3, WMA or other formats, this tool has what it takes to get all these formats converted to M4R ringtone. Unlike most conversion tools, this software allows you to trim your song to a length within 40 seconds so that you can keep the most amazing part. Besides, it has a bunch of options to convert one type of video file into another quickly and easily.
Step 1: Import WAV files and clip them to a length of 40 seconds
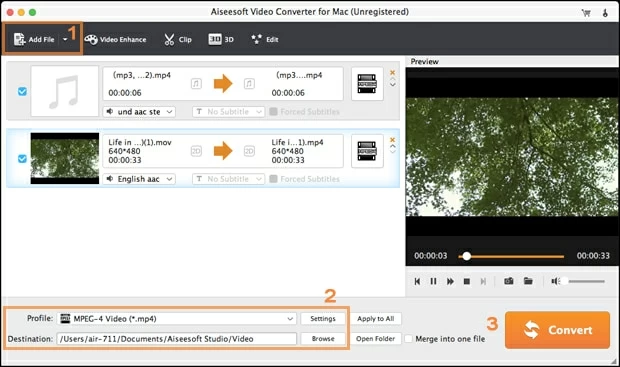
Click "Add File" in the upper-left position to add the source lossless WAV audio files to this M4R ringtone converter.
Alternatively, you can directly drag the source files and drop them onto the blank area of the program.

After the selection of WAV songs, you may need to clip the part of each song to less than 40 seconds as required by iPhone Ringtone. Simply click "Clip" button in the top toolbar to perform the task.
There are two ways to get it done. One is by dragging or sliding the scissors in the timeline; the other is to fill in the specific Start and End time in the box. After you are finished, click "OK" to save the result and back to the main interface.

Step 2: Select M4R file type as output
In the bottom side of the interface, click "Profile" drop-down menu to get into format-selection panel which arranged by category. Then choose "M4R – iPhone Ringtones (*.m4r)" under "General Audio" category.

Click "Settings" (next to "Profile") and you are able to get everything in control: Encoder, Sample Rate, Channels and Audio Bitrate. As a rule, you don't have to tweak anything because this program has set all the parameters in the right way.
Please note: M4R's Encoder should be AAC.

Step 3: Begin the conversion from WAV to M4R on Mac
Before the actual WAV to M4R conversion, select a local place to store the exported M4R audio files by clicking "Browse" button below "Settings" at the bottom of the interface.
After that, press the big "Convert" button in the bottom right corner to get the conversion process started.
After the conversion process has completed, navigate to the location you specify previously, now, the M4R audio files are right on there ready for making ringtone.

Step 4: Sync the M4R ringtone files to iPhone through iTunes
Launch iTunes on your computer and add the M4R ringtone files to the ringtone section. Get both iPhone and iTunes connected. This way, you can sync the lovely ringtone to your iPhone.
To set ringtones on your iPhone, open the Settings app on your device, select "Sounds", tap the "Ringtone" option, and select your new ringtone from the list.
That's it.