How to Extract Sound Track from M4V to AC3 on a Mac
Get You Acquainted With WMA
WMA (Windows Media Audio) is Microsoft's format which is supposed to overtake MP3, but it is not as popular as MP3. Based on WMA, WMA Pro, WMA Lossless and WMA Voice are created with different codec.
How to Open WMA Files?
Windows Media Player is the first choice to play WMA files. You can also put WMA audio files to other media players like VLC, ALLPlayer, MPlayer, RealPlayer, Winamp and so many others.
How Can I Play WMA audios on QuickTime?
WMA is a format that belongs to Windows systems. If you are a Mac user and want to open WMA files on Mac, say, with QuickTime, you may get disappointed because QuickTime doesn't natively open WMA format. In fact, QuickTime player only supports a limited number of audio formats including iTunes Audio files (.m4a, .m4b, .m4p), MP3, AIFF, AU, WAV, AMR. If you cannot play WMA music files on QuickTime the way you want, just try to get WMA files converted to a format that is identified by QuickTime.
One thing to bear in mind: Remember not to change the name of the file extension directly because this won't work properly. You'll have to go to a professional conversion tool for help, which can convert from WMA to QuickTime compatible format without a pain.
Video Converter for Mac is one of the multitudinous file converters for using on your Mac. The highlight about this software is the long list of audio (and video) file types it can convert. It converts your WMA audios to most popular audio formats, like MP3, M4A, M4B, AMR, among others that your applications support. Besides, you can get the audios out of video content and save the audios as one of the QuickTime formats, for example, ripping audio from WMV to MP3.
If you have any WMV video that you want to play with QuickTime in Mac, refer to How to Play WMV using QuickTime.
Step 1: Put WMA Files onto the Program
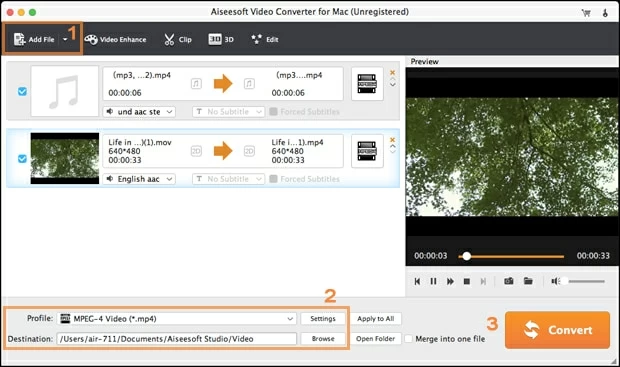
Click "Add File" in the top-left side to load the program with one or more WMA files.

If you would like to join multiple audio parts into one complete one file together, it can be done with relative ease and at no extra cost. All you need to do is highlight the source audio files that you want to combine, then check the "Merge into one file" box in the lower right corner of the interface.
Step 2: Tailor Output Settings
Click "Profile" field in the lower left corner and you will get a dropdown list. From there, move to "General Audio" category and select "M4A – MPEG-4 Audio (*.m4a)" as output format. Other QuickTime formats like MP3, AAC are also available.
Tips: AIFF and WAV are not recommend as a output format at this point, because they are both lossless format while WMA is a lossy format. If you choose to convert WMA to AIFF or WAV, you will get a bigger file but the audio quality is just as good as WMA.

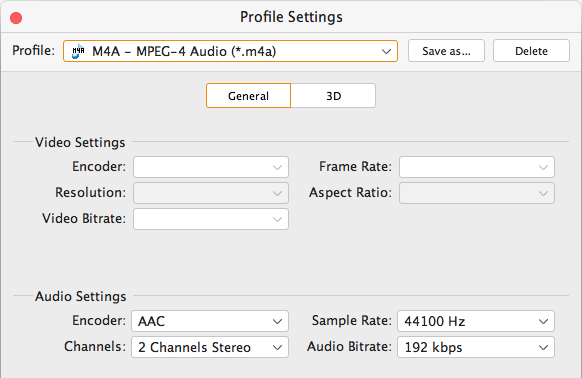
You can then click "Settings" (next to "Profile") option to change the parameters if needed, or leave them by default.

Step 3: Start the WMA Files to QuickTime M4A Files Conversion
After everything is ready, just click "Convert" button in the bottom right corner to get the process going. The time needed ranges from seconds to minutes, depending on the file size. Also, the output file type and conversion settings that you choose will influence the conversion time. A pop-up window like the one below will inform you of the progress.

A few cool features of this WMA converter include things like setting opening the output folder when the conversion process is finished via "Open output folder" box in the window (see above), or let the program shut down the computer automatically.
After the conversion is complete, you're ready to open and play the new created files with QuickTime in your Mac computer.
Enjoy!