How to Play WMV Video Files on Mac OSX
The WMV video file format is widely used on Windows-based computers, but its audio is not compatible with music and editing programs on the Macintosh, nor can it be used on an iPod and other portable MP3 players. If you'd like a soundtrack on WMV video and transfer it to your portable music player, you need to convert WMV to MP3 format on Mac, a audio format recognized by almost all portable music players including (but not limited) to iPod, Sandisk, Zune and Creative.
Video Converter for Mac is an easy to use solution for converting WMV to MP3 file for Mac OS X and create your original video soundtrack by yourself. Not only for Windows Media Video (.wmv) format, many other video formats also can be supported in this Mac converter program, such as FLV Flash video, AVI, DivX, QuickTime Video (.mov), DVD video, and more, Video Converter for Mac can read the audio data from all these video files. Besides, the program will trim an audio clip and join it to another or merge several clips into one file.
The program also has the capability of splitting an audio clip into several different clips. For Windows user, please try Video Converter for Windows here.
Step 1: Import WMV files
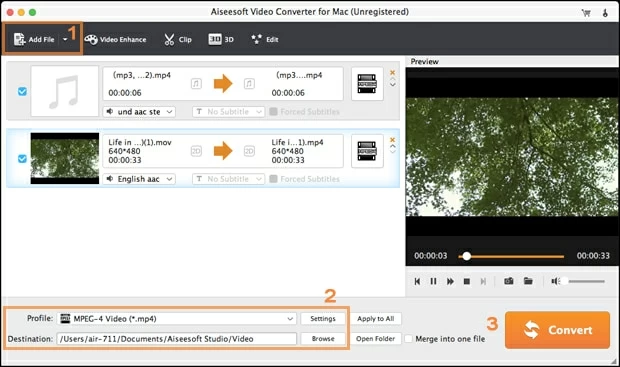
Launch the program, import one or more Windows Media Video (.wmv) files that you want to make the MP3s from by clicking "Add File" button in the toolbar or drag-and-drop video files to this converter.
Another option you have from "Add File" is the ability to load an entire folder of WMV files. To do that click on the small downward arrow icon next to "Add File", this will open a drop-down menu, from there select "Add Folder...", and then choose the folder containing your WMV files to load.
Its interface is damn simple and self explanatory. Check the screenshot given below.

Step 2: Select the audio format that the video to be converted in
Click "Profile" drop-down list, and then choose MP3 as output audio type from General Audio category. Besides MP3, there are many other audio formats offered such as AAC, OGG, WMA, M4A etc to help you get audio file.
In "Settings" next to the "Profile" box - While you click the button, you can tweak the desirable audio quality. By default, the original settings are OK. In this case you can set your own values for bitrate and quality of the audio.
Now let's move on to the "Browse" next to "Destination" box. This is the location on your hard drive where the program will create the MP3 file.

Step 3: Begin converting .WMV to .MP3 in Mac
Back on the converter's main window, we give our transcoding job one more look. When you are ready to convert, click the "Convert" button at the bottom of the screen and the program will convert all the files in the queue. You should see a status window poping up, along with progress bars.
Conversion time may take a few minutes depending on your system's hardware and length of the WMV files.
And you're done with your WMV video. That's how easy it is to encode WMV file to MP3 audio. Now you are ready to enjoy MP3 music on any compatible media player or portable MP3 device.

More Related to MP3 Conversion