How to Rip and Convert Blu-ray to a WAV Format for Mac
See more about: All-in-one Blu-ray Converter to Convert Blu-ray & DVD & Video & Audio to format you need
If you're a high quality movie fun, you probably have a large collection of DVD disks placed on a shelf somewhere. A 4.7/8.5 GB DVD allows content providers to store high quality movies with extras and subtitles. Although it doesn't get much easier than dropping a disc into a tray and pressing Play, there are still different of reasons you would want to rip your DVD's to Xvid or DivX video files. You might want to make digital copy of DVD to good quality Xvid movies on hard drive to protect the original disc from scratched by cat, or just extract a part of it for your presentation. In my case I would love to rip the DVD to Xvid/DivX format with the original AC3 audio track on Mac to play on my PS3 so I can have them ready to access without a disc at any moment.
Converting DVD files into DivX or Xvid video formats has always seemed like a tough task, because you'll have to use the software to get around the restriction as they are usually CSS encrypted. But thanks to DVD Ripper this has been extremely simplified so that anyone will be able to decrypt the disc and convert the DVD movie in one place.
The program lets you rip the DVD contents to whatever file format (of course Divx/ XviD included) that you can then stream to all your players. For a power user, you can even trim out clips, edit your videos to add effects and watermarks. In addition, You can use ready-to-use presets optimized for models of phones and media players to simplify the conversion.
Some of you may be using a Mac, please go head over to DVD Ripper for Mac for converting DVD to Xvid and DivX file.
How to Convert DVD to AVI File
Step 1: Load Disc
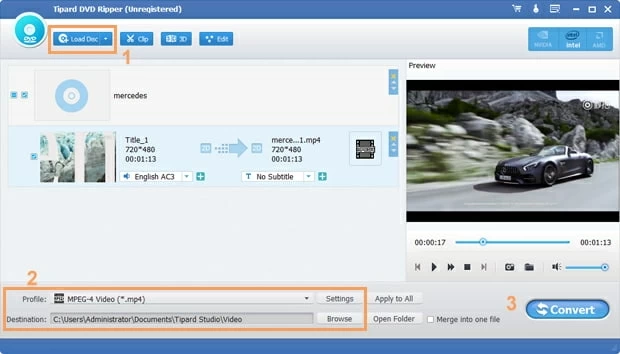
To get started, put the DVD you want to rip into DVD drive and fire up the app. Click "Load Disc" option on the top bar to import DVD files into the project area. The tool will automatically scan your DVD's contents and display the main movie.
A neat feature "Merge into One File" you'll notice in the bottom of the screen is the ability to join multiple files to output a single file.

Step 2: Set output format to DivX or Xvid with AVI extension
DivX and XviD are just the video codecs used to encode video in a container file, both of them (always along with AC3 audio codec) are mostly wrapped in AVI file container. So in this step, I will choose "AVI" as the output format.
Move to the bottom left side of the screen (highlight with orange box No.2), click the "Profile" drop down menu, this will bring up the format panel on the bottom, go to "General Video" category and pick AVI.
More importantly, you will notice an "Destination" option under "Profile" for where you save the ripped content.

Next, fine-tune the settings if required. For advanced users, this DVD to DivX/Xvid converter gives you a bit more control over how you configure settings to effortlessly get the resulting video exactly how you want them. You can do this through "Settings" button next to "Profile" menu.

Alternatively, if you are tired of choosing a certain format and then tweaking the settings, you can pick the preset options. The tool now offers different conversion profiles based on the type of media player or handheld device, such as iPhone, iPad, Android phones, Apple TV.

Step 3: Start conversion
When you're ready, click "Convert" on the bottom right corner to start converting DVD to Xvid/DivX video on your computer.

Depending on the size of DVD content and your machine's specs, it should probably take about a few minutes to a couple of hours. So it's a good idea to let it do its thing overnight.
Once you've ripped your DVDs, you can now watch the ripped movies either in our favorite video players such as Windows media player, QuickTime, VLC for Windows, Mac, or put them into iTunes to sync with your portable iPhone or iPad.