How Can I Recover Messages on Galaxy Note 10
My iPhone 7+ keeps a large file of music (6500+) and i'd like to get all the songs on iPhone 7 plus transferred over to a MacBook Pro I bought recently, btw, as well as the past tracks on my old iPod. How do I go about this?
Several months back, we've talked about how to copy music from iPod onto your MacBook (Pro/ Air). However, smartphones have quickly replaced the MP3 players as the primary means of listening to music on-the-go, and anyone now might be prone to use the hands-down iPhones anywhere to access and save his favorite songs and melodies. Chances are that you have thousands of tracks on your iPhone 7(Plus) and wish to move them into your MacBook.
When it comes to transferring music on iPhone 7 (Plus) to MacBook, you pretty much have to use Music app (or iTunes in macOS 10.14 or earlier) to get it on there. But what are your options if you want copying ripped songs or the items you got somewhere other than iTunes Store. Thankfully, the outstanding third-party software called iTransfer really shines in making music transfer without leaving the music tags behind: song title, album, artist, genre, and other metadata.
Here's how you easily move over both purchased and non-purchased music.
Can I transfer non-purchased music from iPhone 7 to MacBook?
Absolutely YES! Though Apple's iTunes or Music app has never permitted users to move non-purchased music from iPhone devices into MacBook - a common complaint among iPhone users these days, there are still workarounds.
A wealth of third-party utilities out there are designed to fill the gap and help you to get songs off iPhone 7 and put into MacBook (Air, Pro). Despite increasing competition, iPhone Data Transfer is still our favorite iPhone-Mac music transferring service. Not limited on migrating music between iPhone and MacBook, it can work seamlessly with iPads, iPods, Windows computers and Mac machines in moving photos, videos, podcasts, TV shows, and so on.
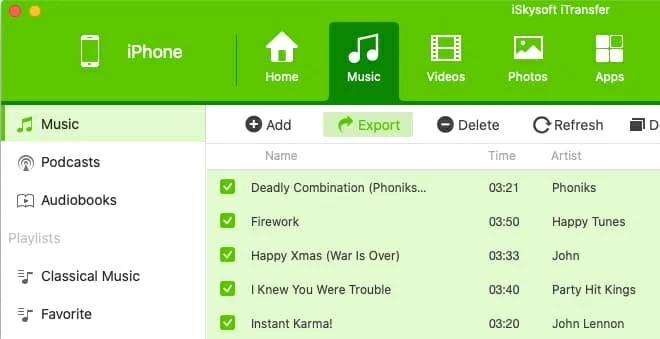
iPhone 7 (Plus) music transfer to MacBook, put simply, is the process of scanning tracks and playlists on the phone with iTransfer to copy them over to the machine. The program will let you manually select one, multiple, or all the songs for single or batch migration. Then click the "Export" button and it will take care of the rest.
The UI is clear and organized with shortcuts icons laid out on the initial window, so that you can trigger specific tasks quickly with a single tap. These shortcuts include Backup Photos to Mac, Phone to Phone Transfer, etc.
Before you get started using iTransfer to get iPhone 7 tunes and playlists onto MacBook, here's what you'll need: A USB cable to connect your iPhone 7 from which you transfer the music files, and a MacBook with iTransfer installed.
Step 1: Launch the software and plug your iPhone 7 (Plus) to MacBook
Upon the installation, run the software on MacBook.
Get your iPhone 7 device connected to the machine using a USB lightening cable. It will show up in the form of a device icon on the main screen, just like the screenshot shown below.

Step 2: Highlight desired music to move into MacBook
Then, click Music in the top toolbar. All media files will be sorted by categories on the side bar: Music, Podcasts, iTunes U, Audiobooks, and Playlists.
In Music category, all the songs on your iPhone 7 (Plus) appear grouped by different attributes, such as Time, Artist, Album, Genre, Added, etc. You can select the attribute to display the tracks in a certain order.
Next up, select the song(s) you want to save back to MacBook. Or hold down Command-A to choose entire music list.

Step 3: Move songs on iPhone 7 (Plus) into MacBook (Pro, Air)
To trigger transferring process, press Export button in the menu bar, and when prompted, designate a desired folder to store the tunes.
Once confirmed, it will automatically pull music out of iPhone 7 and save onto MacBook in the background. Please wait patiently until the process completes.

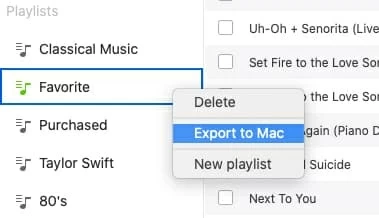
iTransfer includes a nice feature to import a playlist you've created on iPhone 7 to the MacBook, so you don't have to rebuild one. It's easy to do overall - locate the playlist under "Playlists" heading, right-click on it, and choose "Export to Mac".

Tips: If you have some songs locally saved on your MacBook and intend to import them back to your iPhone 7 memory, iTransfer satisfies your need as well. More details are clarified in the dedicated article: How to add music from Mac to iPhone devices.
How to add purchased music into MacBook (Air, Pro) without paying?
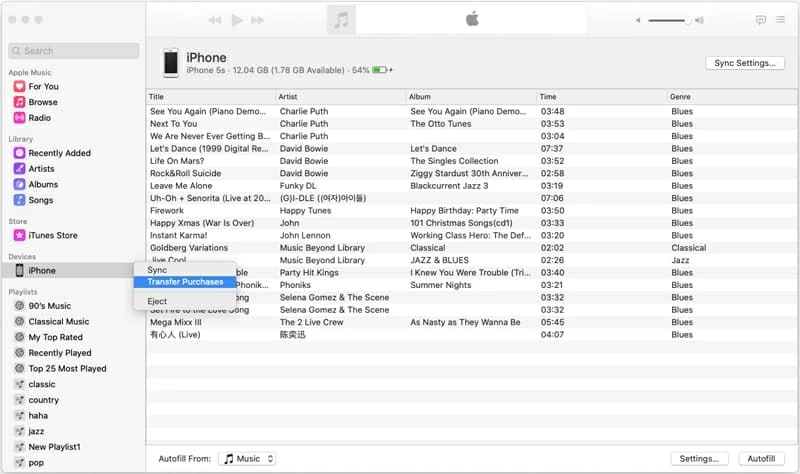
Apple claims that "iTunes music syncing is generally a one-way street - from computer to iPhone device. There is no direct way to transfer iPhone 7 (Plus) music to MacBook Air (or MacBook Pro) - the only exception is the songs directly purchased from iTunes store." This is true, and to import iTunes Store purchases to MacBook, you just need to use "Transfer Purchases" function.
Also, though iTunes is being phased out in macOS 10.15 Catalina and newer, you can accomplish the task at no charge via the new Music app. Just follow the steps outlined below:

Is there a way to move music from Apple Music into MacBook Pro?
Within your Apple Music subscription, the included "Sync Music" function grants you to access the music tracks on all your devices that are logged in with the same Apple ID. That way, migrating songs from iPhone 7 Plus over to MacBook is just a breeze.

Noted: This method only works with a subscription of Apple Music which is still active.