How to Transfer Music from iPhone XR to iMac Pro
If you're an iPhone-loving Windows User, you may rely on iTunes to manage your media library, make purchases, add custom ringtones to your iPhone 11 Pro (Max), sync content to the device, but it has a few limitations, too. iTunes cannot get non-purchased music out of iPhone 11 to a Windows 10 machine—as Apple implement a security measure that prevents any unauthorized sharing of the file. This means the songs that were ripped from old CD collections, bought from a third-party website or app won't be transferred over.
There's still a solution, though. In this post, I'm going to talk about all the different ways you can try to transfer music from iPhone 11 Pro (Max) onto Windows 10 PC (or to iTunes library). I've broken down into three parts: instructions on transferring purchased items, instructions involved an iTunes alternative to add non-iTunes purchases at a time, and instructions of downloading music to the computer from subscribed Apple Music. Do yourself a favor and take any route meets your need.
[Don't Miss: Recover your iTunes library from your iPod or iOS device - Apple Discussion]
1. Use "Transfer Purchases" in iTunes (Free)
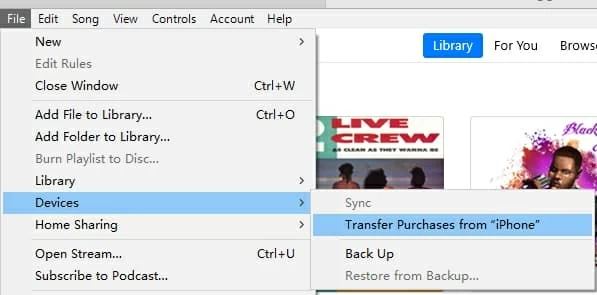
iTunes is bloated and slow, but the good thing is that, it works pretty well in transferring iTunes Store purchases into a new library. If you have purchased songs in iTunes Store on iPhone 11 Pro, you could easily move them to Windows 10 by using the "Transfer Purchases" function.
Tips: Provided that you've subscribed to Apple Music or iTunes Match within iPhone 11 Pro Max and want to copy the downloaded tracks to Windows 10 desktop & laptop, skip to the third part get the solution. It's also a free and easy process.

iTunes will do that in the background. Now the iTunes purchased music on the iPhone 11 has been imported to Windows 10 iTunes Library. To locate the transferred tunes on your computer, simply select a song, click File on the menu bar, and choose Show in Windows Explorer.
2. iTunes Alternative: Put iPhone 11 Pro Tunes to Windows 10 (Easy, Fast)
iTunes normally syncs ripped tracks to the iPhone device, but it isn't any good for copying them back to the computer. What you need is music transfer software smart enough to move music files not purchased on iTunes Store from iPhone 11 Pro to new Windows 10 computer. iPhone Data Transfer allows you to do exactly that, and won't change any settings in the handset.
The fast, lightweight program lets you manage music collection, and migrate iPhone 11 songs and playlists back to the Windows 10 desktop PC. It also transfers album art, ratings, as well as TV shows, videos, photos, audiobooks, etc., to the hard drive or directly into iTunes. Compared to other tools, iTransfer has the cleanest interface and lets user to do some basic editing, like removing duplicated songs, rename the music, add the name of the song back, fix music ID3 tags, and more
Once you've got the intelligent iTransfer downloaded, this is a great time to back up music files on iPhone 11 Pro in Windows 10 laptop & desktop. It's reasonably quick and painless: connect your phone, pick what songs you wish to save onto the computer, then take the time to complete the migration procedure. See the complete guide below:
Step 1: Hook up iPhone 11 Pro (Max) to Windows 10
First, run iTransfer that's installed on your Windows 10 desktop (or laptop).
Connect your iPhone 11 to the machine. It will be recognized automatically.

Step 2: Click "Music" tab and choose songs to transfer
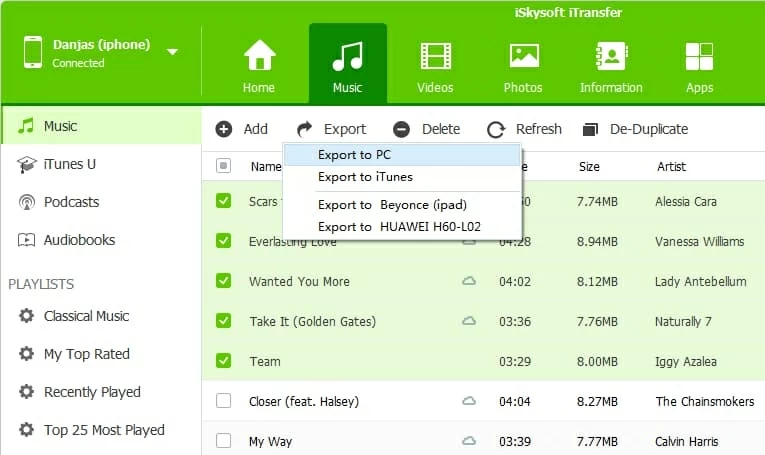
To export tracks and playlists from iPhone 11 to Windows 10, press Music tab on the top navigation bar. You'll now see a screen that has a pretty detailed review of the music library, and things are classified into categories on the sidebar.
Then click on "Music" option from the sidebar, which should be selected by default. On the right pane that appears, pick a song, multiple songs or all tracks which you want to get into Windows 10.

Step 3: Copy over iPhone 11 Pro music to Windows 10 PC
Once you've done that, click Export button underneath the Music tab on the top, and choose "Export to PC" option.
Next up, select a folder where you want the transferred music tracks and playlists included, then click Save button and done.
[Don't Miss: How to Import Photos from iPhone to a Windows 10 Laptop]

Regardless, you're going to want to save a playlist you've created on the old iPhone 11 to Windows 10. Right-click that playlist on the sidebar and select "Export to PC" option.

Done! You now have all of music in Windows 10. BTY, you could import new tunes to the iPhone without using iTunes. iTransfer has the reverse-sync ability to do so.
3. Enable "iCloud Music Library" in iTunes on Windows 10
Apple Music has been a powerful music streaming service on iPhones, and once you join its subscription plan, you could stream music on as many devices as you like. That means you could upload and sync your music library across all of your devices, including a Windows 10 computer. This works as well if you subscribed to iTunes Match.
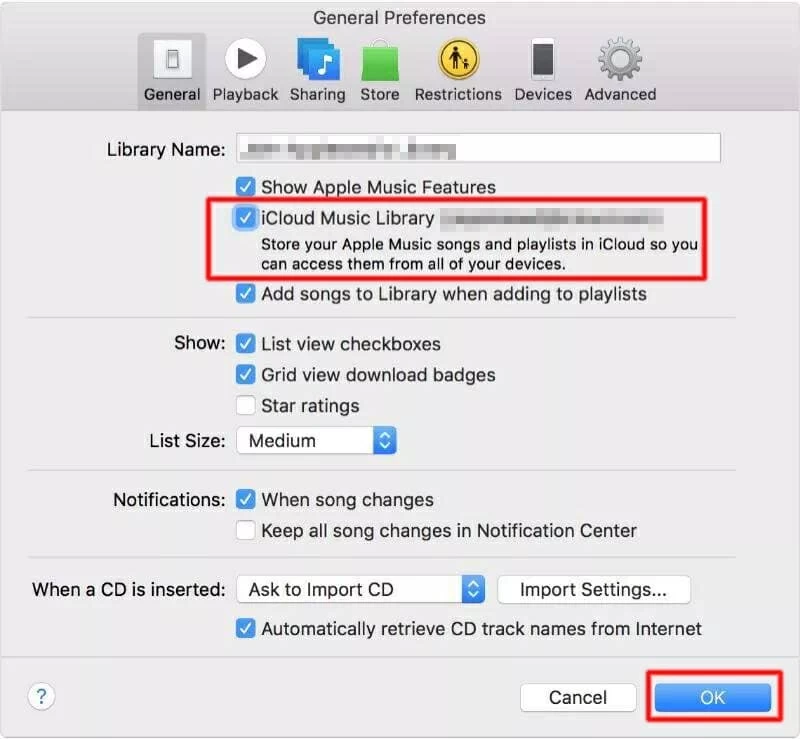
To move songs in iPhone 11 over to Windows 10 laptop, you need to enable "Sync Library" on your phone and "iCloud Music Library" in iTunes for Windows.

iTunes is now syncing and downloading music from iPhone 11 to Windows 10 PC. Sit back and wait until the process finishes.