How to Record PS4 Gameplay on PC
Streaming Switch to Discord can be a bit troublesome, as no app helps directly Discord on Switch. Here you'll learn how to stream Switch gameplay to Discord with certain tools.

You can get your Switch to stream on Discord using appropriate tools and software.
If you're a Nintendo Switch player, you may sometimes need to share the gameplay with others by streaming Switch on Discord. However, it can be challenging since you cannot download Discord on the Switch for streaming directly. In this case, you'll have to stream your Switch gameplay on Discord with additional tools.
Below, we've elaborated on how to stream Nintendo Switch on Discord with the help of some Switch streaming tools. And if interested in recording Switch livestream moments, you can try a comprehensive recording utility - the AppGeeker Screen Recorder to get the task done.
In this article, you'll know about:
Preparations before you stream Switch gameplay to Discord
In order to stream Switch gameplay on Discord, you'll need to prepare a few things in advance.
First of all, you'll require a Nintendo Switch and a computer or laptop for streaming on Discord.
Additionally, a Dock, a video capture card, and an HDMI cable are needed as essential components. However, you can forego the need for a video capture card if your PC or laptop has an HDMI port, which is not a feature commonly found in most computers.
And in terms of livestream software for Switch, VLC or OBS can be great options, with the former being more beginner-friendly. Moreover, it's crucial to download Discord on your PC and create an account in the software beforehand.
Read more: How to capture gameplay on PC
You may find it a little tricky to stream Switch on Discord. But with this step-by-step guide, that's not a big deal at all. Just keep reading and check out how to livestream Switch on Discord.
Tip: In the following, we'll use VLC to make a video window to stream Nintendo Switch on Discord, since it's suitable for both newbies and experts.
Also read: How to record a live stream on PC
1. Make your Switch connected with a video capture card
Note:
2. Power on and configure your Switch
After the connection, turn on your Switch by pressing the power button at the top-left side of the console, and the Switch screen will show on your computer. Next, on your Switch homepage, go to System Settings > TV Resolution, then select 1080p and Full RGB Range for optimized screen-share video quality.
3. Adjust the VLC video window settings
Step 1. Paste these codes on Notepad or Microsoft Word.
"C:\Program Files\VideoLAN\VLC\vlc.exe" dshow:// :dshow-vdev="Game Capture HD60 S (Video) (#01)" :dshow-adev="Game Capture HD60 S (Audio) (#01)" :dshow-aspect-ratio="16:9" :dshow-audio-samplerate=48000 :dshow-audio-channels=2 :live-caching=0 :dshow-fps=60
Note:
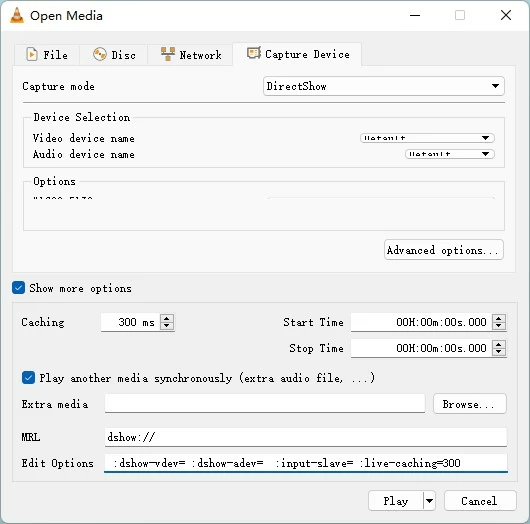
Step 2. Open VLC, and navigate to Media > Open Capture Device... at the top bar menu.

Step 3. Head on to the Capture Device section, and select DirectShow next to Capture mode.

Step 4. For Video device name and Audio device name, choose the name of your capture card from the drop-down list.
Step 5. Tick the box of Show more options at the lower-left, and paste the code from Notepad to the blank beside Edit Options.
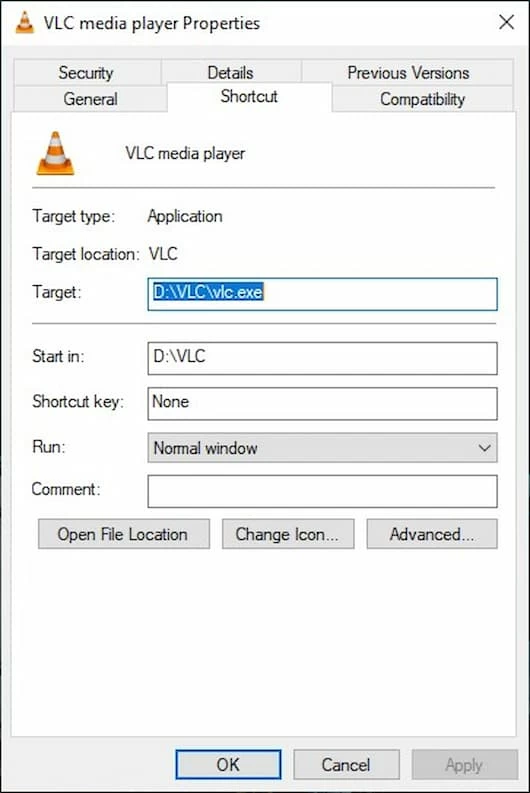
Step 6. Close VLC and right-click its shortcut on your desktop to select Properties.
Step 7. Paste the code to the box of Target and hit OK.

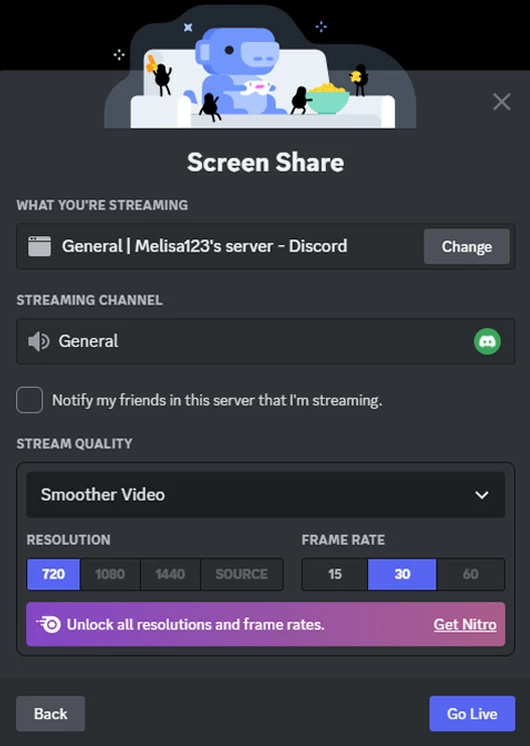
4. Set up Discord for the Switch live stream

Want to record your Switch gameplay streaming on Discord to save and share your highlighted moments with your friends? Let the all-in-one tool AppGeeker Screen Recorder help you finish the task! It enables you to record not only Switch streaming, but also any other games like Minecraft, or even your entire desktop screen.
And this impressively powerful and tool-rich recording software is nevertheless easy to use. With simple clicks, you're able to record a Switch clip in high-quality covering sound from your microphone and your webcam, in which way a reaction video can be created without any effort.
Here's how to record Nintendo Switch streaming to Discord by the AppGeeker Screen Recorder:
Step 1. Open the VLC window with your Switch screen displayed, then launch the software and choose Video Recorder on the left.

Step 2. Determine the recording settings. Set a recording area by selecting Full or Custom, and enable Webcam, System Sound and Microphone as per your needs.

Step 3. Hit REC to start recording Switch livestream to Discord.
Step 4. Hit the red Stop button to end the recording.
![]()
Step 5. In the preview window, hit Done at the lower right to export the recording file. It's optional to edit the video before the exportation by clicking Advanced Trimmer.

Don't miss: How to record a YouTube video
Conclusion
Through this ultimate tutorial, your doubt about how to stream Switch to Discord may be dispelled, and you may find it easy to do it if preparations are made ahead of time. In addition, should you need to record clips of Switch streaming, the AppGeeker Screen Recorder can be your optimal choice. Give it a try and we're sure you'll be surprised.