
How to download iCloud photos to iPhone
Want to keep your iMessage conversations for sentimental reasons? In this post, we'll show you several ways to download iMessage history on your device.
The reason people download iMessage history varies from person to person. Needless to say, there are many precious moments we want to treasure, and looking at the previous chat history brings us back to those joyful moments. So, back up your iMessage history before it becomes too late. Read the guide carefully to get the four ways to download iMessage history.
Table of Contents
One of the universal solutions for iMessage download is to use iCloud, an Apple feature that helps you back up your devices and keep the data safe and available wherever you are. Since your information is stored in iCloud of the same Apple ID, the messages you send, receive or delete on one device will simultaneously appear on all the others.
To learn how to download iMessage on iPhone using iCloud, follow the steps:
1. Open Settings and tap on [Your Name].
2. Select iCloud and toggle on Messages by the Sync this iPhone button from the app list.
3. Then, all the iMessage history will be downloaded to iPhone.

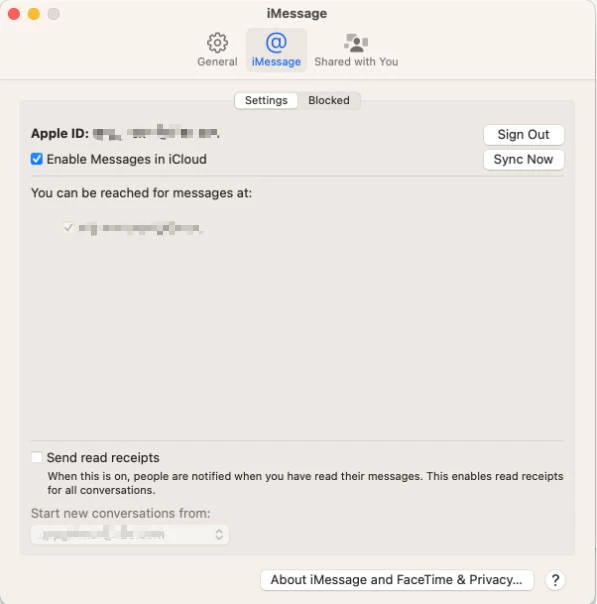
About how to download iMessage on Mac:
1. Go to Messages.
2. Click on Messages > Settings in the top menu.
3. In the new interface, choose iMessage and check Enable Messages in iCloud is on.
4. Finally, tap the Sync Now button to back up your iMessage conversations in this iCloud.
Note:
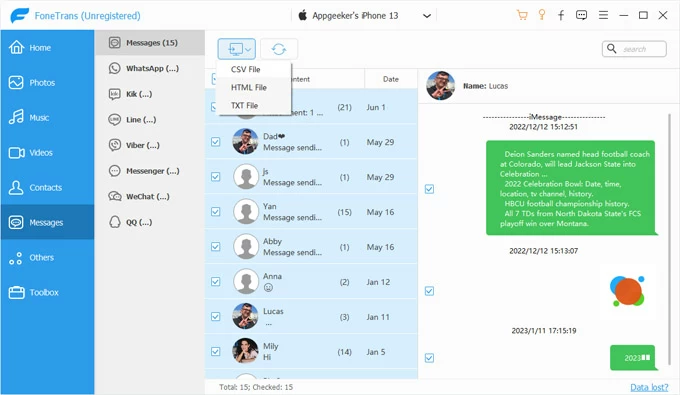
Another way to download iMessage history to PC or Mac involves a third-party app. As an iOS data management program, iPhone Data Transfer helps you transfer iMessage, SMS or text messages and back up the files on your iPhone/iPad to a Mac/PC with one click.
Do as follows to view and download iMessage history:
Step 1: Install and launch iPhone Data Transfer totally for free.
Step 2: Connect your iPhone to the computer with a USB cable. You can see a successful connection message on the program page.
Step 3: Click on Messages on the left sidebar and wait for its self-synchronizing process. The iMessage chats are now restored safely on your PC.
Step 4: When it's over, check the box to select messages to download. iPhone Data Transfer gives you permission to preview all iPhone iMessage history, so that you can choose what to print and untick unnecessary content. Choose the Export to PC icon with CSV/HTML/TXT formats straightway.
For safekeeping purposes, it is a good choice for a macOS user to download iMessage history by printing down and exporting it as a PDF file. This can be easily actualized on a MacBook. If you tend to know more about how to see iMessage history, continue reading!
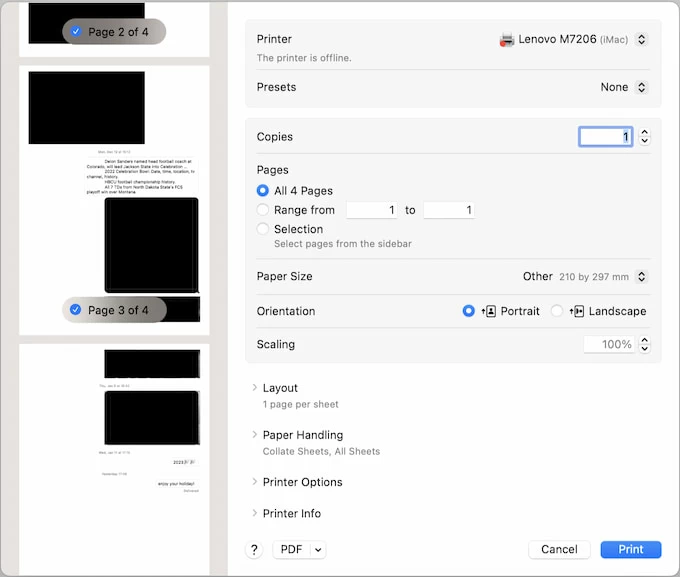
Tip: You might notice that instead of the original images, black boxes are positioned in the dialogue. That's because media are not visible when printing messages on a Mac. You'll need to go to Finder or Photos to match with time and print down.
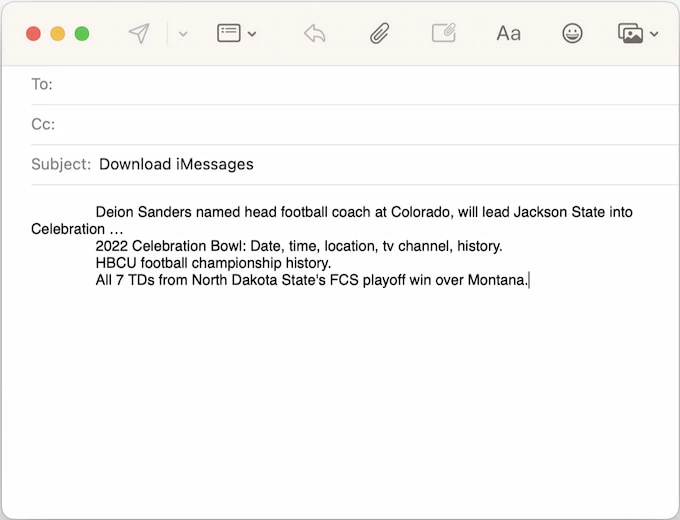
The last method we would like to introduce on how to download iMessage is simple but a little tedious. You are able to download the whole iMessage history or some specific texts and view them in your email box. This measure can be achieved on your iOS devices and Mac/PC.
1. Open Messages on your device.
2. Enter the chat box and right-click on the text to copy it.
3. Then go to Mail, paste the message or the whole conversation and send it to your own email.
4. You can see your iMessage history downloaded in the inbox now.
Now you not only know how to download iMessage history on iPhone or Mac, but also to get a backup of both electronic edition and print edition for double insurance. Until now, Apple hasn't offered you a direct Print button for iMessage, so using iPhone Data transfer could be your best choice to back up iMessage history and manage other files.