How to Transfer Photos from iPhone to USB
In your daily life, you might need to download photos from iCloud to your iPhone. Here we'll break down how to get your iCloud pictures to iPhone with ease.
Tip: If you prefer not to rely on iCloud or are looking for an alternative, iPhone Data Transfer lets you directly transfer photos from iPhone to computer, ensuring they're securely backed up without needing cloud storage.

Learn how to download photos from iCloud to iPhone to take more control of your photos.
iCloud indeed provides a powerful cloud storage service to save your photos and videos, keeping them updated and accessible across all your Apple devices. However, at times, you might prefer to download your photos from iCloud to your iPhone instead of storing them in iCloud—perhaps to free up iCloud storage, create a local copy for offline access, or upgrade to a new iPhone.
This guide is designed to walk you through the various methods of downloading photos from iCloud to iPhone, ensuring you can enjoy your cherished memories anytime, anywhere.
Table of Contents
Before you start downloading your photos from iCloud library to your iPhone, there are a few things you'll need to ensure a smooth process.
Sufficient iPhone Storage: Check if your iPhone has enough available space to accommodate the iCloud photos you want to download. High-resolution photos and videos can quickly take up a lot of storage. If your device is running low on space, it may not be able to download the entire iCloud photo library.
Stable Internet Connection: Since iCloud operates over the internet, it's crucial to have a stable and fast Wi-Fi connection when downloading photos.
Correct iCloud Account Logged In: Make sure your iPhone is signed into the correct Apple ID that contains the iCloud photos you need.
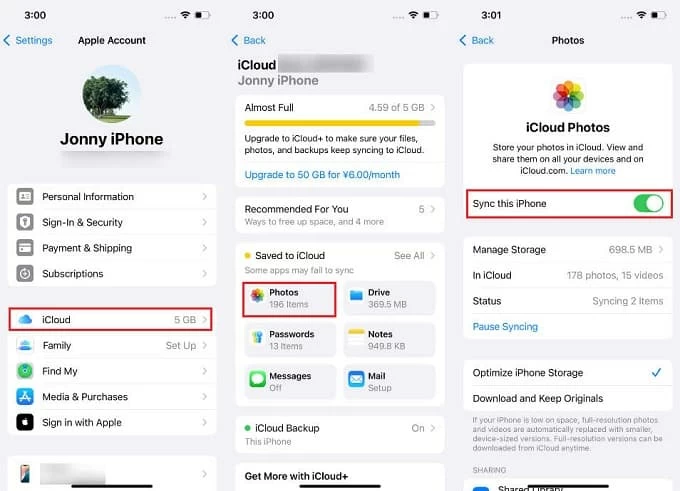
iCloud Storage Capacity: If your iCloud storage is full or near full, new photos may not be downloaded to your device successfully. Navigate to Settings > [Your Name] > iCloud > Manage Storage to view iCloud space usage. If it is full, consider upgrading your plan.
As the cornerstone of Apple's system for managing photos, iCloud Photos automatically uploads your photos and stores your entire photo library in iCloud, giving you access to it from any Apple device. As long as your iPhone has enough space, iCloud Photos allows you to download photos and videos in full resolution and save them locally on your iPhone.
1. Open the Settings app on your iPhone.
2. Tap on your Apple ID at the top of the screen.
3. Select iCloud, then Photos.
4. Toggle on Sync this iPhone to enable iCloud Photos.

5. Select Download and Keep Originals to download full-resolution versions of all your photos and videos to your iPhone.

6. If you want to save space on your iPhone, you can select Optimize iPhone Storage to download iCloud photos to iPhone in low-resolution and keep full-quality images in iCloud.
Once iCloud Photos is turned on, new photos captured on your iPhone will be uploaded to iCloud, and new photos in iCloud that are not already stored locally will be downloaded. This method works well for users who want all their photos from iCloud synced across devices without needing to manually manage the files.
Shared Albums in iCloud is a collaborative feature that allows you to share specific photos and videos with your family and friends. Members of a Shared Album have the ability to view, comment on, add, and download photos from this image collections.
Unlike iCloud Photos, which syncs the entire iCloud photo library to iPhone, Shared Albums give you more control over which photos are shared and downloaded. Follow below to use Shared Albums to download a copy of photos from iCloud to an iPhone.
1. Make sure you set up Shared Albums. On your iPhone, head to Settings > [your name] > iCloud > Photos and scroll down to switch Shared Albums on.

2. Open Photos app and locate the Albums tab.
3. Find the Shared Albums section and select your wanted album.
4. Select the needed photos or tap Select All in the upper left corner.
5. Tap the Share button in the lower left corner.
6. Choose Save Image to get iCloud photos on iPhone.

Note:
Besides that, you can visit iCloud.com to download the photos from iCloud storage to iPhone storage. The web version of iCloud also offers great convenience for transferring photos from iPhone to computer. Here is how to download your iCloud photos to iPhone from iCloud.com:
1. Open any browser on your iPhone.
2. Visit icloud.com and log in with your Apple account.
3. Tap on Photos.
4. Browse your iCloud photos and tap on Select in the upper right corner to pick the desired pictures. Or tap Select All to download all iCloud photos to iPhone.
5. Tap more button in the lower right corner and select Download to get them on Photos app.

Tip: You can tap "More Download Options" to choose the quality and format of the downloaded pictures.
If your iPhone is stolen, lost, reset, or if you've purchased a new iPhone, transferring photos from iCloud backup to your iPhone's storage is an effective method. When you restore from an iCloud backup, not only will your photos be restored, but other data such as contacts, messages, and app data will also be recovered.
1. Create an up-to-date iCloud backup containing your photos. Navigate to Settings > [your name] > iCloud > iCloud Backup, turn on Backup This iPhone, and then tap Back Up Now.
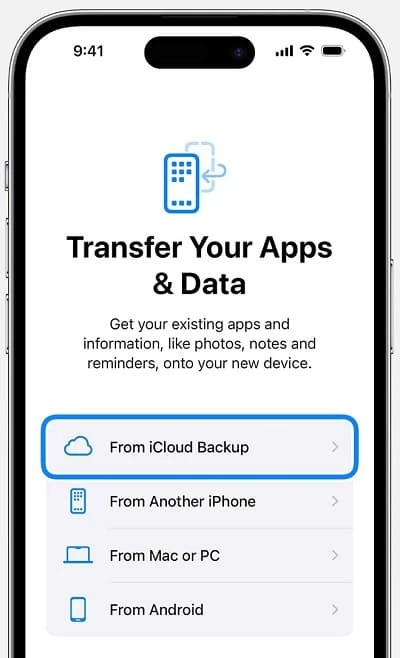
2. On your new iPhone or after a factory reset, follow the on-screen setup instructions until you reach the Transfer Your Apps & Data screen.
3. Select From iCloud Backup and sign in with your Apple ID.

4. Choose the most recent backup to restore.
All your photos will begin downloading from iCloud to your iPhone once the restore process is complete.
While you can download all photos from iCloud to your iPhone's internal storage, the entire iCloud photo library still consumes a large amount of space. You can consider transferring iCloud photos to a PC or Mac for backup and to free up iPhone memory.
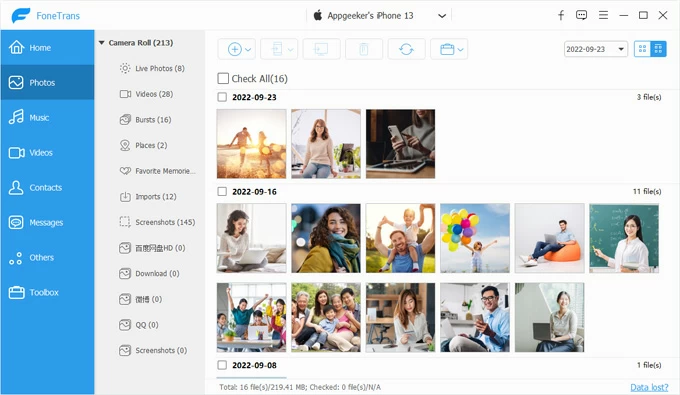
Using iPhone Data Transfer is a reliable and effective way to transfer all your iCloud photos from iPhone to computer without losing quality at once, bypassing any cloud-related restrictions. In addition to photos, this software can also transfer other multimedia files such as music, videos, contacts, etc. between iPhones and between iPhones and computers.
Assuming your iCloud photos are already downloaded to your iPhone and accessible, you can follow the steps below to move iCloud photos to your computer with iPhone Data Transfer.

With iPhone Data Transfer, you can effortlessly transfer photos from iPhone to PC without iTunes, or transfer photos from Mac to iPhone. This iCloud alternative will make it easier to back up and manage your pictures and other media files like videos and songs.
Conclusion
Based on the above content, you can get iCloud photos downloaded on iPhone in four ways: iCloud Photos, Shared Albums, iCloud.com and iCloud backup. Choose the most suitable method according to your specific situation. No matter your preference, these methods ensure your memories are always safe, organized, and within reach.
1. Why are my downloaded iCloud photos not showing up on my iPhone?
Here are the common reasons why photos downloaded from iCloud not showing up on iPhone and troubleshooting steps to help you resolve the problem:
2. How do I transfer all my photos from iCloud to my iPhone without compressing them?
To get the photos stored in iCloud in their original formats at full resolution, you can go to Settings > [Your Name] > iCloud > Photos on the iPhone, and select Download and Keep Originals to ensure the full-size original photos are download on your iPhone.
3. Where can I find and access my downloaded iCloud photos on my iPhone?
You can find your downloaded iCloud pictures in the Photos app on your iPhone. They will sync automatically and be accessible in the Library tab of the Photos app. You can also access them in the Recents album or any specific album you've organized them into.
4. Why are my downloaded iCloud images not in high resolution?
Blurry iCloud photos may occur if they haven't fully downloaded from iCloud. This happens if "Optimize iPhone Storage" is enabled, showing lower-resolution versions. Ensure a stable internet connection, and tap the photo to download the full-resolution version.