How to Copy iPad Music Back to a Blank iTunes Library
Want to move favorite music from Android to iOS device? In the past, you might do it by using computer as a bridge. Nowadays, this method has been obsolete since new technology has been invented. In this post, a guide will be introduced to explain how to move music from an Google Pixel phone to an iPad (Pro, Air, Mini, whatever).
If you have already got a new iPad, you may be looking for an easy and quick way to copy all your music from the old Google Pixel phone to new iPad. An unfashionable way to do this is get tracks off Pixel onto computer and then move to your new iPad with iTunes (iTunes Alternatives). However, this will takes you inordinate amount of time, especially when you have thousands of songs in the old device.
Luckily, there is a useful music transfer program named Phone Transfer to give you a hand. It is a neat music transferring application in between, giving you the ability to copy music from Google Pixel to iPad and vice versa without any difficulty.
Tips: To be better supported by the device, sometimes you need to convert the music format firstly before you copy the songs to your device, such as FLAC to ALAC, MP3 to AAC, WAV to MP3 and more.
Pixel Music to iPad Transfer Guide
Step 1: Open up the tool and click Phone to Phone Transfer module
Once you have the software installed on your computer, fire up it. On the software's main screen are presented four modules: Phone to phone transfer, Back up your phone, Restore from backups and Erase your old phone.
Here we click Phone to phone transfer module in order to transfer tracks to iPad from your Google Pixel smartphone.

Then, please connect both Google handset and iPad to the computer using a USB cable.
It should be noted that debugging more must be enabled on Google Pixel in order to gain access to data including music within your Android phone. You can click "Cannot recognize the device " or consult How to enable debugging mode on Android for help.
If it is your first time connecting your iPad to the computer, you will be prompted to tap Trust on the home screen.

Don't Miss: How to Sync Music to Your iPhone from Mac without iTunes
Step 2: Check Music to transfer
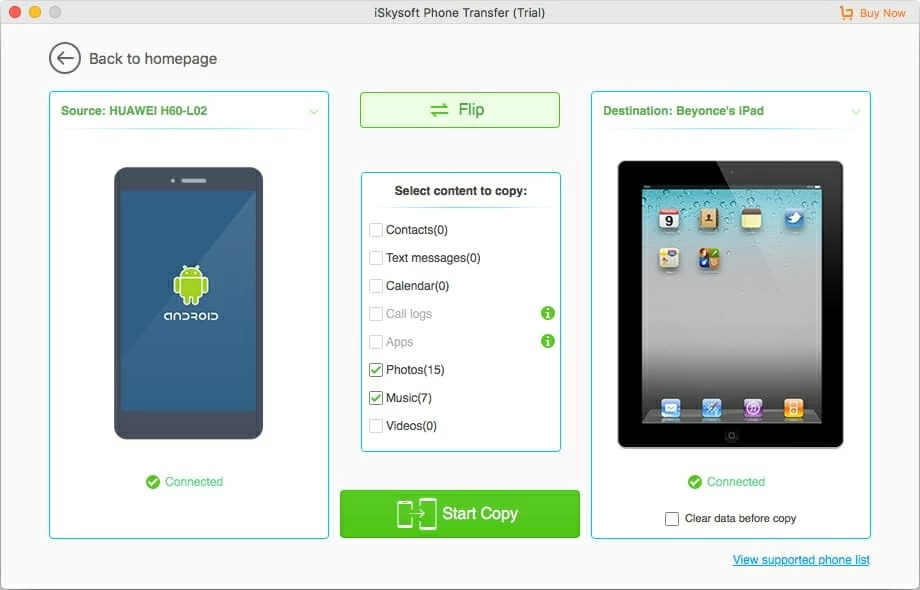
Once the two devices are connected successfully, the software recognizes and displays the scanned results in the center pane, as you can see as below. Please ensure that the Google Pixel phone is connected as source (left) and iPad as destination (right). If both devices are misplaced, please click Flip button to change their positions.
Go ahead and check box next to Music.

Furthermore, this program offers you a Clear data before copy option to erase the data in your iPad before starting transfer songs and other stuff from your old Google phone.
Step 3: Transfer music from Pixel to iPad
After everything is ready, click Start Copy button and the software begins coping your favorite music files from Google Pixel device to iPad.
After it is finished, click ok and unplug both devices. Now you're ready to enjoy music in your iPad!
By the way, you can use iTransfer to better manage the music files as well as other content between iPad, Android phone and the computer without iTunes. See one of our popular tutorials about how to copy music from iPad and save on a Windows computer.
Happy music transferring!

There's more about Phone Transfer
It goes without saying that how critical it is to back up your files, especially when it comes to music files and other important content. To prevent thousands of tracks from being lost due to a variety of reasons, Phone Transfer is capable of exporting your favorite songs and other things from your Google smartphone or iPad and keep them safe on the computer. Whenever you need them back, you extract the music files and put them back into your devices.