How to Copy iPad Music Over to PC Computer
iTunes is a pretty good media management application with colossal set of features, but it isn't perfect. Every time you want to put a movie onto your iPad with iTunes, you'll have to find a video converter to convert the movie into an iPad friendly format, if it isn't already, to get the file to work properly. You then import it into your iTunes library, and finally sync with your iPad. How time the whole process takes? May be a few minutes or a few hours.
It doesn't mean iTunes is a bad program, but it does slow down the process of adding movies from your computer to iPad media library. Additionally, iTunes doesn't support FLAC, APE, OGG music files. So is there an easy and quick to import your movies to iPad without using iTunes?
Fortunately for you, many of popular programs on the web have capabilities for adding movies/ videos to iPad without iTunes. Some of which just does the job to satisfy average user's transfer needs, while others give you more control and advanced options with a bloated interface.
In this post, we will introduce a neat application that make getting movies onto iPad a piece of cake without the need of meddling with iTunes. The name of the app is called iPhone Data Transfer. It's simple to use. You just connect your iPad to the computer, click the Add button on the program's window to navigate to your media folder on the machine, select the movies, and it starts importing them into your iPad automatically, no matter what file format they are.
This software goes where iTunes won't by making it extremely easy to transfer your iPad music back to computer or to another iOS device, along with other files such as podcasts, movies, photos, TV shows. It works on both Windows and Mac platform. The Windows version even supports contacts and messages. [Also see: Back up iPhone music to Windows 10]
With a few simple clicks you can copy movies and other media files you want from local computer to your iPad without a need of iTunes.
How to Put Movies onto an iPad Without iTunes
Step 1: Connect to your iPad
Download and install iTransfer on your computer and launch it. The application is easy to use, as the interface is intuitive and the buttons and texts on it are relatively large.
Use the USB cable that came with your iPad to connect it to the computer.

Step 2: Import movies to iPad
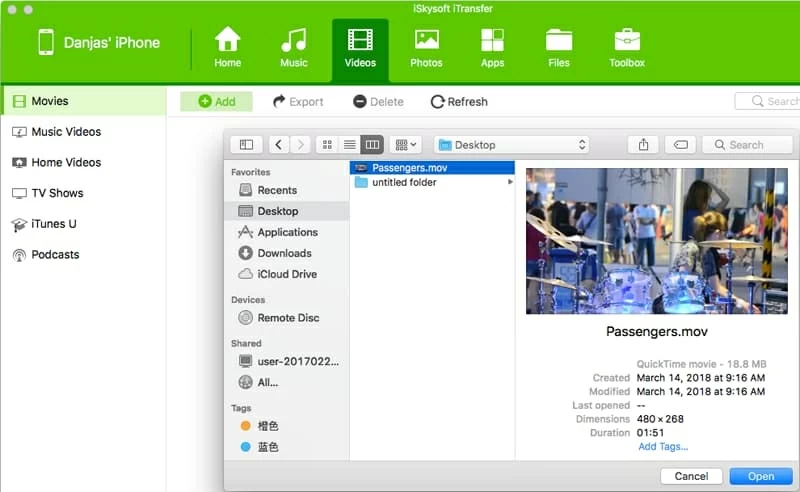
On the top navigation bar, click the Video button and this will show you all video files existing on your iPad library.
To put movies files onto your iPad, click the Add option under Home button. In the dialog that opens, browse your hard drive for the video & movie file(s) you want to put onto iPad, select them and hit the Open. Then the movies will automatically be transferred to the iPad. You'll track the progress move along on the screen.
When it completes, open your video app on your iPad, you should see that these movie files are sitting there waiting for you to play.

That's all there is to transferring videos from computer to iPad without involving of iTunes. It's incredibly simple to use. Now open your Video app on the iPad to find your movies…where it belongs.
This program also works with music, photos, TV shows, podcasts and other media files. You don't worry about the file type compatible issue. It can convert any obscure file types on the fly so that it will play seamless on your iPad.
Conclusion
The iPad is a nice device for watching movies and listen to music, but not everyone love iTunes. If you want to transferring movies to the iPad (or iPhone) without using iTunes, you can find some lighter and more efficient replacements to iTunes, and iTransfer is definitely in the list.