How to Recover Call Logs from Sony Xperia Phone
Data loss could happen to your Samsung Galaxy S22 phone at any time. You want to reclaim more storage space by deleting some data and clear the cache (you are sick of getting the low space warning all the time). Whether you deleted the data by mistake or the system wiped it out, a few ways help you recover data files on Samsung Galaxy S22 (SM-S901U, SM-S901W, etc).
To maximize the possibility of data recovery on Galaxy S22, you should cut back on the activities on the device. Any further use of the device will create new data which is going to overwrite what you attempt to get back. Even if you just surf the net online, it will produce new data through cache.
Option 1: Restore data from backup via Samsung Smart Switch app
With Samsung Cloud, you can back up your Galaxy S22 data like contacts, photos, texts, notes, reminder, and apps to external storage media via Smart Switch and restore from it. Should you made the backup before you lost the data files, you can restore them without a hassle.
Here's how you can get started on retrieving deleted data on Samsung Galaxy S22.
Option 2: Recover data from Samsung Galaxy S22 internal storage
While Smart Switch do a great job of restoring backup data to your Galaxy S22 device, it gets a bit trickier when you don't have a backup file prepared. But that doesn't mean you're out of luck. Android Data Recovery makes it possible to retrieve lost data files on Galaxy S22 phone.
It is a cross-platform utility available for Windows and Mac, allowing you to deeply scan the internal memory of the device to find the recoverable files. You can select which types of data to be restored from Samsung Galaxy S22 device. You can filter the scanned results and pinpoint what you want. Although it may take a little bit while to scan the content, the process of restoring them to the computer is astonishingly fast.
Here's how to use Android Data Recovery to recover data on Samsung Galaxy S22 memory.
Step 1: Select data recovery mode
Run the program on the computer to enter the startup window. Choose "Android Data Recovery" mode. Then, attach your Galaxy S22 phone to computer via USB cable.

Step 2: Set the device to USB debugging mode
Once connected, you're prompted to activate USB Debugging mode on the device to access to the device. If you don't set up the phone, follow the on-screen instructions to enable it.
You can also check our article on how to allow USB Debugging mode on Android to finish it.

Step 3: Scan Galaxy S22 to find lost data files
On the next screen, you're going to select which types of data you want to scan for deleted files. Choose whatever you want back from Galaxy S22 and press Next button to proceed.

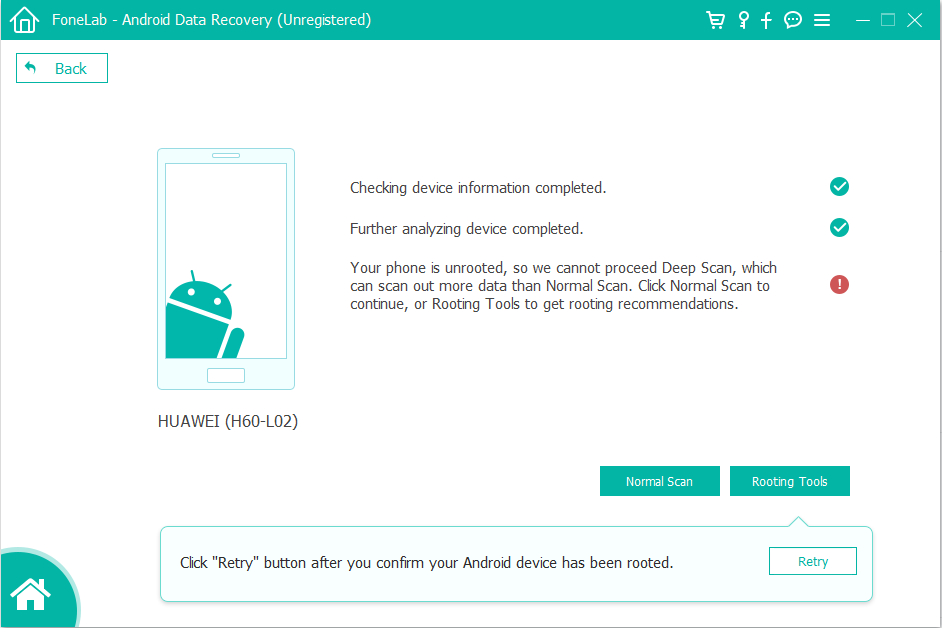
A window as below will appear, prompting to root your handset for a deep data scan. Press Rooting Tools button to mount KingoRoot on the computer for the rooting task.
Once rooted, this software will begin scanning your device completely. How long the scan process will take may vary from 15 to 20 minutes. Please be patient.
This article may be helpful: how to safely root and unroot an Android device.

Step 4: Restore data files
When the scan is finished, All found data files will be divided into two section on the left pane: "Contacts & Messages" and "Media". Clicking any of the categories will bring up the corresponding files on the right pane.

Next, select the data files you want to retrieve from the list. Then click the Recover button at the lower right position of the window to save the data to the computer.

Samsung Galaxy S22 - Backup your data
To prevent another data loss, you should back up your valuable data from time to time. Galaxy S22 has built-in option to do this online. Here's how.
If you want to back up your data on Samsung S22 to PC locally instead, you can try with the "Backup & Restore" function included in Android Data Recovery application.