How to Encode FLV Files to AVI Files on Mac OS X
How can I convert a movie file from FLV to MOV format so that QuickTime can read it? Well, I downloaded a flash video off YouTube, and had to download VLC as well to read it. Well. now I need a safe way to convert it into .MOV then put onto my iPad, but iTunes can't read it.
Because FLV (flash video) lacks compatibility with commonly used digital media players and editing programs, sometimes you might need to convert FLV file to a format to take with on an Apple product. In that case, you can convert FLV to MOV for Mac. If you grab a FLV flash file off online and want to drop to edit in Final Cut Pro, you can also choose to transfer your .flv to ProRes .mov file that FCP does support natively. On the other hand, you may want to share a MOV video clip saved on your Mac desktop to YouTube or other video hosting sites, then you need to convert MOV to FLV format. Today we'll look at a way to convert certain video files, such as .flv to .mov for Mac, with the software named Video Converter for Mac.
Video Converter for Mac is a digital file conversion application that lets you effortlessly convert videos to whatever type of video file you want for playback on portable digital devices such as iPhone, iPad, or copy into iTunes, iMovie, Final Cut Pro etc. It also includes a basic set of editing tool such as trimming, cropping, rotating, adjusting video effect and more. If you need to convert between FLV and MOV format on Windows, please try Video Converter for Windows.
Read another useful article: how can you convert MTS to a MOV format.
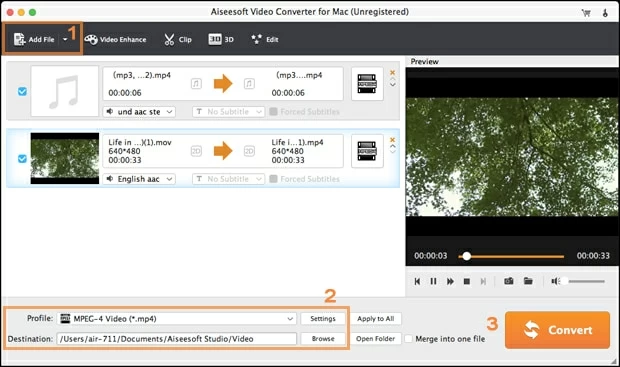
Step 1: Launch the Mac application and import FLV files
Click "Add File" button to open browser-like dialog box and browse to your FLV video, select it and click "Open", or manually drag-and-drop files to the interface of this FLV to MOV video converter.
This FLV converter for Mac also supports batch-encoding feature, which allows you to import multiple FLV video files and convert them at one time.
Under the video list, there's a "Merge" option to join video or audio files together.

Step 2: Set output parameters
Next, head to the drop-down menu labeled "Profile", where you select MOV as the output format.
Then click the "Browse" button in the "Destination" box to specify a location where you wish to save the output video, and then enter a file name.

For a simple setting operation you can stick with its output preset profiles, which designed and optimized for a host of portable devices (iPhone, iPad, Kindle Fire, PS4, Xbox One...) you happened to have. Of course, you can customize your final video or audio output settings if you want to experiment using "Settings" option to the right side of "Profile" drop-down list.

The FLV to QuickTime MOV application comes with a lot of video or audio options to allow you to tweak the video/audio parameters of your finished movie like: quality, codec, bitrate, etc. Keep in mind that as the video quality increases, so does the encoding time.

The Mac app also has options for simple video editing tasks prior to conversion. Get more details in here.
Step 3: Begin converting FLV to MOV file on Mac
After all the settings, simply click the "Convert" button to start the FLV to MOV conversion process. Now it's time to wait.
A window will appear showing the progress of the operation, the process might take some time depending on your encoding settings and size of original size. Be patient.

Conclusion
Easy, fast, converts to and from almost any digital video & audio sources on the planet. You can also refer to conversion from mpeg format to mp4 format here. Anyway, Video Converter mentioned here is highly recommended.
More Related to YouTube to QuickTime Conversion