How to Get the Audio from MTS Video on Camcorder to MP3
High definition camcorder (Canon, Panosonic, JVC, Sony...) is becoming a natural fit for its lighter weight, higher capacity memory. It is really fabulous that you can use your camcorder to capture moment in holiday, wedding, birthday and so on. The downside, of course, is the nagging question of what to do with this video in mts format once you're done shooting it. These files in camcorder are often saved as .mts or .m2ts extensions of the AVCHD format, but they are not readable with QuickTime, iPhone, iPad, etc.
To play MTS files from camcorder, you may need to convert MTS to MOV for Mac or PC's, a QuickTime movie file that widely used on Mac system, and it can be easily edited - no need to rewrite data after editing.
Video Converter for Mac is our favorite for this purpose. It features a well-designed interface and simple navigational functions. It can easily convert MTS to MOV format on Mac in a fast speed, and let you transfer MTS & M2TS to other conceivable video formats like MP4, AVI, WMV etc. In addition, the utility gives you ability to edit the MTS files prior to encoding - you can trim, crop the video, add effects and merge them.
For converting a .mts to a .mov file on Windows, please try Video Converter for Windows to get the job done.
Step 1: Import MTS videos
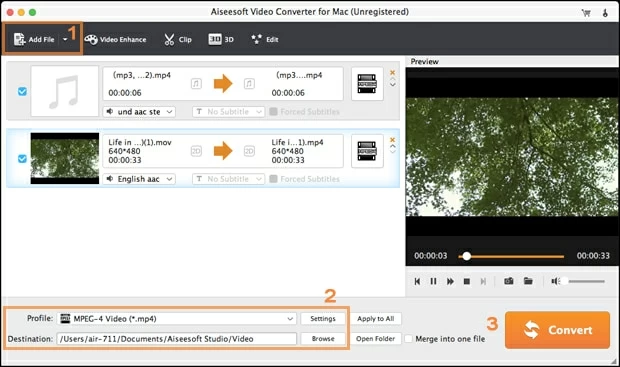
Launch the program and drag the MTS files into the window, or click the Add File button to open the file browser window and navigate to the MTS files you would like to convert to MOV format.
This Mac MTS to MOV converter can handle batch conversion for AVCHD .mts files as well as other formats, so you are able to import as many as you want to convert into the board for processing.

Step 2: Set MOV as output file format
Click Profile pull-down list option on the lower left-hand side of the interface, this opens a panel where you can see a wide range of format options. For this article, the purpose is to create an MOV file, so here we pick MOV - QuickTime Video(*.mov) as the resulting format.

Further Configuration of Format (Optional)
Note: there's a number of conversion profile options (quality, size, bit rate, codec, sample rate, etc.) that affect how the output file behaves. You can access these options by click the Settings button to the right side of Profile menu. However, you can leave that in their default settings unless you really know what you are doing.
Also, you're allowed to create you own custom profile. After you have settings tweaked, click the Save as... button located in the upper right corner of the window. Then enter a name for the custom profile in the opened dialog and hit the OK button. After that you will find the saved profile displayed in the "User Defined" category.

This Mac MTS converter also includes pre-configured presets that will simplify the process of choosing conversion settings. Simple select the preset (Apple, Game Console, Tablet, Portable Video Player, Mobile Phone, etc.) you want from the list and you're ready to go to next step.

Step 3: Converting MTS to MOV file on Mac (or PC)
Go to the "Browse" in "Desination" field at the bottom side to save your work to your Mac.
After all the settings complete, now, you simple hit the Convert button to start encoding process.

Wait for the application to convert the MTS file you imported from the camera to MOV format. The progress will be monitored in the conversion window with two progress bars, as in the screenshot below. See Also: How to burn AVCHD videos onto a DVD for playing on home DVD player
Conclusion
Video Converter is an excellent program. It lets you convert movie files into multiple formats quickly through its intuitive interface, and its depth of options provides a nice balance for advanced users. If you need to convert files and want something easy to use you should definitely check it out.
4K camcorders: Panasonic HC-WX970 4K Ultra HD, Panasonic AG-DVX200PJ, Panasonic G7, Panasonic Lumix FZ 1000, Sony Handycam FDR-AX33 4K Ultra HD, Canon's XC10, etc.
How to import (.mts) video from a USB camcorder or camera to edit in iMovie