How to Convert and Add WMV to iTunes for Sync with iPhone
While WMV videos are popularly used when you are running a Windows computer - importing them into Windows Movie Maker to create a project, downloading videos in WMV and save on your hard drive, playing wmv movie footages on Xbox One and Surface - they're also not the most conducive to work on Mac OS X, especially if you merely want to copy them into an iOS player such as iPad or edit in iMovie. And that's what prompted us to come with a user guide on WMV to M4V conversion.
M4V is a container format that developed by Apple, very similar to the MP4 format, mainly used for Mac OS X and also workable in Windows. Today, we'll use a simple media converter to quickly convert your movie files from WMV to M4V without messing with confusing settings and options. For some reason, it's quite likely you want to convert M4V to WMV file format on Mac, the utility can work for you as well.
Video Converter for Mac, a user-friendly multimedia conversion tool, gives you many options for converting all conceivable video formats. With it, you can change the video format in WMV to M4V on Mac OS X with only several simple clicks. What's more, the program comes with several pre-configured profiles for working with the exported video on devices like iPhone, iPad, handheld consoles, Android phones.
Please note, the program has its Windows version - Video Converter for Windows to help you get things done in Windows PC, and has a special feature that can pull off video while you are watching it from video source sites and save in different formats.
Step 1: Add WMV video files
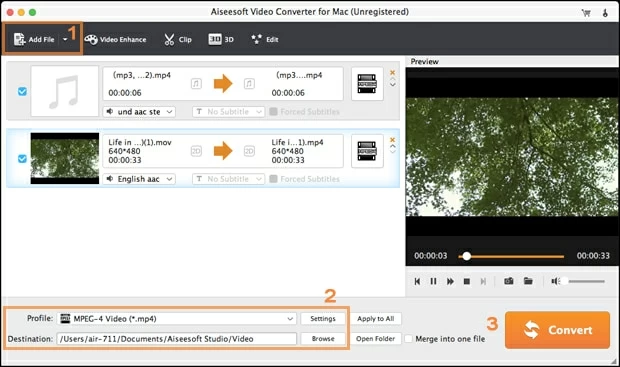
Launch the WMV to M4V converter for Mac. To add video files to the queue, there are two methods available: Click "Add File" button to browser for your files, or directly drag the target WMV file to the left part of the main interface.
You can add multiple files to the queue and convert them all at one time. If you want to make several video files to one large file, you may check "Merge" option beneath the queue.

Step 2: Pick the export format - M4V
Click "Profile" drop-down box, and then choose "MP4 MPEG-4 Video (*.m4v) as output format from "General Video" list.
Add that to the fact that you can find MP4, MOV, AVI and other options on the list. If you want to convert WMV to MP4 in Mac, for example, all you need to do is select the MP4 option from the list instead.

Under "Settings" button to the right of "Profile", you really can have control of output parameters. you can get in there and change the video/audio codec, bitrate, resolution and other settings. Please note that you need to understand what you're doing in order to reconfigure the value properly, or else you'd better leave them alone.

The Mac WMV to M4V converter has preset options to convert video for vast majority of portable devices and these are a great way to save time if you happen to own one of them. The program will automatically update the output parameter settings for you.

Step 3: Encoding the WMV movie
We are now ready to convert WMV to M4V file on a Mac now! After all the settings, click on the "Convert" button, and the progress will begin.
Now just wait until the WMV is converted to M4V, a blue bar will display while the conversion is taking place.
When it is done, just enjoy it!

More Related to WMV Conversion