How to Convert AVI to a HTML 5 WebM Format on Mac
For Mac users, one of the best media players probably points to QuickTime, a media player preinstalled on every new Mac. If you downloaded a file that is in .asf (Advance Streaming Format) file type from the Internet, it is OK to play the file in Windows Media Player since it is a Microsoft format. But just in case you put it onto Apple QuickTime player, you'll find that the player doesn't read the .asf file. QuickTime player does come with strict limitations when it comes to digital videos it will work with.
What Format is the Best Option for QuickTime Player
Apple QuickTime has a limited number of supported formats which span around dozens of video and audio formats: MOV, MP4, M4V, 3GP, AVCHD, DV, MP3, M4A, M4B, AIFF, AU, WAV, etc. However, not all video formats supported by QuickTime player are equal. As a rule of thumb, we list three types of optimal formats for your reference.
Convert the ASF to Format that QuickTime Accepts
The web brims with ASF converters of every kind. While some are accompanied by adware and plugins or other sorts of junks, others may come with complicated process. Video Converter for Mac is the go-to converter if you're looking for something that's clean, efficient as well as easy to use.
The software brings every necessary option that you'll need to convert from ASF to QuickTime video files on the main interface, and offers advanced options to adjust the final quality of your file. Its notable feature is the ability to accept virtually any audio or visual file as input and capable of converting to a whole set of audio and video formats. Plus, the software has some options such as the ability to flip and rotate the video, trim or crop the video, adjust the effects, as well as add your own watermark.
Step 1: Add ASF files to the software
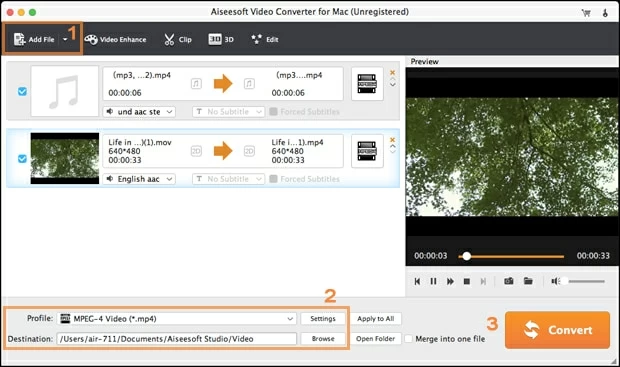
After successfully setting up this ASF conveter on your computer, double click it to open and you will see simple user interface with a few options that lets users perform the conversion with no trouble of getting messed up.
Click on the small inverted arrow beside "Add File" on the left top will give you two options: "Add file" and "Add folder", after which you can choose either one to to open the file browsing dialog and load the ASF file(s) to the program. It is more straightforward to drag and drop the desired source files onto the interface.
When the ASF files are imported, you should get a window like this.

"Merge into one file" (located at the bottom right corner of the startup interface): Using this feature, you can combine two or more videos that you have stored in your machine to create a new video. And generally, there is no limit for video amount that should be joined.
Step 2: Configure output settings
Then to this important step. Hold your mouse down to the lower left side of the screen, press "Profile" drop-down menu to open the format selecting window, in which are many profiles, covering an array of specific format types, a vast range of possible portable devices, application and more. From them, choose a format profile that's friendly with QT player. MOV - QuickTime Video (*.mov), MPEG-4 Video (*.mp4) and M4V MPEG-4 Video (*.m4v) are all available, depending on how you want your videos to be converted into.

Sometimes you may want to play with the parameters to create the best quality videos. A click of "Setting" button next to "Profile" menu will introduce a window like the screenshot below.
As you can see in the screenshot, both video and audio settings are open to you and if you know something about these technical data, here you can specify the compression codecs for the video and audio for enhancing the video quality. But in general, the default settings are capable of working in a good result.

Step 3: Start converting ASF on Mac
Prior to conversion, you can perform basic edits like trimming, cropping, adding effects, adjusting volumn, creating onscreen text & image watermarks and more via "Edit" option on the top toolbar to stylize and animate your videos for a perfect watching effect. If you are not interested, skip this part.
After you are done with the edits, if any, on the center bottom of the startup window, click once on "Browse" button to save your resulting video to your Mac.
Now, click "Convert" to fire up the ASF to QuickTime file process. Your Mac machine needs lots of processing power for converting video smoothly. Don't work with other programs or browse the Web until it's finished. Aftre that, you can open the output folder to check the files.
Done! You're ready to view your new created files using QuickTime player.
