How to Convert M4V on Mac to Create WebM HTML5 Format
It is eye-catching that watching a high-definition movie via HDTV on a wide screen, and there are changes that you have got quite a few movies ended with .wmv file extension from the Internet or somewhere else stored on your computer, and you try to play through your Apple TV (the latest Apple TV 4 included) with big screen. However, you will fail to do this playback.
Actually, WMV(Windows Media Video) seems to be a pesky format for Apple users since it is Microsoft's proprietary file format that Apple's Mac OS X system and iOS devices including Apple TV don't support this format. Hence, to sync your favorite WMV movies to Apple TV through iTunes or via Airplay, you'd better to convert WMV to Apple TV compatible formats at first.
If you have no idea about what to do temporarily, you can take the Video Converter for Mac into consideration, which gives you quick access to all conversion options available in an one-stop interface. With a full-fledged storehouse of a long list of formats, this utility lets you convert various audio and video formats into various other formats and takes good advantages to convert your WMV file(s) into Apple TV readable MP4, MOV or M4V at a time effortlessly and flawlessly.
In addition, it provides a wide range of specific devices with presets to fit for your conversion needs, including a series of Apple products, Android smart phones & tablets, TVs, and multimedia players.
Step 1: Add WMV File(s)
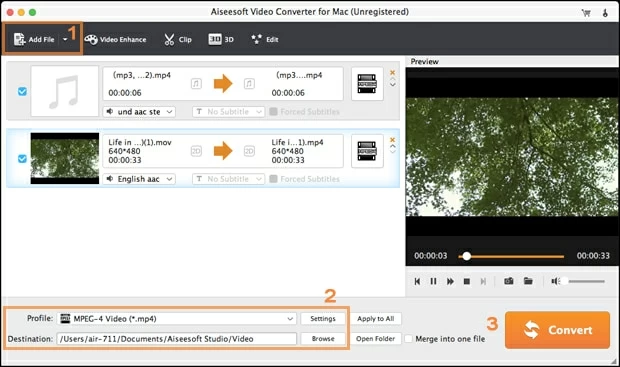
A click of "Add File" button located at the upper-left corner to navigate to the WMV video files on your Mac that you want to stream to Apple TV and upload to the program. Or simply drag and drop the source file to the middle pane of the interface.
On the lower right position, there is an option "Merge into one file", allowing you to join several video clips together.

Step 2: Set Target Preferences
Until you get familiar with how it all works may I suggest you stick with the Apple TV preset. This will guarantee it will be workable and the preset gives pretty much the best output for Apple TV anyway.
Simply click on Profile drop-down arrow to open the format selection dialog, and move mouse cursor to Apple TV category and then select your ATV model as the output format among a group of optimized preset profiles listed on its expanding panel.

Instead, you can select a particular ATV-friendly format, like H.264/MPEG-4 AVC Video (*.mp4) under General Video column.

Click Settings (near Profile) to access the advanced options. You can fine tune a number of quality parameters shown as below window, including the resulting bit rate, encoder, sample rate, frame rate, etc. This is optional.

Step 3: Start WMV to Apple TV Conversion
Now comes the last part.
Click "Browse" icon near Destination field at the bottom of the main interface to specify a destination directory where you want your converted files saved in.
When you're satisfied with the settings for the resultant file, hit "Convert" button to let go the WMV conversion to ATV-acceptable format. You'll see the progress while the converting process is taking place. The amount of time will vary depending on the size and length of the video as well as your Mac's processor.
Success! The steps on converting WMV for Apple TV playing on Mac are just as easy!

Step 4: Stream and Play Converted Video on Apple TV
After the conversion is finished, you can open the folder location on your Mac computer to get the converted movies and use iTunes or Airplay to stream on Apple TV, enjoying in the comfort of your home entertainment system. Have a great time!