
Transfer Songs to iPhone without iTunes

Transferring photos from Mac to iPhone is easy when you follow the steps in this guide, whether you choose to use a cable, cloud services, or third-party transfer tools.


Explore quick and easy ways for Mac-to-iPhone photo transfer, either with a cable or wirelessly.
Transferring photos from Mac to iPhone is a quick and simple way to access your favorite pictures on the go. Whether you want to transfer an entire picture folder or only essential images, there are quite a few ways to import photos from your Mac to iPhone Photos Library directly.
From a USB cable connection to using cloud-based services, this guide covers several different methods on how to transfer photos from Mac to iPhone, ensuring you can enjoy your precious memories wherever you are.
Table of contents:
Whether you're transferring bulk photos or individual images, iPhone Data Transfer simplifies the process of moving photos between a Mac and iPhone without any quality loss.
Typically, there are two common ways to transfer photos from a Mac to an iPhone — using a USB cable or wireless cloud services.
With these wired and wireless options, you can easily move your pictures from Mac to iPhone and enjoy them anytime you want.
While Apple's iCloud syncs Mac photos with iPhone simultaneously, it doesn't allow you to add specific pictures. For those who don't have enough iCloud storage or want to transfer their photos from Mac to iPhone selectively without iCloud, these cable-based methods can be helpful.
To import photos from your Mac to iPhone, iTunes or Finder is a convenient way. By using a USB cable, you're allowed to transfer Mac photos to your iPhone directly, whether it's your entire photo library or a specific folder of pictures.
Note:
Here's how to transfer photos from Mac to iPhone using a cable via iTunes/Finder:
1. Run Finder or iTunes on your Mac and connect your iPhone with a proper data cable.
TIP: For macOS Catalina 10.15 or later, use Finder. For macOS Mojave 10.14 or earlier, run the latest version of iTunes.
2. Select your iPhone from the left sidebar when it appears under Locations. If it's the first time you're adding photos to iPhone, unlock your device and tap Trust on the screen to allow access.
3. Click Photos from the top toolbar. The photo syncing option won't show up here if the iCloud Photos is enabled on your iPhone.
4. Tick the checkbox next to Sync photos to your device from option.
5. Click the drop-down box and choose Photos, Pictures, or a local folder on your Mac.
6. Select the album(s) or folder(s) that contains the pictures you wish to move to your iPhone.
7. Hit the Apply button at the bottom to start transferring photos to iPhone.

Sync all photos or just selected folders on your Mac to iPhone, including the videos or not.
Once done, the selected photos will be transferred to your iPhone and replace all content in Photos Library. To prevent data loss, try the following method to move photos from Mac to iPhone without iTunes in a simpler way.
Whether you're looking to transfer a large photo library, specific pictures, or multiple folders, the all-in-one tool — iPhone Data Transfer offers an easy and quick solution to move photos from Mac to iPhone/iPad with just a few clicks.
This iPhone photo transfer tool is user-friendly, enabling you to effortlessly add photos from your Mac to your iPhone Photos Library without losing quality. It supports various formats like JPEG, HEIC, PNG, and more, and automatically detects incompatible images, converting them to iOS-friendly formats for seamless viewing and sharing.
Compatible with all iOS versions and devices, here are the steps to transfer photos from Mac to iPhone without using iTunes or iCloud:
Step 1: Launch iPhone Data Transfer on Mac and connect your iPhone.
Run this software on your Mac, MacBook or iMac, and link your iPhone using a USB or Lightning cable. If asked, enter your passcode and let your iPhone trust this computer.
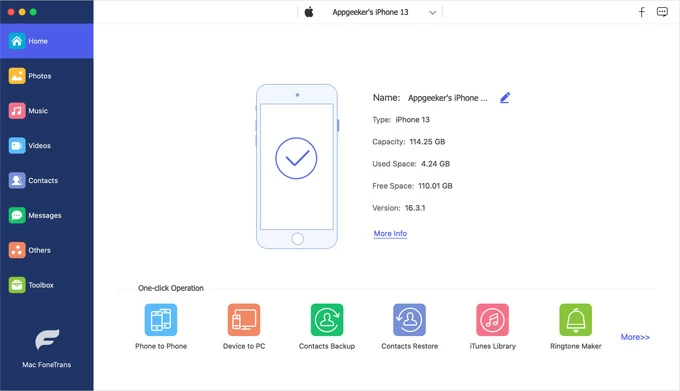
Step 2: Click Photos from the left menu.
From here, you're able to access your iPhone's Photos Library and manage all the pictures and videos in your camera roll and other albums.

Step 3: Add pictures from Mac to iPhone.
Click the + button at the top, and select Add File or Add Folder to choose your desired photos or picture folder on your Mac. Alternatively, you may drag and drop the photos from your Mac to this iPhone Photos window directly.

It will quickly transfer your photos to your iPhone without overwriting any existing data in your Photos app. Additionally, it supports transferring music, videos, messages, and other data between iOS devices and Mac/PC. For transferring music from Mac to iPhone, check out this separate guide.
A wired connection can import photos to iPhone easily. But it doesn't mean that there's no other way to transfer pictures from Mac to iPhone wirelessly. To make it, the most convenient way is to use the Apple-supported iCloud, AirDrop, and other cloud-based services.
iCloud Photos has made it simple to transfer Mac photos to iPhone wirelessly. When iCloud Photos is enabled on both devices, your videos and photos from Mac will automatically sync to your iPhone and other iCloud-connected devices, offering real-time access in the Photos library.
Before moving photos from Mac to iPhone:
There are two ways to transfer photos from Mac to iPhone: automatic syncing via iCloud Photos app or manually uploading photos through the iCloud website.
Use iCloud Photos app to sync Mac photos to iPhone
Step 1. Turn on iCloud Photos on Mac.
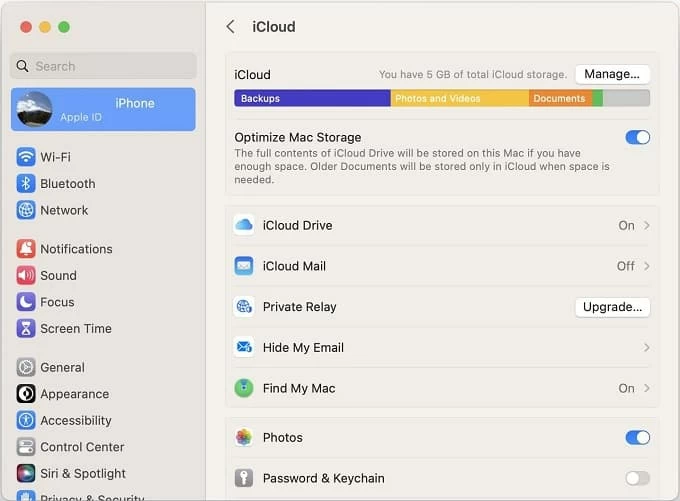
Step 2. Enable iCloud Photos on iPhone.
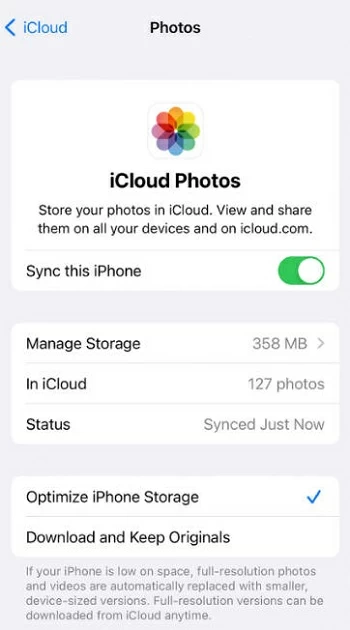
Step 3. Access Mac photos on your iPhone.
Note that if you delete pictures on your device or iCloud, they are also deleted from all iCloud-linked devices. See how to retrieve iPhone photos from iCloud.
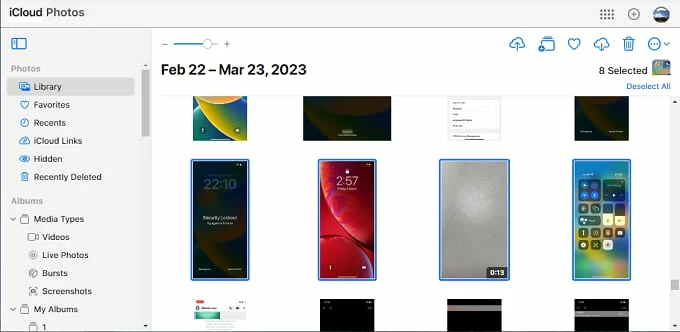
Use iCloud Photos website to upload photos from Mac to iPhone
Another option is using iCloud website to upload the photos on your Mac, and then download to your iPhone. To quickly get photos from your Mac to iPhone through iCloud Photos website:
When the pictures are added to iCloud Photos successfully, you can easily check them in the Photos app on your iPhone and any of your iCloud-enabled devices.
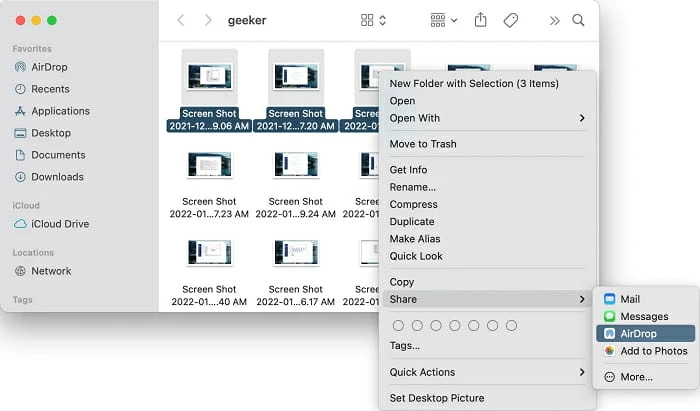
Introduced in Apple ecosystem, AirDrop is an excellent option for wireless photo transfer from Mac to iPhone if you just want to move a couple of pictures. Ensure that your Mac and iPhone have AirDrop enabled and set it to receive from Everyone. Place them near each other within the Bluetooth and Wi-Fi range, and here's how to AriDrop photos from Mac to iPhone:
Step1. Enable AirDrop on Mac.

Step 2. Turn on AirDrop on iPhone.
Step 3. Select and AirDrop photos from your Mac to iPhone.
If you have thousands of photos to move, iPhone Data Transfer would be a better option for bulk transfer in no time.
Google Photos is an ideal pick for those who want to transfer photos from their Mac to their iPhone without cable or iCloud. It provides each user with 15 GB of free cloud storage, which is much larger than iCloud offers. Just install it on your Apple devices and ensure there's enough storage for the photos you prefer to transfer from Mac to iPhone. Here's what to do:
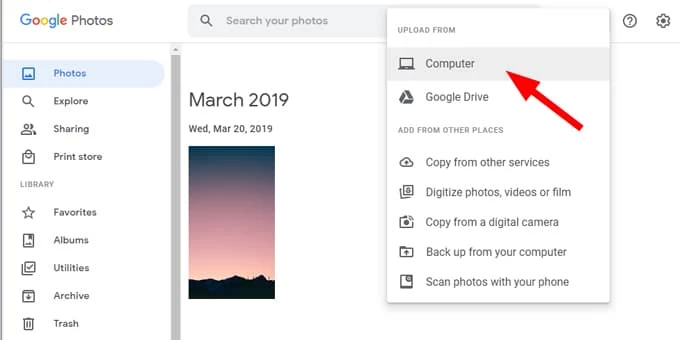
You may also drag and drop your pictures or videos here to upload.

Hopefully, these methods can help you transfer photos from your Mac to your iPhone either with or without a cable. If necessary, they can also help with the photo transfer from Mac to iPad. If you still have trouble in moving pictures to iPhone, check out these FAQs:
Q1. Why can't I transfer photos from Mac to iPhone?
When transferring photos with a wired connection, make sure you're using a rightful USB or Lightning cable and allow your iPhone to trust your computer if anything required.
When using cloud services, check if there's enough cloud storage for the pictures and videos you want transfer. Ensure both your Mac and iPhone are connected to a stable Wi-Fi network.
If you're sharing photos with AirDrop, make sure to put your Mac and iPhone close to each other.
Q2. Can I transfer photos from Mac to iPhone without iCloud?
Yes. There are multiple non-iCloud options that can transfer pictures and videos from Mac iPhone:
Q3. How do I transfer photos from my Mac to iPhone without using a cable?
Many cloud-based services allow for wireless transfer of photos from a Mac to an iPhone. For example, you can use iCloud Photos, Google Photos, Dropbox, and other cloud storage drives. Also, Apple's AirDrop feature enables Mac users to share photos with their iPhone wirelessly.
Q4. I have thousands of pictures on my Mac. How can I transfer them to my iPhone's Photos Library?
If you have a large library of photos and videos on your Mac, the iPhone Data Transfer can be an efficient option to move all pictures to your iPhone in minutes. Simply follow these quick steps: