
iPhone Is Unavailable. How to Unlock It

Looking to import photos from your iPhone to a Windows 10 PC? Here are 5 easy ways to transfer your iPhone pictures instantly, whether using a USB cable or wirelessly.

Transferring photos from iPhone to Windows 10 allows you to access your iPhone pictures on PC for local viewing and editing on a larger screen. Whether you prefer to free up space on your device, back up important photos and videos, or manage your Photos Library in one place, there are multiple ways to help you transfer iPhone photos to Windows 10 seamlessly.

It's extremely easy to get photos off iPhone to a Windows 10 PC or laptop, either wired or wirelessly.
Typically, there are two common ways to transfer photos from iPhone photos to Windows 10: use a cable or wirelessly.
Let's explore these reliable ways to get photos from your iPhone to Windows 10 PC quickly:
Table of contents:
Compatible with all iOS-format pictures and videos, iPhone Data Transfer allows for bulk and selective photo transfer from iPhone to Windows 10 and vice versa, all in their full quality.
Using a proper USB cable or Lightning cable, you can securely connect your iPhone to Windows 10 for direct photo transfer, without using iCloud or other services.
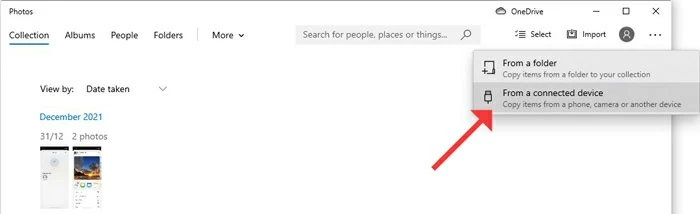
The pre-installed Windows Photos app on Windows 10 allows you to import photos from iPhone directly via a wired connection. Once connected, you can preview the current pictures and videos on your device and transfer specific iPhone photos to a local Windows 10 folder. Preparing a USB cable, here's how to import photos from iPhone to Windows 10 PC via Photos app:
Step 1. Connect your iPhone to PC with a USB cable.
Plug your iPhone to your Windows 10 PC using a compatible USB cable. If asked, enter your passcode and tap Trust for access permission.
Step 2. Open the Photos app on Windows 10.
If the Photos app doesn't open automatically, click the Start button, type Photos, and select the Photos app to open it.
Step 3. Preview and select the photos on iPhone.
In Photos app, click the Import button in the top-right corner, select From a connected device and target your iPhone; when it loads the pictures on your iPhone, preview and select the photos you want to transfer.
Step 4. Import iPhone photos to Windows 10 folder.
Click on Import, select an Import to folder, and confirm with Import items button. These iPhone photos will transfer and save to your Windows 10 PC instantly for local access.
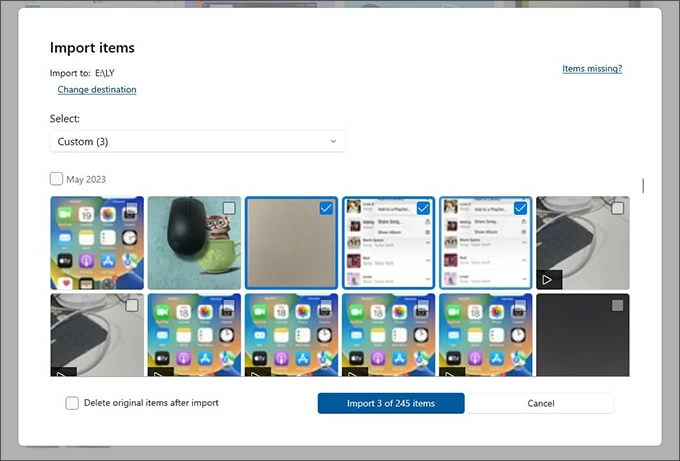
You may choose to keep or delete the original items on your iPhone after import. If you accidentally delete some pictures, check this to recover permanently deleted photos on iPhone.
File Explorer is another built-in tool on Windows 10 for photo transfer from iPhone. Based on a cable connection, it enables you to copy photos from iPhone to Windows 10 local folder easily.
The process is quite simple and straightforward. However, note that File Explorer will sort iPhone photos by month instead of by your current albums, which takes some time to find your desired pictures. Steps to transfer iPhone photos to Windows 10 via File Explorer by copy-n-paste:
1. Connect your iPhone to Windows 10 PC using a USB cable. If required, agree with Trust on Trust this computer prompt.
2. Open a File Explorer folder and navigate to This PC from the left side.
3. Under Devices and drives, select Apple iPhone to access your iPhone pictures.
4. Double-click to open Internal Storage > DCIM folder, where your iPhone photos will be stored separately in different folders from month to month.
5. Locate the images or picture folder you want, press Ctrl key and click to select them.
6. Right-click on the selected photos and choose Copy from the expanded menu.
7. Open a local folder on Windows 10 to paste the iPhone photos you just copied.
TIP: The photos not taken by your iPhone will NOT appear in the File Explorer. To transfer other downloaded and extracted pictures, check the next method.

Whether you're looking to import your entire Photos Library or just some selected pictures and albums, the reliable tool - iPhone Data Transfer enables bulk transfer of photos from iPhone to Windows 10 / 11 or vice versa in their original quality.
This cross-platform data transfer tool is compatible with all iOS-format pictures and videos, including HEIC, JPEG, PNG, Live Photos, and more. Plus, it has a built-in HEIC Converter that converts iOS photos to common JPEG and PNG formats, so you can enjoy better compatibility and wider use after transferring the iPhone photos to your Windows 10 PC or laptop.
With simple clicks, here's how to transfer iPhone photos to Windows 10 without iCloud or iTunes, supporting all iOS versions and models:
Step 1. Open iPhone Data Transfer on Windows 10 and connect your iPhone.
Link your iPhone using a proper USB cable. If your iOS device prompts with Trust This Computer message, tap Trust and follow the instructions to verify your passcode.

Step 2. Access iPhone Photos for preview and selection.
From the left menu, navigate to Photos where you'll view all current photos and videos in your iPhone Photos Library; select the photos you want, or simply click Check All at the top.

Step 3. Import photos from iPhone to Windows 10.
Click the computer icon for Export to PC option; in the pop-up window, select a location to save the transferred iPhone photos on your Windows 10 PC.

Once done, these iPhone photos will get to your Windows 10 seamlessly, allowing for local access, viewing, editing, and sharing. If necessary, you may delete the original photos after transfer to free up iPhone storage. It also helps to import photos from iPhone to Windows 11 PC.
Aside from wired transfer, there are cloud-based services like iCloud Photos that support wireless photo transfer from iPhone to Windows 10 without a cable.
Preset on Apple ecosystem, iCloud Photos can automatically sync your entire iPhone Photos Library with your Windows 10 PC / laptop, and all devices linked to the same Apple ID, including iCloud.com. That is, you can access your iPhone photos from your Windows 10 PC in real time as long as there's a stable Wi-Fi network and enough iCloud storage space.
To share iPhone photos with your Windows 10, turn on iCloud Photos syncing first:
Next, link your Windows 10 machine to iCloud Photos for full access to your iPhone pictures. There are two ways to make it:
The iCloud for Windows app helps you download iPhone photos to Windows 10 wirelessly.
1. Download and install the latest version of iCloud for Windows on your computer.
2. Open iCloud for Windows and sign in to your iCloud account with the same Apple ID and password used on your iPhone. It may ask you to verify your identity for security.
3. Select the checkbox next to Photos, and click the Options button.
4. Check iCloud Photos Library box to enable it.
5. Tick Download new photos and videos to my PC option and set a Windows 10 location to save your iPhone photos. If needed, tick Keep high efficiency original if available as well.
TIP: If you also want to transfer photos from PC to iPhone through iCloud, tick Upload new photos and videos from my PC option.
6. Hit Done > Apply to save the settings.

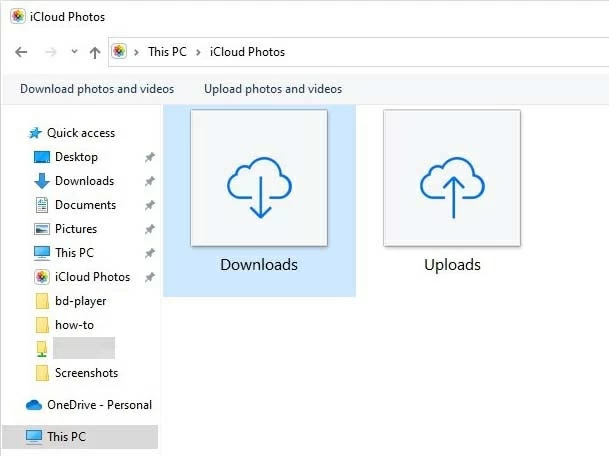
After that, open This PC on File Explorer and double-click iCloud Photos > Downloads. Here, you can access all downloaded iPhone photos on your Windows 10 for any future use.
Besides the automatic syncing with iCloud for Windows app, it's also possible to manually get photos off iPhone to Windows 10 using iCloud.com.

Note: While iCloud Photos supports wireless iPhone photo transfer to Windows 10, keep in mind that the free iCloud storage you can use is 5 GB only. To move a large Photos Library, consider upgrading to iCloud + for additional storage.
With these wired and wireless options, you now have the ability to transfer your photos from iPhone to Windows 10 computer easily and quickly. If your iPhone photos cannot transfer to your Windows PC successfully, check these potential causes and fixes:
Check USB cable connection
Ensure your iPhone is connected with a correct USB or Lightning cable. Additionally, enter your passcode and trust this computer when you're asked to. If failed, unplug your iPhone and re-connect it later or use a different data cable.
Check network connection
When transferring iPhone photos via iCloud or other cloud-based solutions like Google Photos or Dropbox, make sure both the iOS device and Windows 10 machine are connected to an active and stable Wi-Fi network.
Check storage space
If you're moving a large number of pictures and videos, ensure your Windows 10 computer has enough storage space to save them all.
If you're using cloud services like iCloud Photos or Google Photos to transfer your iPhone photos across platforms, sufficient cloud space is also required to ensure seamless syncing.
To import all photos from an iPhone to a Windows 10 PC, you can do it with a cable or wirelessly:
Enable iCloud Photos on iPhone to sync your whole Photos Library across iOS and Windows wirelessly, without needing a cable:
The cable-based tool iPhone Data Transfer offers a one-click shortcut to get all photos off your iPhone to a Windows PC directly without iCloud or iTunes: