How to Get Photos from iPhone to PC

Want to transfer music from your iPhone to your computer for free? Discover these easy methods to move your purchased & non-purchased songs effortlessly!

![]()
There are various free ways to transfer music from an iPhone to a Windows PC or Mac.
Transferring music from iPhone to computer doesn't have to be complicated or expensive. Whether you want to back up your music library, free up device space, or simply move your favorite songs, there are several free methods to transfer music from iPhone to computer.
In this guide, we'll guide you through multiple ways to help you transfer iPhone music to PC or Mac for free. Whether using iTunes, cloud services, or other simple transfer tools, you'll the find the method that works best for you. Let's get started!
For effortless music transfer, iPhone Data Transfer offers a fast way to move your songs from iPhone to a Windows PC or Mac, either selectively or in bulk, without any loss of quality.
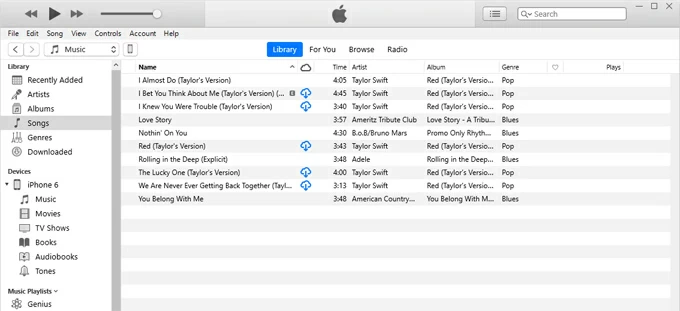
Officially supported by Apple, iTunes is a free option to import music purchased from the iTunes Store or Apple Music. With a cable connection, you can easily transfer all purchased songs from your iPhone to computer for local playback, working for both Windows PC and macOS.
Note:
To transfer purchased music from iPhone to computer with iTunes free, here's how:
Step 1. Connect your iPhone with your PC or Mac.
Step 2. Transfer songs from iPhone to iTunes Music Library.
![]()
Step 3. Download iPhone music to your computer.
However, this method only works for music bought from iTunes or Apple Music. It can't transfer songs imported from CDs, downloaded from other sources, or received from other devices.
To transfer your non-purchased songs, iPhone Data Transfer provides a seamless solution. This all-in-one tool allows you to move music between your iPhone and Windows PC or Mac without any quality loss, including downloaded tracks, existing playlists, MP3 files, music videos, and more. It can also detect incompatible music files and convert them into a compatible format, ensuring smooth playback after the transfer.
Beyond music, it supports transferring various data files between iOS and Windows/macOS, such as photos, videos, messages, contacts, etc. With its powerful features and intuitive interface, iPhone Data Transfer would be an excellent choice for iPhone-to-computer music transfer, whether you want back up your favorite tracks or free up space on your device.
Compatible with both Windows and macOS, here's how to transfer music from iPhone to computer without iTunes using a free version of iPhone Data Transfer:
Step 1. Launch iPhone Data Transfer on your PC or Mac and connect the source iPhone via a USB cable. If needed, enter your passcode and trust this computer.

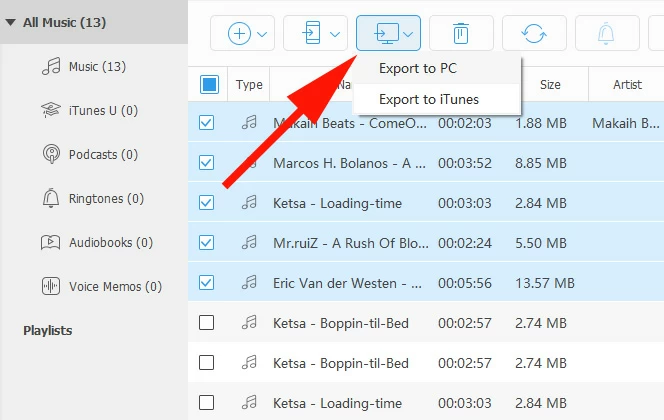
Step 2. Navigate to the Music tab in the left menu. This lets you access and manage the current music library on your iPhone.

Step 3. Select the iPhone music you wish to transfer to your PC or Mac. You may check individual tracks, playlists, or check all music files.
Step 4. Click the computer icon at the top and choose Export to PC to transfer music to your computer. In the pop-up window, select a destination to save the transferred songs locally.
If necessary, use the Find duplicate songs feature (in the top toolbar) to remove duplicates from your iPhone, or delete the original tracks after transferring the music to your computer.
The free version limits the number of songs you can transfer. If you need to move a large music library, consider upgrading to unlock unlimited transfers. It also supports music transfer between iPhones, making it a great option when switching to a new device.
Cloud services, such as iCloud, Google Drive, and Dropbox, offer free cloud storage that allows you to sync music across devices linked to the same account, so that you're able to transfer your music from iPhone to computer without charges.
If you have iCloud Drive enabled, you can download your iPhone music to your computer by logging into iCloud on a web browser (iCloud.com) and saving the music files on your PC or Mac for offline playback. The process relies on a stable Wi-Fi network and enough iCloud storage. Here's how to transfer music files from iPhone to computer using iCloud for free:
TIP: iCloud offers only 5GB of free storage. If you're running low on space, consider upgrading to iCloud+ for additional storage.
1. On your iPhone, move to Settings > your Apple ID > iCloud.
2. Tap Drive (or iCloud Drive) and then turn on Sync this iPhone toggle.
3. Switch to the app where your music files are stored, and move them to the Files app.
4. Open Files app, tap three dots > Select to choose the music files you want to transfer.
5. Tap the folder icon at the bottom and move them to your iCloud Drive.

6. On your computer, visit iCloud.com and log in with the same Apple ID used on your iPhone.
7. Once in, click the iCloud Drive option.
8. Browse the music files to select and click the Download button in the upper-right corner.

This way, the music files on your iPhone will be downloaded to your computer. If there's a large amount of music to transfer, services like Google Drive offers more available storage.
Exclusive to Apple devices, AirDrop offers a fast and free way to wirelessly transfer music from your iPhone to your Mac, especially for a few tracks. Simply ensure both devices are within Wi-Fi and Bluetooth range. Here's how to share music from iPhone to Mac using AirDrop:
Step 1. Enable the AirDrop on Mac.
Open a Finder window on your desktop, select Go > AirDrop and allow it to be discovered by Contacts Only or Everyone.
Step 2. Turn on AirDrop on iPhone.
Swipe down from the top edge of your iPhone to access the Control Center, tap AirDrop icon to enable it, and long-press on AirDrop and set it to Everyone or Contacts Only.

Step 3. Share music from your iPhone to computer.
On your iPhone, locate the songs you prefer to transfer, press on them and select Share button; from the sharing options, select AirDrop and target your Mac when it appears in nearby devices.
When an AirDrop message shows up on your Mac, select Accept to save the music files shared from your iPhone.

You can also transfer all your iPhone music to your computer for free by creating a full backup of your device with iTunes. However, keep in mind that this method doesn't allow selective transfers, and the backed-up music won't be directly accessible. Follow the steps to back up your iPhone music with computer using iTunes:
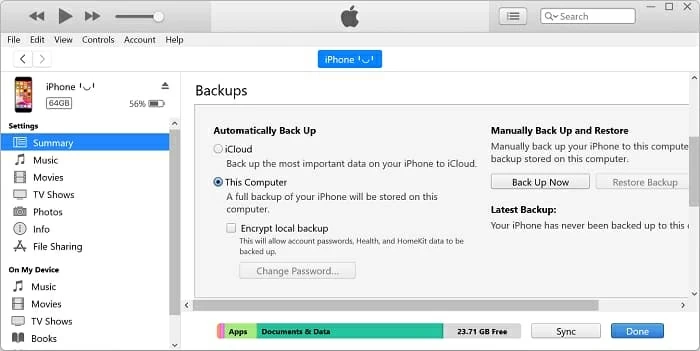
This will back up your iPhone data with your computer, including all existing music. You may restore the music to your iPhone or another iDevice if you accidentally delete important tracks.
For a more convenient solution to transfer your music selectively with a clear preview, check out the iPhone Data Transfer method above.
Another free option is emailing the songs to yourself, which allows quick transfer of music from your iPhone to a Windows PC or Mac. However, email services typically have attachment size limits, so you may need to send multiple emails to transfer all your music files.
Q1 - Can I transfer music from iPhone to a computer without iTunes for free?
Yes, you can use iCloud Music Library, free versions of third-party tools (like iPhone Data Transfer), or cloud services (iCloud Drive, Google Drive) to transfer iPhone music without iTunes for free.
Q2 - Can I transfer non-iTunes music from iPhone to my computer for free?
Yes, some tools, like iPhone Data Transfer, offer a free version that lets you transfer non-purchased music from your iPhone to a Windows PC or Mac at no cost. However, the free version limits the number of music tracks you can transfer.
Q3 - How do I transfer my music from my iPhone to a Windows 11 PC?
Q4 - Why can't I transfer my iPhone music to my computer?
Several factors can prevent a successful music transfer:
If these don't work, try iPhone Data Transfer for a quick and direct way to move music from your iPhone to your computer in just a few clicks.