How to transfer music to iPhone without iTunes - 5 Ways

Check these easy solutions to transfer music from iPhone to Windows 11 with wired or wireless methods. Works for both purchased and non-purchased songs.


Explore these efficient ways to transfer songs from iPhone to Windows 11 PC with or without cable.
Do you have a large music collection on your iPhone that you'd like to enjoy on your Windows 11 PC or laptop? Whether to free up storage space, create a backup, or simply listen to your favorite songs offline on your computer, transferring music from iPhone to Windows 11 is a great solution to enlarge your local music library.
While iTunes can transfer purchased Apple music, it doesn't support non-purchased tracks. But no worries — there are multiple wired and wireless ways to transfer music from iPhone to Windows 11, including both purchased and non-purchased songs.
In this guide, we'll walk you through the most convenient methods for seamless music transfer from iPhone to Windows 11, ensuring smooth local playback without quality loss. Let's dive in!
Table of Contents
The efficient tool iPhone Data Transfer enables effortless transfers of non-purchased music across iOS and Windows 11/10 without using iTunes.
Supported by Apple official, iTunes is a quick solution to transfer purchased music from iPhone to Windows 11, whether for offline listening or local backup. This method works via a wired connection. You can simply connect your iPhone to Windows 11 for music transfer, syncing all your purchased songs, playlists, and albums directly.
However, note that iTunes can only transfer the songs purchased from Apple Music or iTunes Store. To move songs extracted from other sources, check the next method instead.
Steps to transfer Apple music from iPhone to Windows 11 via iTunes:
Step 1. Run the latest version of iTunes on Windows 11. You may download the newest iTunes from Apple's official website or get it from Microsoft App Store.
Before music transfer, authorize your Windows 11 PC through Account > Authorizations > Authorize This Computer > Authorize.
Step 2. Connect your iPhone to computer via a proper USB cable. If asked, enter the passcode and allow your device to trust this computer. Seek fixes if you forgot your iPhone passcode.
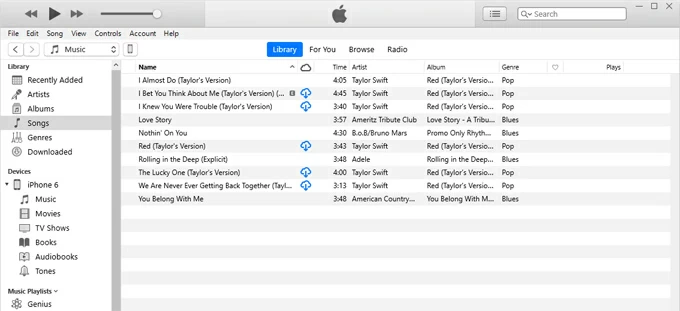
Step 3. From the top toolbar on iTunes, select Files > Devices > Transfer Purchases from your iPhone. All your purchased iPhone music will move to iTunes Library automatically.
![]()
Step 4. Check Recently Added tab on the left side of iTunes window. The music tracks added just now will display in the list.
Step 5. Find your desired song and click the Download button next to it. This will download iPhone music from iTunes to your Windows 11 PC or laptop for offline listening.
It may take a while to get all songs from your iPhone to Windows 11, depending on the amount of music you're transferring.
If you're looking for an easy way to transfer non-purchased music from iPhone to Windows 11, the cross-platform tool iPhone Data Transfer is a powerful way to make the process hassle-free.
This all-in-one tool supports various iOS music files, including non-Apple purchased songs, playlists, MP3s, ringtones, music videos, extracted audio files, and more. With just a few clicks, it lets you bulk transfer music from iPhone to Windows 11 PC or laptop without needing iTunes.
Whether you want to move your entire music library or just individual songs, it ensures seamless transfer without quality loss. Here's how to transfer music from iPhone to Windows 11 without iTunes effortlessly, working for all iOS versions and models:
Step 1: Launch iPhone Data Transfer on PC and connect your iPhone via a USB cable.
Once connected, unlock your iPhone and tap Trust on the Trust This Computer notification.

Step 2: Navigate to Music tab from the left-side menu.
From here, you'll view all current songs and playlists in your iPhone's Music Library. You may manage the content before transferring the music you want.

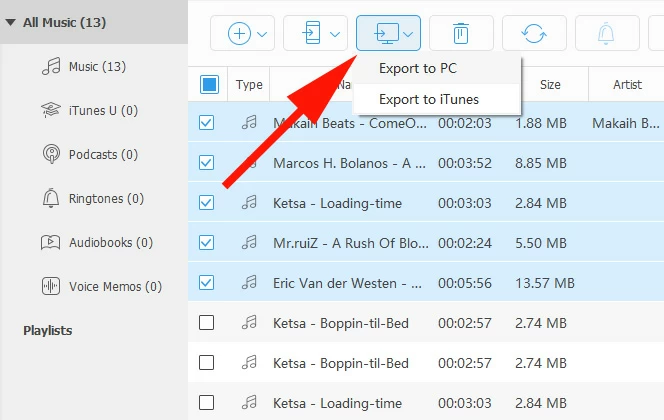
Step 3: Transfer iPhone music to Windows 11 folder.
Tick the checkboxes to select the songs you prefer to transfer, then click the computer icon at the top toolbar and choose Export to PC. When it prompts, specify a location on your Windows 11 to save all transferred iPhone music.
TIP: If you select Export to iTunes, the iPhone music goes to your iTunes Library instead.
If necessary, you can also use it to transfer music from Windows 11 to iPhone and enjoy your favorite songs on the go.
In addition to the cable-based methods, there are several wireless options for iPhone to Windows 11 music transfer without needing a cable.
While iTunes transfers purchases from your iPhone through a cable, it also allows you to download music from iPhone to Windows 11 wirelessly with an Apple ID. That is, when you purchase songs on iPhone, you can log in to the same Apple account in iTunes to sync your current iPhone Music Library and download those purchased songs to your Windows 11 computer for local playback.
Keep both platforms connected to a stable Wi-Fi network. Here are the steps to transfer music to Windows 11 from iPhone using your Apple ID:
1. Open the latest iTunes on your Windows 11 desktop.
2. Select Account from the top menu on the iTunes window.
3. Click View My Account and ensure you're signed in with the same Apple ID used on iPhone.
4. If you are not signed in, click Sign In instead and log in to your Apple Music account using the same Apple ID and password.
5. Then, click Account again and choose Purchased.
6. Check Not in My Library tab. It will display the songs you've purchased on your iPhone but not in your iTunes Library.
7. Select the songs you wish to transfer from iPhone to Windows 11 and click Download icon.
Once done, the music on your iPhone will transfer to Windows 11, ready for offline playback. Note: This method doesn't support the music not purchased from Apple Music or iTunes Store.
Alternatively, cloud services, like iCloud Drive or Google Drive, offer online storage to transfer music across iPhone and Windows 11 PC without a cable. You can upload music files from your iPhone to cloud drive, and then download the songs to your Windows 11's local folder.
To ensure successful music transfer, make sure you're using the same account on both iOS and Windows and that there's enough cloud space for all song tracks you're planning to move. Here's to use Google Drive for music transfer from iPhone to Windows 11 wirelessly:
Afterward, you may access and play the iPhone music on your Windows 11 PC offline. Keep in mind that the transfer steps may differ, based on which cloud service you're using.

With these easy and efficient options, transferring iPhone music to a Windows 11 PC is a breeze. Whether using a cable or not, you can transfer both purchased and non-purchased songs from your iPhone to your PC for seamless playback.
Q1. Can I transfer music from my iPhone to Windows 11 PC without iTunes?
Yes, it's possible to transfer music from an iPhone to a Windows 11 PC without using iTunes.
Q2. How do I transfer my iPhone music to my Windows 11 PC without cable?
If you have iTunes installed on your Windows PC, simply sign in with the same Apple ID that's used on your iPhone, and then download purchased songs onto your Windows 11 locally.
Alternatively, using cloud services like Google Drive, OneDrive, and Dropbox also allows you to wirelessly move music files from your iPhone to computer without iTunes.
Q3. Is there any way to I transfer non-purchased songs from my iPhone to my Windows 11 laptop?
Yes, tools like iPhone Data Transfer let users easily transfer non-purchased music from iOS to Windows 11/10 in minutes. The process is straightforward and requires no technical skills. Simply follow these steps:
After transfer, you'll be able to play your iPhone music on your Windows laptop at any time.
Q4. How can you transfer all purchased music from an iPhone to a Windows 11 PC?
Thanks to iTunes, it's easy to transfer purchases from iPhone to Windows PC all at once.