How to record FaceTime Call with Sound
Apple lets you manually or automatically transfer iTunes music to iPhone on Windows 11 PC. If you don't want iTunes to sync music with iPhone, you have other options.
How to transfer music from Windows 11 with or without iTunes:
Apple allows you to choose either automatic sync or manual method to transfer your iTunes music to iPhone.
One of the fundamental uses of iTunes for Windows 11 is to transfer media files, including music, from your PC to iPhone, iPad and iPod Touch. But users who are new to Apple's iTunes app might not yet know how to sync music from iTunes with iPhone automatically, as well as transfer music from Windows 11 PC to iPhone without syncing. Here we'll show you the detailed instructions to transfer your music to iPhone with iTunes in two ways.
For those who are not a fan of iTunes app and want to transfer music from Windows 11 to iPhone media library without using iTunes, we also introduce an excellent third-party program in this post to help you add or export music to and from iPhone without limitation.
Here's how to execute music transfer to iPhone with or without iTunes.
Table of Contents
Windows 10 and Windows 11 both don't have iTunes built in by default. Before learn how to use iTunes to add music to iPhone automatically or manually, check to see if the iTunes app is installed on your PC; if not, be sure to download it from iTunes webpage in Apple official site, or get iTunes for Windows 11 from the Microsoft Store.
If you have iTunes already installed on your Windows 11 PC before, you can head to Help > About iTunes to know which exact version you have. Ensure that it's running the latest version. If you have any available iTunes updates, you can keep it up-to-date through Help > Check for Updates.
Let's start with the easiest, simplest way for transferring music to iPhone from iTunes. It involves iTunes' automatic music sync feature. Here's how to do.
1. Connect the iPhone to your Windows 11 computer using a USB cable, and open iTunes. When prompted, tap Trust on your device screen to trust the PC for the first time.
2. Select the iPhone icon in the upper-left corner of the iTunes window once it's recognized.
![]()
Click the small device icon when it appears on iTunes.
3. On the left menu pane, select Music.

Checking the box next to Sync Music on iTunes will enable automatic transfer.
4. Check Sync Music option to enable automatic sync feature. (see image above)
5. Select Entire Music Library. This will enable the automatic transfer of all music to iPhone; to transfer only certain songs from iTunes library, select playlists, artists, albums, and genres instead. You then need to specify what music playlist, artist, album and genre you wish to transfer from iTunes on your Windows 11 computer.
6. To start automatically syncing music to iPhone from iTunes, click Apply at the lower right corner of window.
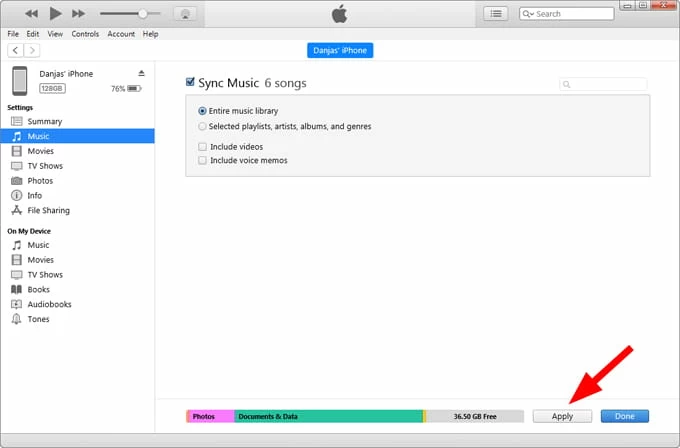
Click "Apply" button to save your settings and automatically sync music from an iTunes library on computer.
By design, music syncing with iTunes is one direction only, from iTunes on Windows 11 computer to iPhone. If you want to do a reverse task—from iPhone to iTunes library or local hard drive, you'll need to resort to a 3rd-party utility. We will discussion it later in this article.
Related article: How to Fix Unvailable iPhone
If you don't want to go with automatic sync with iTunes—a process which replaces all of music on your iPhone with your iTunes library, you may consider using iTunes to manually transfer music to an iPhone without syncing. This way, you can define what songs to be added to iPhone.
Follow these steps to manually transfer music to iPhone without syncing from Windows 11 computer.
1. Once your iPhone is connected to iTunes on PC, select the device icon in the upper left corner of iTunes screen.
2. Select Summary in the left menu pane.
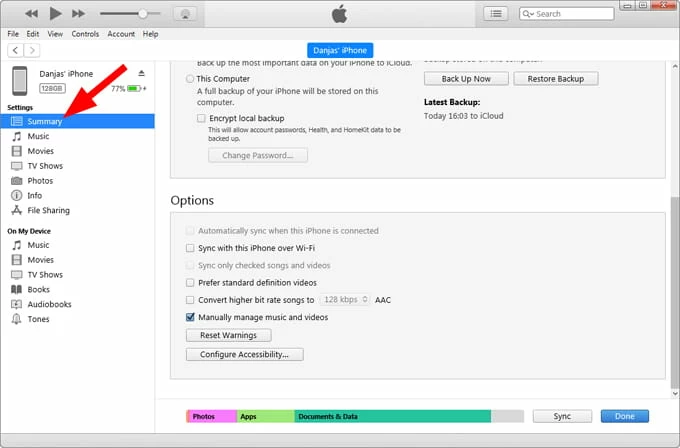
In Summary section, you will get option to manually transfer your music and playlists to iPhone.
Tip: it adds a status bar to the bottom of your iTunes window showing the number of Audio (songs), Photos, Documents & Data, and the free space left on the iPhone.
3. Scroll through the screen until you see Manually manage music and videos under Option section, select it.

Click "Manually manage music and videos" to disable automatic sync.
4. To save change, click on Apply button.
5. Click the back arrow at the upper left corner to go back to iTunes library.
6. In Songs list, select music you want to transfer. You may hold the Ctrl key to select multiple songs. You can also select from Albums, Artists or Genres list.

You can hold the selected songs and move to the left pane where the iPhone is listed.
7. Once selected, drag and drop it from Library to your iPhone on the left pane. Done!
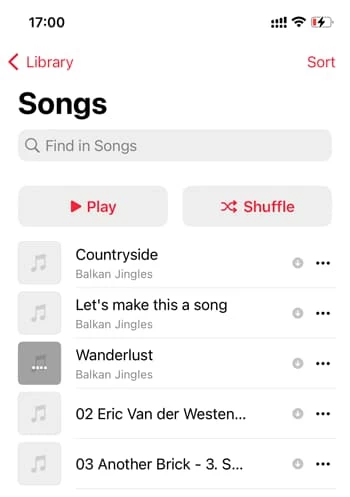
You'll find your transferred files under Library > Songs in Music app.
Related Article: How to Retrieve Deleted Text Messages on iPhone
If you're not a fan of iTunes app, or for some reasons, you try to transfer music from Windows 11 computer to iPhone but iTunes doesn't work, you may resort to a third-party solution like iPhone Data Transfer.
The program is more lightweight than iTunes, delivering a straightforward operation and fast, intuitive transfer of all your media files between computer and iPhone/iPad, and it is both Windows and Mac compatible.
Main features:
Once you have downloaded and install the software on your computer, you're ready for transferring music from Windows 11 laptop or PC to iPhone without iTunes.
Step 1: Connect iPhone to Windows 11 PC
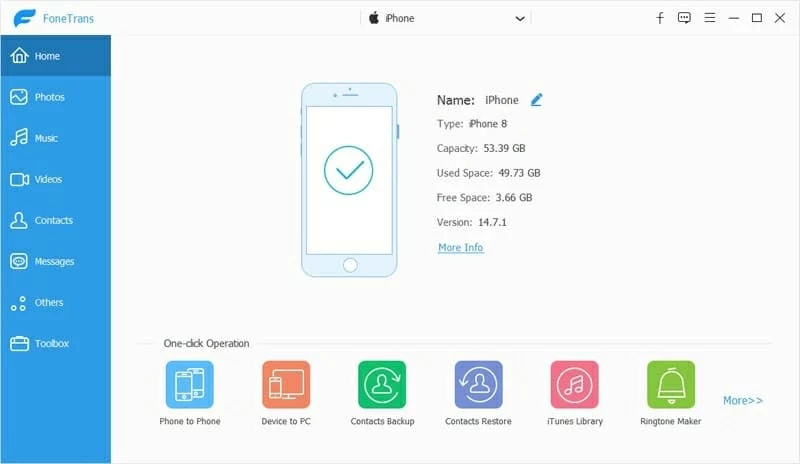
Plug your iPhone into your computer using a USB cable, and then launch iPhone Data Transfer. If iTunes opens automatically, close it.
Step 2: Open iPhone music library
Once connected, click the Music menu on the left pane. You will see your music library with all songs listed on the right pane.

Step 3: Add music from Windows 11 hard drive
To transfer songs from to your iPhone from your computer, hit the Add icon in the top left of the screen. In the opening dialog, navigate to your music folder and select your tracks, click Open.
Alternatively, simply drag-n-drop your songs from your local collections to the program window.

You don't need to care about what format the track is on your computer, the application can convert it automatically to an iOS friendly format while transferring to your iPhone.
Step 4: Play your song on Music app.
Now, you can listen to songs you just transferred on your iPhone.
That's how you use iPhone Data Transfer software to add music from computer to iPhone without using iTunes. It's pretty simple and easy.
Related Article: How to Screen Record on Windows 10