
How to Import Video from PC to iPhone without iTunes

From automatic syncing to selective sharing, you can transfer iPhone photos to iPad wirelessly or wired, with a variety of options to suit your needs.

Transferring iPhone photos to iPad lets you seamlessly access your pictures and videos on both devices. Whether you're looking to free up storage space or make a backup of your iPhone photos, Apple has made it easy to transfer photos from iPhone to iPad wirelessly or with a cable.

Transferring photos from iPhone to iPad can be easy, whether using a cable or wirelessly.
In this guide, we will show you how to transfer photos from iPhone to iPad in various ways, ensuring you can get your pictures and videos on a larger screen without hassle:
By following these methods, your iPhone photos will transfer to your iPad for seamless access, viewing, editing, and sharing.
When your iDevices are using the same Apple ID, it's incredibly easy to transfer iPhone photos to iPad automatically using iCloud Photos. With iCloud Photos enabled on both devices, all pictures and videos on your iPhone Photos Library will wirelessly sync to your iPad as well as any other device linked to your Apple account.
Ensure your iPhone and iPad are signed in with the same Apple ID and connected to an active Wi-Fi network. Here's how to sync photos from iPhone to iPad with iCloud Photos:
Note: There's only 5 GB of free storage in each iCloud account. If you have a large photo library, try upgrading to iCloud + for more cloud storage capacity or using the next method.
1. Open your iPhone and go to Settings > [your name] > iCloud > Photos.
2. Turn on the toggle next to Sync this iPhone (or iCloud Photos in older iOS). This will automatically upload and sync your iPhone photos with iCloud.
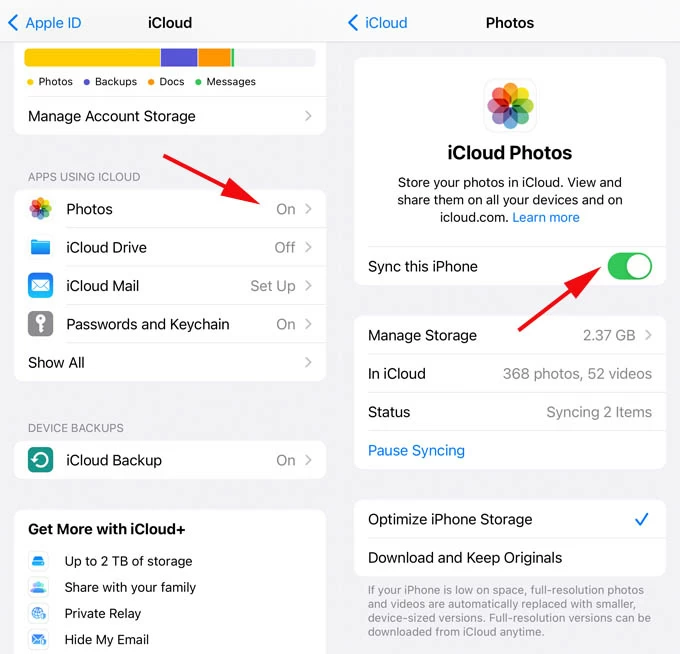
You'll see how much iCloud storage is used and how many pictures and videos are stored in iCloud.
3. On your iPad, head to Settings > Apple ID > iCloud and toggle on Sync this iPad option.
TIP: You may choose Download and Keep Originals to get iPhone photos on iPad in their full resolution, or select Optimize iPhone Storage to save storage space.
4. Open the Photos app on your iPad and wait for iPhone photos to sync from iCloud.
This way, all pictures and videos in your iPhone Photos Library are now accessible on your iPad. Plus, iCloud Photos also offers the recovery ability if your iPad photos disappeared.
If you're looking for a reliable and fast way to transfer photos from iPhone to iPad without relying on iCloud or iTunes, iPhone Data Transfer is the ultimate solution, especially when your iCloud storage is running out or your iDevices are with different Apple ID.
This user-friendly tool enables you to transfer photos directly between iPhone and iPad without Wi-Fi — whether it's your entire library or just selected pictures and albums. With support for unlimited bulk transfers, you can easily move thousands of iOS photos and videos in one go.
Additionally, it's fully compatible with all iOS image formats, including HEIC, JPEG, PNG, Live Photos, ensuring no quality is lost during the transfer. By simply using a USB cable, here's how to transfer pictures from iPhone to iPad without iCloud or iTunes:
Step 1. Launch iPhone Data Transfer your iPhone and iPad.

Step 2. Preview and select your desired iPhone photos to transfer.

Step 3. Get photos from iPhone to iPad.
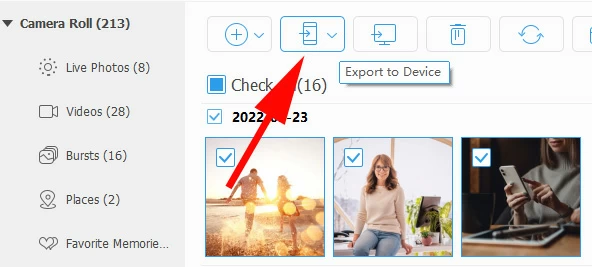
That's it! The photos on your iPhone will get to your iPad without iCloud in seconds. Additionally, it offers a one-click shortcut to transfer your entire Photos Library at once:


Aside from photos, it also works if you wish to transfer videos, music, contacts, messages, and other data files between iOS devices, or between iOS and Windows PC/Mac.
As a built-in feature on all Apple devices, AirDrop is the simplest way to transfer a few photos from iPhone to iPad wirelessly. The process is quick and straightforward, allowing you to share iPhone photos with a nearby iPad instantly and securely. To get started, make sure to enable AirDrop on your iPhone and iPad and place them within the range of Wi-Fi and Bluetooth.
Steps on how to share photos from iPhone to iPad wirelessly via AirDrop:
1. Turn on AirDrop on both iPhone and iPad.
Swipe down from the upper-right corner of your devices; when Control Center opens, long-press the AirDrop icon to enable it and set it to be discovered by Everyone or Contacts Only.
TIP: If either of your devices have Personal Hotspot on, turn it off first.

2. AirDrop photos from iPhone to iPad.
Open the Photos app on your iPhone, then tap Select from the top-right corner and choose the pictures you want to transfer to your iPad.
Tap the Share button at the bottom, choose AirDrop and select the target iPad from the detected nearby AirDrop devices.
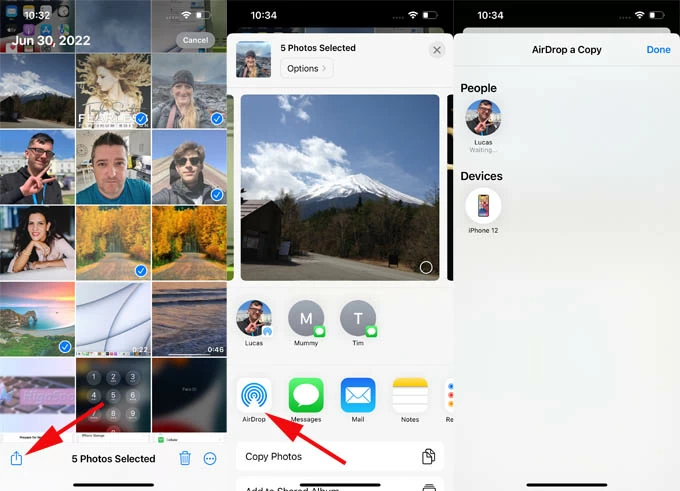
3. Accept the shared iPhone photos on iPad.
When AirDrop notification shows up on your iPad, tap Accept to receive the shared pictures and save them to your Photos Library directly for future access. It also works to transfer photos between iPhones without iCloud.
Another simple way to transfer photos from your iPhone to iPad wirelessly is to use the Shared Albums. It's a pre-installed feature in Photos app, allowing you to share specific pictures and video instead of the entire Photos Library with the people you invite. The shared iPhone photos are instantly accessible on your iPad and all devices subscribed to the album, and they can add their own photos, videos, and comments.
Steps for photo transfer from iPhone to iPad with Shared Album:
1. Enable Shared Albums: On your iPhone, go to Settings > [Your Name] > iCloud > Photos, then toggle on Shared Albums.

2. Create a shared album on iPhone: Open the Photos app on your iPhone, scroll down to select Shared Albums, tap on Create and enter a name for the album.
3. Invite your iPad (using the same Apple ID) as a subscriber: Tap Invite option and add your iPad as the recipient.
4. Add iPhone photos to the Shared Album: Tap Add Photos button and choose the images you'd like to share; then press Post to share it.

5. Join the Shared Album on your iPad: When a notification appears on your iPad, tap on it and tap Accept to save the shared album.
6. Download photos from iPhone's shared album to iPad: Open the newly shared album on your iPad, select the pictures you want and tap Share icon > Save Image to download them.

Note: If you delete the shared album, it's automatically removed from all your subscribed devices.
If you prefer a wired method, iTunes is a great option to transfer pictures from iPhone to iPad with a computer. By connecting your iDevices with computer, you can easily import iPhone photos to your PC or Mac and then sync them to your iPad by using iTunes.
Before transferring photos from iPhone to iPad:
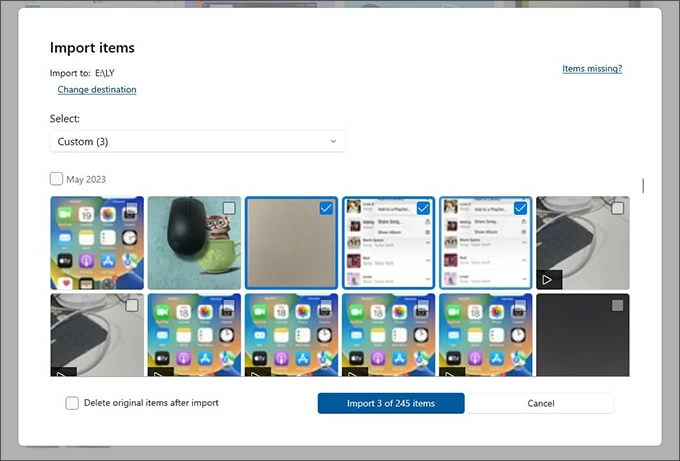
Step 1. Import photos from iPhone to computer.
Both Windows and macOS have a default Photos app that allows users to import photos and videos from an iPhone directly via a USB cable. The steps may vary slightly:
TIP: You may create a new folder to save the imported iPhone photos.
Step 2. Disconnect the source iPhone and connect your iPad.
Step 3. Sync photos to iPad from computer using iTunes.

1. How to sync photos from iPhone to iPad automatically?
For automatic iPhone photo transfer to iPad, iCloud might be your best option:
Ensure there's sufficient iCloud storage. iCloud will automatically sync all iPhone photos with your Mac. If you have a large photo library, consider subscribing to iCloud + for more cloud space.
2. Can I transfer photos from iPhone to iPad without using iCloud?
Yes, you can use Shared Albums or AirDrop to transfer specific photos and albums on iPhone to iPad without relying on iCloud.
For a more convenient option, the iPhone Data Transfer tool enables you to directly transfer all or just a selection of your photos from iPhone to iPad, and vice versa. All in a few simple clicks.
3. Why can't my iPhone photos transfer to iPad?
When using iCloud to sync iPhone photos with iPad automatically, ensure both your devices are signed in with the same Apple ID and connected to a stable network. Also, verify if there's enough iCloud storage to sync all your photos and videos.
If you're sharing photos by AirDrop, make sure to set your iPhone/iPad to discovered by Everyone and put them within their Wi-Fi and Bluetooth range.
4. How do I transfer all photos from my iPhone to iPad?
To transfer all pictures and videos, use iCloud Photos to sync your entire iPhone Photos Library to iPad. Or, use iPhone Data Transfer's one-click shortcut to transfer iPhone photos all at once with a single click.
5. How do I transfer photos wirelessly from iPhone to iPad?
Apple's iCloud Photos and AirDrop enable wireless photo transfer across devices. Also, cloud services like Google Photos or Dropbox, and email can help transfer your photos wirelessly.