
How to Transfer Audiobooks to iPhone
Say goodbye to iCloud storage limitations and explore the freedom of transferring photos between your Apple devices using iTunes, Airdrop, and iPhone Data Transfer.
While iCloud provides a convenient way to sync photos across Apple devices, it may not always be the preferred choice to transfer photos from iPhone to iPad due to its limited storage space (5 GB for free) and Internet dependence.
To transfer your iPhone photos to iPad without iCloud, there are several techniques available, which are Apple iTunes, AirDrop, and a third-party tool iPhone Data Transfer. Among them, the latter stands out for its efficiency, simplicity, and versatility. With just a few clicks, you can transfer photos between iPhone and iPad without iCloud or Wi-Fi.

With iCloud Photos enabled, photos are automatically transferred from iPhone to iPad.
Table of Contents
Developed by Apple Inc., iTunes allows users to connect their iOS devices, such as iPhones and iPads, to their computers and seamlessly transfer content between devices.
With iTunes, you can back up your iPhone photos to your computer and then sync those photos to your iPad.
Learn more: How to transfer photos from iPhone to Windows 11 PC
Here are something you need to know before transferring photos from iPhone to iPad via iTunes.
By following these steps, you can transfer your iPhone photos to iPad without iCloud.
1. Connect iPhone to a computer using a USB cable and launch iTunes.
2. Hit on the device icon in iTunes.
3. In the "Backups" tab, choose "This Computer" under "Automatically Back Up."
4. Click "Back Up Now" below "Manually Back Up and Restore" to start downloading iPhone photos with iTunes.
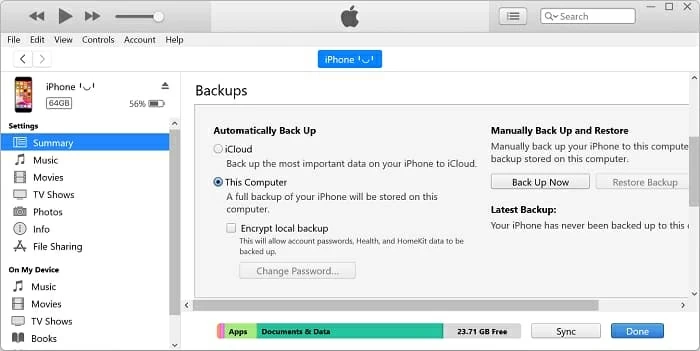
5. Disconnect your iPhone from the computer once the syncing process is complete.
6. Connect your iPad to the same computer.
7. Select devices, then navigate to the "Photos" tab > "Sync Photos" > "All folders" > "Apply."
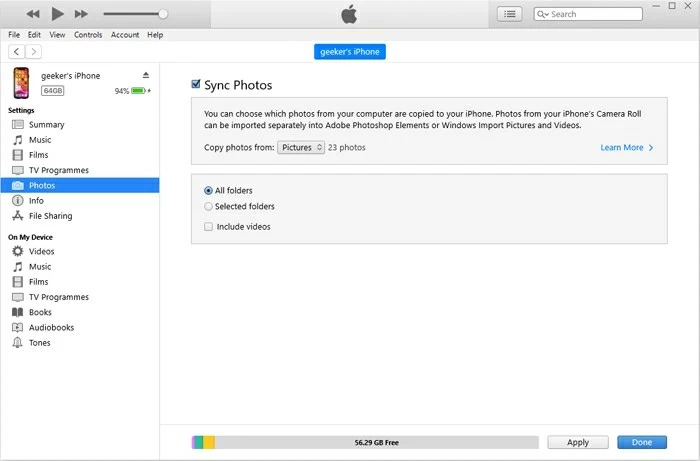
While iTunes is a commonly used option, it has the drawback of overwriting existing iPad photos during transferring iPhone photos to iPad. Luckily, there is an alternative solution available, iPhone Data Transfer, which enables you to transfer photos and other files between your iPhone and iPad without risking data loss.
This handy tool also allows you to transfer photos selectively, and maintain the clarity and resolution of your images. You can copy pictures in various formats, including HEIC, JPG, JPEG, PNG, and etc. In addition to moving photos from iPhone to iPad without iCloud, the software offers other functionalities like transferring videos, contacts, messages, and more.
Key features:
1. Plug your iPhone and iPad into your computer, and launch iPhone Data Transfer. Tap "Trust" and enter your device passcode if prompted.
2. Go to "Photos" at the left menu, then choose the photos you want to transfer to iPad. You have options to select individual photos, specific albums, or even entire photo libraries.
3. Click "Export to device" and choose your iPad to transfer photos from iPhone without iCloud.

4. Once finished, you can find the transferred pictures in the "Photos" app on your iPad.
AirDrop provides a quick and wireless method to share files between iOS devices. It's a convenient way to transfer photos from iPhone to iPad without iCloud or cable.
You may also want to know: How to AirDrop photos from iPhone to Mac
Here's a guide on how to move your iPhone photos to your iPad without iCloud using AirDrop:
1. Enable AirDrop feature on both your iPhone and iPad.
2. Open the Photos app on your iPhone and select the photos you want to share.
3. Tap on the "Share" button, then look for the AirDrop icon and tap on it.
4. Select your iPad's name to initiate the transfer.
5. On your iPad, tap "Accept" to receive the photos.

Once the transfer is complete, the shared photos will be saved in the Photos app on your iPad. If you can't find your airdropped files, see: Where do AirDrop files go?
If you have enough iCloud storage and ensure that both your iPhone and iPad are connected to a Wi-Fi network, then you may want to know how to transfer iPhone photos to your iPad using iCloud Photos.
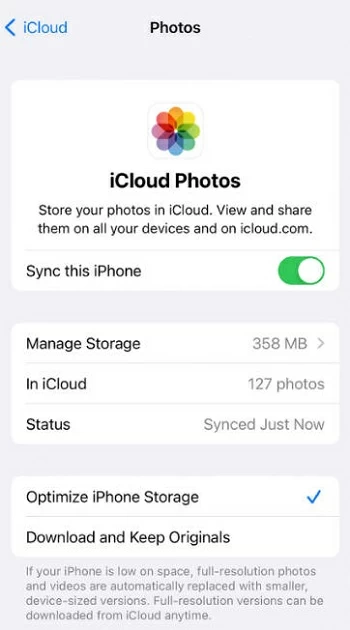
By moving photos from iPhone to iCloud and then syncing the photos on iPad, it is easy to transfer photos from iPhone to iPad with iCloud.
If you don't have enough storage to transfer photos between iPhone and iPad, you can purchase an iCloud+ plan or try to use AppGeeker iPhone Data Transfer as an alternative.
Can I transfer photos from iPhone to iPad without iCloud?
Yes, you can sync photos from your iPhone to your iPad without using iCloud. Remember to turn off iCloud Photos on your iPad before transferring photos.
For Windows users and older versions of Mac users:
For Mac owners with macOS Catalina or later, you can use Finder to transfer photos from your iPhone to iPad without needing for iCloud.
Should I use My Photo Stream to sync photos from iPhone to iPad?
My Photo Stream is a feature that allows you to automatically upload and sync your most recent photos across your Apple devices. It stores up to 30 days or 1,000 photos, whichever comes first. It doesn't count against your iCloud storage limit and is designed to quickly share photos between your devices.
However, it is not advisable to transfer photos between iOS devices using My Photo Stream, because Apple no longer supports this feature since July 26, 2023.
How to share photos from iPhone to iPad without iCloud?
You can use messaging apps like iMessage, WhatsApp, or email to send a small amount of photos from your iPhone to your iPad without using iCloud.
1. Attach the photos to a message or email and send them to yourself.
2. Open the message or email on your iPad and download the photos to your iPad's Photos app or any desired location.