
What to Do When the iPhone Is in Security Lockout

If you want to transfer your iPhone's videos to Mac for saving or editing, this ultimate guide will give you best ways to transfer videos from iPhone to your Mac.

![]()
You can transfer your videos from iPhone to Mac via wired or wireless methods.
Transferring videos from iPhone to Mac has various benefits, such as creating backup copies of important memories, editing videos, or simply freeing up storage space on your iPhone.
As a common task for many iPhone and Mac users, there are several available ways to transfer videos from an iPhone to a Mac. For example, import videos from iPhone to Mac using the built-in Apple apps, or wirelessly transfer photos and videos from iPhone to Mac with iCloud service, or utilize specialized iPhone Data Transfer software to transfer large iPhone videos to Mac without losing quality.
This article will detail the best ways on how to transfer videos from iPhone to Mac effortlessly, providing you with useful tips and tricks so that you can edit and process the videos transferred from your iPhone on Mac.
See also: How to transfer music to iPhone without iTunes
Choosing the right method to transfer videos from your iPhone to Mac depends on factors like file size, speed, and whether you prefer a wired or wireless solution. Here's a quick breakdown:
The Photos app is built into Mac (OS X Yosemite or later) and iOS devices and is designed to help users organize and edit their photos and videos. Users can import videos from their iPhone to their Mac or MacBook by connecting Mac / MacBook and iPhone via data cable.
Note:
1. Connect your unlocked iPhone to the Mac using a suitable USB cable. If needed, tap "Trust" to establish a secure connection.
2. Open the Photos app on your Mac. If you checked the "Open Photos for this device" option before, the Photos app will open automatically when devices are successfully connected.
![]()
3. Locate "Devices" on the left sidebar and select your iPhone. Photos app will display an Import window with all photos and videos from your iPhone's Photo app.
4. You can select or create an album to save the imported videos in the drop-down menu next to "Album" / "Import to".
5. Select your desired videos to transfer to your Mac and click "Import Selected" in the upper right corner.
6. Or select "Import All New Items" in the top right to transfer all new videos and photos to Mac.
Tip: You can check "Delete items after import" at top right-hand corner to delete videos on iPhone that have been transferred to Mac to save iPhone's memory.
The transferred video can be viewed in the Imports section, or in Albums > My Albums list to locate the folder where you have stored the videos.
Limitations:
Another way to use USB cable to transfer videos from iPhone to Mac / MacBook Air / Pro / iMac is Image Capture, a pre-installed application on macOS, which facilitates you to directly move iPhone's video clips to any folder or hard drive on your Mac, rather than saving them in the Photos Library.
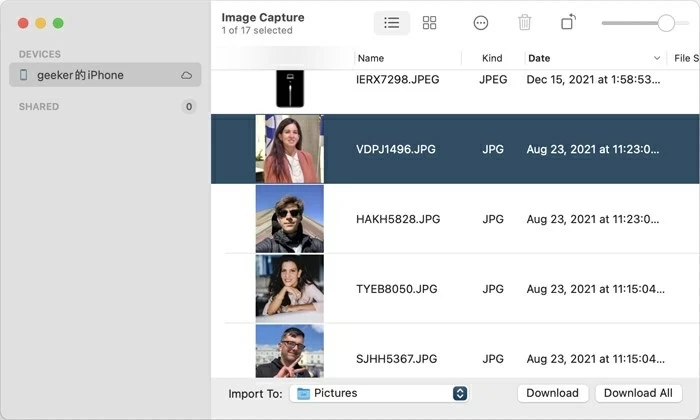
1. Unlock your iPhone and plug it into your Mac computer with a compatible USB cable.
2. Open Image Capture app. You can find it using Spotlight search or in the Applications folder.
3. Select your iPhone in the "DIVECES" list. And you'll view all the videos and photos stored on it.
4. Choose the videos you want to transfer. Use the Command or Shift key to select multiple items.
5. Click "Import To" in the lower left to select the target folder for saving your videos.
6. Hit "Download" or "Download All" in the lower right corner to transfer videos from your iPhone to your Mac local hard drive.
Tip: Click the "three dots" in the top-right corner, you can choose "Delete after import" to remove videos from your iPhone that you have downloaded to your Mac.
Compared to the Photos app, Image Capture is more flexible and more suitable for transferring long video to Mac.
If you forget your iPhone passcode and your iPhone becomes unavailable, you can refer to How to fix iPhone Unavailable to solve this problem.
To transfer large video files from iPhone to Mac without video quality compression, you can give iPhone Data Transfer a try. It can transfer your videos from iPhone to Mac in bulk quickly and stably, including videos in Photos app, Movies, TV Shows, Home Videos, Music Videos, etc. and even perform one-click transfer and backup.
With iPhone Data Transfer, you can achieve seamless transfer and management of multimedia files between iPhone and Mac, including videos, music, photos, and more.
Key features:
Here's how to transfer videos from an iPhone to the Mac using iPhone Data Transfer:
1. Launch the software on your desktop and connect your iPhone to your Mac. The home screen will show your iPhone information.
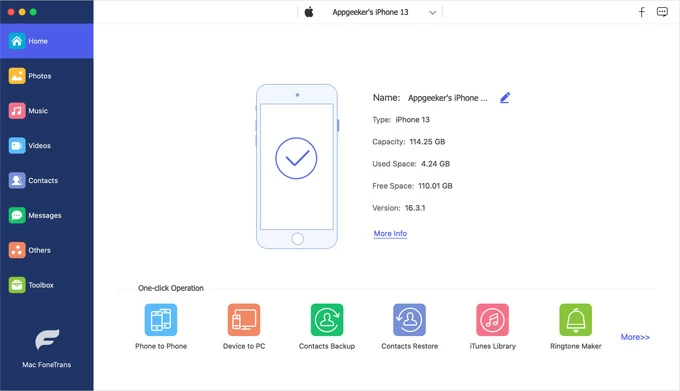
Tip: Make sure your iPhone is unlocked and choose to trust the computer when asked.
2. Select the "Videos" tab in the left sidebar. You'll see all videos from your iPhone in the right window, categorized as Movies, Music Videos, Home Videos, TV Shows, iTunes U, and Podcasts.
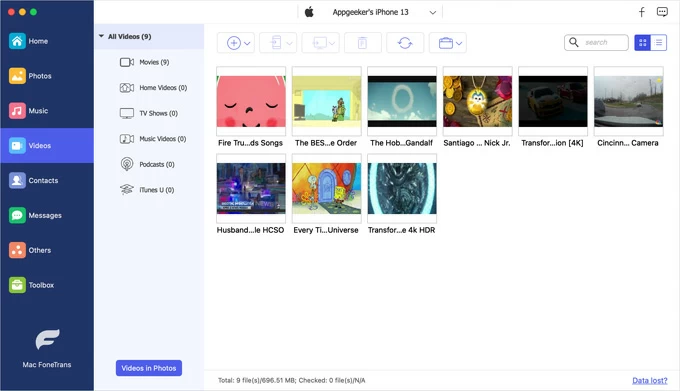
3. Pick the videos to transfer. Select videos by checking the small box next to each video. You can also check the box next to Type at the top to move all videos contained in a specific category to your Mac.
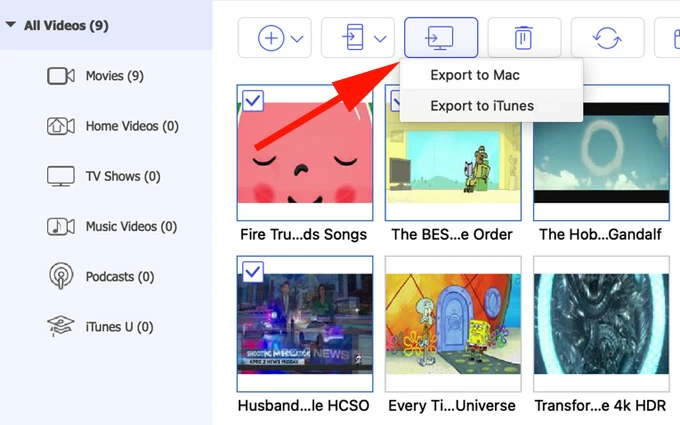
4. Click the "computer" icon on the upper taskbar and select "Export to Mac." You need to choose a folder on the Mac to save the videos transferred from iPhone.
Note:
Wait for the process to end and the transferred iPhone videos will be saved in the destination folder of your choice on Mac. But if you want to transfer some YouTube videos from Mac to iPhone, you can use Screen Recorder to record YouTube videos on your Mac first, and then transfer them through iPhone Data Transfer.
For those who don't have the right USB cable or want to wirelessly transfer videos to Mac from an iPhone, AirDrop is a great option, especially when you want to quickly share small-sized videos between devices. However, to use AirDrop to send videos from iPhone to Mac, the following conditions must be met:
Once everything is ready, follow the steps below to airdrop your videos:
1. Head to Control Center on your iPhone, long tap "AirDrop" icon and set it to "Everyone for 10 Minutes" or "Contacts Only."
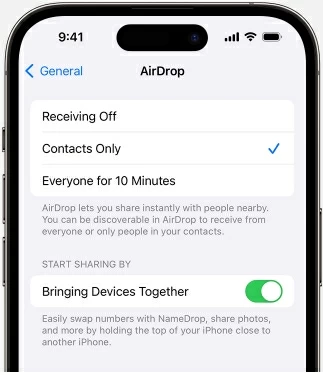
2. On your Mac, open Finder, click "Go" in the menu bar, and select "AirDrop." Ensure AirDrop is set to "Everyone" or "Contacts Only."
3. Open the Photos app on your iPhone and select the video you want to send to your Mac.
4. Tap the "Share icon" at the bottom left and select "AirDrop" in the menu that appears.
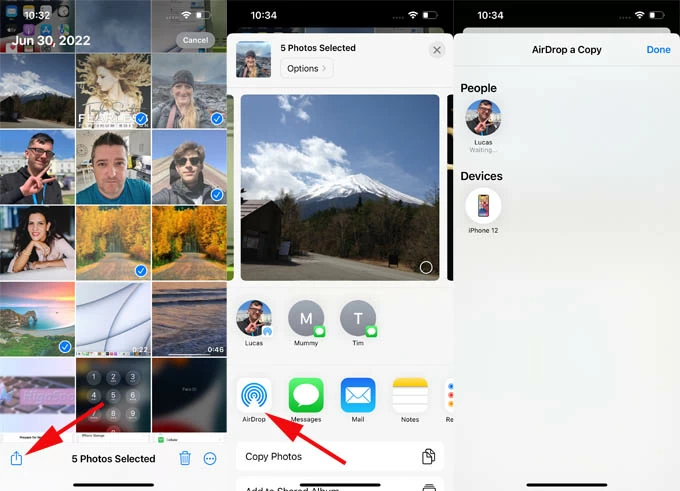
5. Choose your Mac as the receiving device in the AirDrop page.
6. Accept the transfer. On your Mac, click "Accept" in the pop-up prompt to save the videos to your Downloads folder or another designated location.
Limitations:
iCloud Photos, one of the features coming with iCloud, allows Apple devices with the same Apple account to access photos and videos synced to iCloud anytime. An iPhone with iCloud Photos enabled will automatically upload photos and videos from the Photos app to iCloud, making them accessible on your Mac without any manual effort.
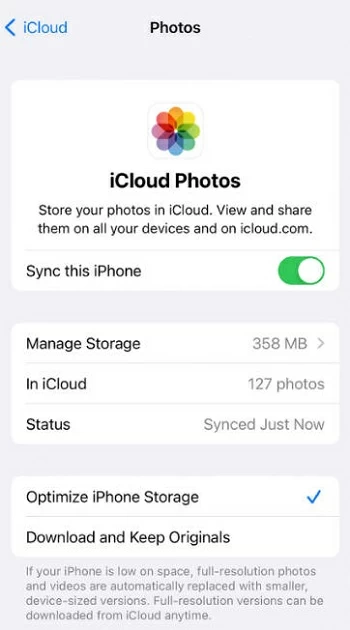
Step 1. Enable iCloud Photos on your iPhone.
To turn on iCloud Photos on your iPhone, navigate to Settings > [your name] > iCloud > Photos, and switch the "Sync this iPhone" button to ON.
Step 2. Enable iCloud Photos on your Mac.

Note:
Step 3. Access videos on Mac.
After syncing, run the Photos app on your Mac, and the videos from your iPhone have been transferred to your Mac without USB cable connection.
Alternatively, you can sign into iCloud.com and select the video to download to your Mac in the Photos tab.
Note:
Limitations:
For more help getting the most out of your iCloud to retrieve your lost photos, check out our article: How to restore photos from iCloud backup.
If you prefer more control over where your videos are stored, iCloud Drive is a great alternative to iCloud Photos. This method lets you upload specific videos to iCloud and access them on your Mac without syncing your entire Photos library.
1. Upload iPhone videos to iCloud Drive. On your iPhone, navigate to the video you need, and tap the "Share" icon. Select "Save to Files" and choose "iCloud Drive" as the destination.
2. Find transferred videos on Mac. On your Mac, open Finder and click on "iCloud Drive" in the sidebar. Locate the videos you uploaded and download them to your desired folder.
Conclusion
Transferring videos from your iPhone to your Mac doesn't have to be a daunting task. With the variety of methods available—ranging from wired transfers such as Photos app, Image Capture, iPhone Data Transfer to wireless transfers such as AirDrop, iCloud Photos, and iCloud Drive—you can choose the one that best fits your needs.
Can I transfer videos from iPhone to Mac wirelessly?
There are several ways to wirelessly move iPhone videos to Mac:
How to transfer videos from iPhone to Mac without losing quality?
To avoid the original quality of video being compressed, or to transfer your 4k video from iPhone to Mac without quality loss, you can choose to transfer videos using iCloud Photos, which can keep your videos in original full resolution on the iCloud.
Activate iCloud Photos on your Mac and iPhone. Then launch the Photos app on Mac and select Photos > Preferences. Next, locate the "iCloud" tab and enable "Download Originals to this Mac" to store videos with original quality on Mac.
How to transfer video and photos between iPhone and macOS?
If you want to transfer photos and videos between iPhone and Mac, you can take the help of AirDrop, iCloud Photos, Photos app. These features or apps that are closely related to the Apple ecosystem allow you to transfer videos and photos from your iPhone to Mac, and vice versa.
Or you can try specialized transfer tools, like AppGeeker iPhone Transfer Data, to transfer a large number of multimedia files, including photos, videos and music, at once and convert them to a format compatible with your device.