How to copy a Blu-ray to another DVD using a Single BD Drive
Now in the age of information and knowledge explosion, it has realized resources sharing all over the world because of the development of the Internet. YouTube is one of the most prevalent video-sharing websites around the globe that brings people a lot. Millions of videos—ranging from video clips, music video, recordings, to movie trailers and TV show clips—have been uploaded and shared every day.
Meanwhile, thanks to large storage capacity and high video resolution, Blu-ray is still popular in market although it is no fresh at all. If you're a BD fan, you probably have a large Blu-ray collection on your bookshelf. You can certainly watch these Blu-ray movies the usual way on big TV screen with a Blu-ray player, but wouldn't it a great idea to upload some of favorite clips from Blu-ray onto YouTube for sharing with friends? There is no doubt that YouTube doesn't support Blu-ray uploading directly, but extracting a clip from a Blu-ray to a normal video format that you could then publish on YouTube is possible and simple.
In order to get the things simpler, a Blu-ray ripping tool that combines ripping and converting all in one place is introduced in this article. Blu-ray Converter is our favorite. It is an versatile solution that specially designed for both Windows and Mac users to rip Blu-ray/ DVDs and convert to nearly all types of video formats like MP4, MOV, AVI, M4V, WMV which is supported by YouTube and other video sharing sites. You can also use it as a video converter to convert digital video and audio files.
Moreover, you could edit BD/ DVD video by cropping, trimming, adjusting effects and putting watermark to create your own personalized video before uploading onto YouTube site.
The following guide will walk you through the steps on how to rip your Blu-ray and convert movie file to a common video for YouTube on Mac. To be on the safe side, you could invest an external hard drive to your Mac machine as the process of converting Blu-ray to YouTube file will take up a vast amount of physical space.
Step 1: Load the Blu-ray titles
Open up the Blu-ray Ripper. Click Load Disc button on the top bar to import the source BD movie, or directly drag-n-drop the BD movie titles to the program interface.
As you can see, after loading source Blu-ray, all its titles with relevant details are listed orderly on the screen. You could choose your preferred subtitles and audio tracks by clicking the Subtitles and Audio tracks boxes.

Tip: a Edit image icon is available on the top menu bar, which comes with editing filters that enable you to personalize video: Trim, Watermark, adjust effects, Crop and Convert to 3D effect.
Note: generally, the length of the clips to be uploaded YouTube is no more than 15minutes if you don't want to verified your account, and therefore need to split video clips into multiple smaller parts to fit the YouTube limit.
Step 2: Choose target format for YouTube and configure conversion settings
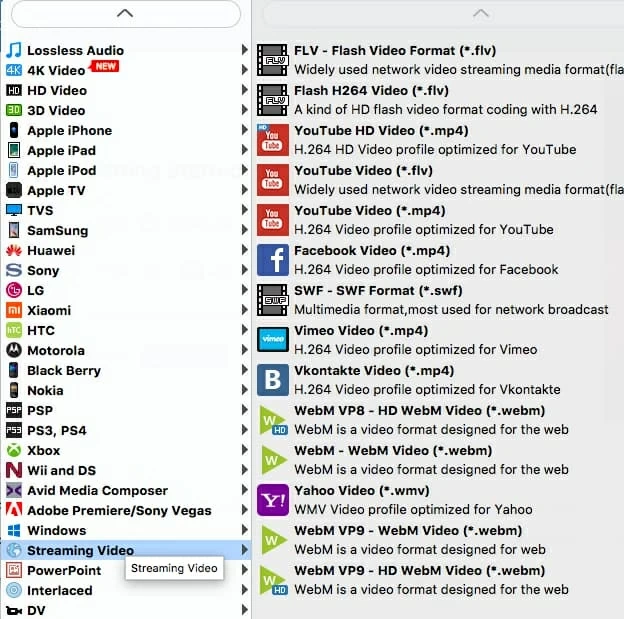
Click the Profile in the middle of top toolbar, this should open a drop-down menu from where you can choose the desired format that YouTube understands for output. For your convenience, this software comes with a large number of presets including YouTube profiles.
Go to Streaming Video category and then select one of available profile from its opening list. We recommend you pick YouTube HD Video (*.mp4) or YouTube Video (*.mp4) as it is a common denominator file format across multiple platforms. For those who are using a Mac, HD MOV Video under HD Video category is also a nice alternative.

To make the target videos more compatible with YouTube, you could hit the Settings button next to Profile menu to enter the Profile Settings panel where you could fine tune the parameters including Video Codec, Quality, Resolution, Bit Rate, Frame Rate, Aspect Ratio (YouTube uses 16:9 aspect ratio players), Audio Codec, Audio Quality, Bit Rate, Sample Rate, Channels, etc.
This is optional.

Step 3: Convert Blu-ray movie to YouTube video format on Mac
After finishing the whole settings, select a place where you want to save your final videos with your Mac hard drive in Destination field in the lower left side of the screen.
Finally, press the blue Convert button at the bottom to start converting the Blu-ray into YouTube friendly file on your Mac machine.
Also, it must be pointed out that you'll need a good free amount of space on your computer hard drive or external hard drive for the output file or else the conversion will fail!

Step 4: Upload ripped Blu-ray movie to YouTube site
When the process is complete, you're ready to put your ripped video files to YouTube. The only thing left to do is sign in to YouTube, touch the Upload icon at the top of the screen, select the video, adjust the title, description, tags and privacy settings of your video, press the Upload icon again.
Enjoy your great time!