How to Add MP3 to Apple Music on iPhone
Transferring photos from your digital camera to iPhone is a great way to instantly share your digital camera photos, edit them creatively, or store them securely, and here's how.

You can use an adapter or card reader to seamlessly move photos from camera to iPhone.
Transferring photos from digital camera to iPhone has become essential for photographers who want to edit, share, or store their images conveniently. Whether you're working with high-resolution shots or capturing special moments, getting those digital camera photos onto your iPhone unlocks a world of creative possibilities.
This guide breaks down practical methods on how to transfer your digital camera photos to an iPhone—ranging from wired transfers with adapters to wireless solutions via Wi-Fi-enabled cameras, as well as advanced software like iPhone Data Transfer. No matter your setup, you'll find a solution that ensures your favorite camera photos can be transferred on iPhone.
Table of Contents
Connecting two devices from such distinct ecosystems isn't always straightforward. So, some preparation will help transfer your digital camera images to iPhone / iPad more seamlessly.
Check compatibility: Confirm your iPhone model, camera, and cable compatibility (e.g., Lightning or USB-C).
Gather necessary accessories: Have the required adapters, cables, or card readers on hand for wired transfers.
Ensure storage space: Verify available space on your iPhone before starting.
Organize your photos: Create folders or categorize photos in the camera for smoother transfers.
When reliability and speed matter most, wired connections are often the go-to solution for transferring digital camera photos to your iPhone. You cannot directly connect an iPhone to a digital camera; instead, you need an adapter as an intermediary to link these two devices.
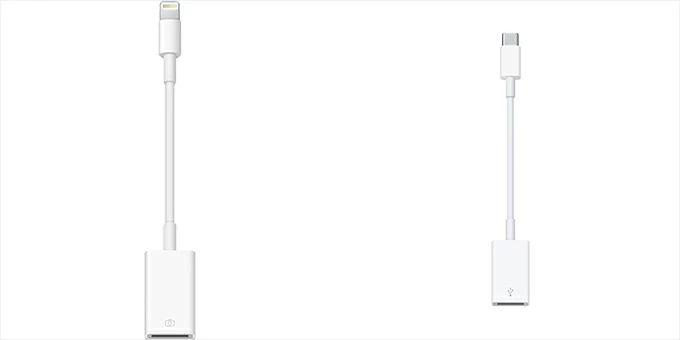
If you don't have the compatible adapter, you can go to Apple Shop to purchase a Lightning to USB Camera Adapter or Apple USB-C to USB Adapter. Here's how to transfer photos from your digital camera to your iPhone using a wired adapter connection.
Tip: If you are using iPhone 15 and later models, prepare an Apple USB-C to USB Adapter; if you are using iPhone 5 to iPhone 14 models, prepare a Lightning to USB 3 Camera Adapter or Lightning to USB Camera Adapter.

1. Use the adapter to connect your iPhone to your digital camera. Plug the Lightning or Type-C port of the adapter into the iPhone, and then plug the other USB port of the adapter into the digital camera.
2. The iPhone's Photos app will enter Import mode. The Photos app will automatically open and enter the Import interface. If not, manually open the Photos app on the iPhone and tap the Import option.
3. Select photos to transfer. Browse your photos from your digital camera and select them, then tap Import. You can also choose Import All for bulk transfers.
4. View the imported photos. Once imported, the photos will appear in a dedicated Imports album in the Photos app. You can also choose whether to keep or delete the transferred photos on the digital camera.
Note:
Read more: How to transfer photos from PC to iPhone
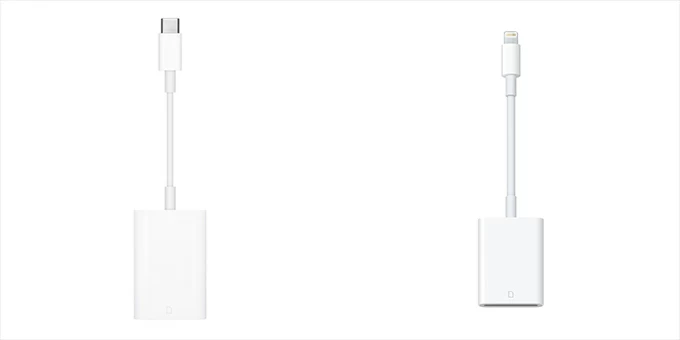
If you prefer to deal with SD cards or choose a lighter way to move your digital camera photos to an iPhone, Lightning to SD Card Camera Reader or Apple USB-C to SD Card Reader provides a convenient alternative. Apple USB-C to SD Card Reader is suitable for iPhone 15 and later iPhone series; Lightning to SD Card Camera Reader is suitable for iPhone 5 - iPhone 14 series.

1. Remove the SD card from your camera and insert it into the card reader.
2. Plug the card reader into your iPhone's Lightning or USB-C port.
3. The Photos app will prompt you to view and import images.
4. Select individual images or import all at once.
5. The transferred photos will automatically save to your iPhone's library.
Getting digital camera photos on your iPhone via a card reader or adapter is a one-way transfer. You can only transfer photos from camera to iPhone, not vice versa.
For photographers looking to do more than just transfer photos, iPhone Data Transfer is an all-in-one tool that offers seamless photo transfer, organization, and backup options, giving you more control over file formats and storage to handle large volumes of photos between cameras, iPhones, and computers.
Even edited or copied photos from your digital camera can be imported to iPhone through this software, bypassing the limitations of Apple adapters. The transfer process will keep the high resolution of your photos and videos and ensure that they are compatible with your iPhone.
1. Download and install the software on your computer, then launch it.
2. Connect your digital camera and iPhone to your computer using appropriate data cables.
Unlock your iPhone and connect it to your computer with a compatible USB cable and make the software recognize it. Then connect camera to computer with a USB data cable, or insert the card reader into your computer.

3. Add digital camera photos to iPhone.
Navigate to the Photos tab, click the Plus icon above the taskbar, and select Add File or Add Folder. In the pop-up window, browse your disk and find the folder where your camera photos are located, then select the photos you want to transfer, and then click Open to upload these photos to iPhone.

Through this software, you can also organize or rename the transferred photos. At the same time, it can also help you transfer iPhone photos to external hard drive or transfe videos from PC to iPhone.
With the development of digital cameras, many modern digital cameras with built-in Wi-Fi capabilities make transferring photos to your iPhone incredibly simple. This method is perfect for quick transfers directly from your camera without the need for extra accessories.
You just make sure your digital camera and iPhone are connected to the same Wi-Fi and download the camera-specific app on your iPhone, then you can directly get camera photos and videos on your iPhone via wireless network. The applicable camera brands include Canon/Nikon/Sony/Fujifilm/Olympus/Panasonic, depending on your camera model.
1. Download the camera's companion app. Install the official app for your camera brand, such as Canon Camera Connect, Nikon SnapBridge, or Sony Imaging Edge Mobile, from the App Store.
2. Enable Wi-Fi on your camera. Access your camera's menu to activate Wi-Fi or wireless LAN. Create a Wi-Fi network or connect to your iPhone directly, depending on your camera's settings.
3. Pair your devices. Open the app on your iPhone and follow the on-screen instructions to pair it with your camera. Some apps require scanning a QR code or entering a PIN displayed on your camera.
4. Select and transfer photos. Browse the photos stored on your camera within the app, select the ones you need, and initiate the transfer. You can move individual photos or entire batches depending on the app's functionality.
Note:
Read later: How to transfer photos from iPhone to iPhone without iCloud
1. Why can't I see the Import option?
This is the solution to not being able to see the Import option:
2. Why can't I view photos from digital camera on my iPhone?
If you can't view photos from your digital camera on your iPhone, here are some common causes and solutions:
3. Will the transferred digital camera photos be compressed on the iPhone?
The transferred digital camera photos generally won't be compressed when imported to your iPhone. With the USB/Lightning to SD Card Camera Reader or Lightning to USB 3/USB Camera Adapter, iOS preserves the original file quality during wired transfer, whether the photos are in JPEG, HEIF, or RAW format.
4. What to do if transferring large files from digital camera to iPhone is slow?
If transferring large amounts of photos is slow, use a wired connection like a Lightning to USB or SD Card Reader for faster speeds. Optimize Wi-Fi connections for wireless transfers or transfer in smaller batches to avoid delays. Consider shooting in JPEG or HEIF for smaller file sizes and ensure your iPhone has enough storage.