How to Fix Your iPhone Unavailable
iTunes provides two simple ways to enable you to transfer music from iTunes to iPhone easily, and this article will guide you how to transfer music to iPhone using iTunes.

You can transfer music to your iPhone with iTunes automatically or manually.
Want to transfer your music from iTunes to your iPhone? Whether you're syncing a few favorite playlists or your entire library, iTunes remains one of the easiest ways to get your music files onto your iPhone. In this guide, we'll walk you through how to transfer music from iTunes to iPhone, plus show you how Appgeeker iPhone Data Transfer can help if you need extra flexibility for transferring iTunes music to iPhone. Let's get your music ready to go on your iPhone!
Table of Contents
Transferring music from iTunes library to your iPhone is also a way to transfer music from your computer to an iPhone. Before you transfer music, here are some preparations:
As a medium for managing and syncing multimedia files between computers and iPhones, iTunes allows you to seamlessly transfer your entire music library or selected playlists, artists, albums, and genres to your iPhone, whether using a USB cable or wirelessly over Wi-Fi, saving you time and effort.
Step 1. Connect iPhone to your computer
Plug your iPhone into your Windows PC or macOS Mojave or earlier computer with an adapted USB cable. If you want to transfer music files from iTunes to iPhone wirelessly, you can also connect your computer to the same Wi-Fi as your iPhone.
Tip: Remember to trust the computer on your iPhone and enter the passcode so that your device can be recognized.
Step 2. Open iTunes on your PC
Run the latest iTunes app on your desktop, click the iPhone icon that appears in the upper left corner to enter the Summary tab.
![]()
Step 3. Enable Sync Music
Navigate to the Music tab on the left taskbar, and check the Sync Music option. If a query window pops up, click Remove and Sync to continue.

Step 4. Sync music from iTunes to iPhone automatically
If you want to move the entire iTunes library, select Entire music library; to transfer some of your favorite music, choose Selected playlists, artists, albums, and genres, and then check the specific songs or tracks in the given Playlists, Artists, Albums options.
Click Apply at the bottom to start transferring iTunes music to your iPhone.

Tip: To get voice memos and music MVs on your iPhone, place a checkmark next to the "Include videos" and "Include voice memos" options.
Wait for the transfer to complete, disconnect your devices, and you can open the Music app on your iPhone to access the music transferred from iTunes.
Note:
If you want your iTunes library (including music, movies, TV shows, photos, etc.) to sync automatically with your iPhone every time directly, check "Automatically sync when this iPhone is connected" or "Sync with this iPhone over Wi-Fi" on the Summary tab and apply it.
Compared to using automatic syncing for music to transfer iTunes music to iPhone, if you don't want your iPhone's original music library to be replaced or erased, choosing to manually add music from iTunes to your iPhone might be more suitable. This way, you can get the iTunes music while keeping the songs originally on your device.
1. After connecting iPhone to computer, open iTunes and click on the device icon.
2. Locate the Summary tab, scroll to the Options section, check Manually manage music and videos and then click Apply.

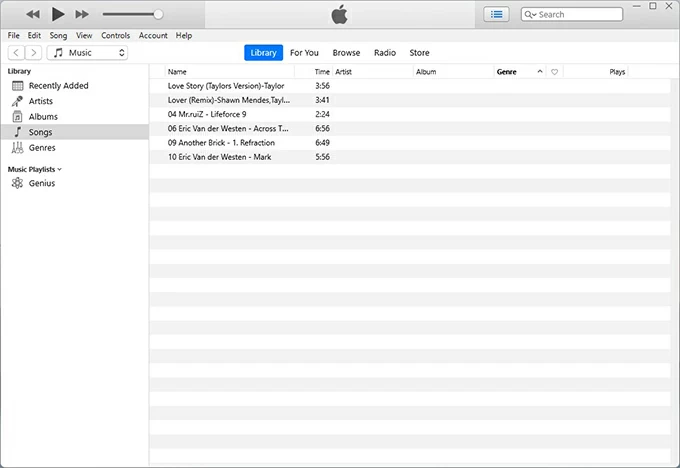
3. Return to the main iTunes screen, make sure the menu in the upper left corner shows Music, then go to the Library tab at the top.
4. Select Songs in the left sidebar, and the right panel will show all the music files in the iTunes library.

5. Choose the songs you need to transfer. You can use the Ctrl key to select multiple songs.
6. Drag the selected songs to the left where your iPhone is displayed (in the Devices section). Alternatively, right-click the selected songs, choose Add to Device from the menu, and then select your iPhone.

You can view the music added to your iPhone in Music under Devices. This method is applicable to adding songs from the computer to iPhone.
Tip: If you turn on the "Manually manage music and videos" option, the Sync Music feature will be automatically disabled.
To better control the music transfer from iTunes to iPhone, Appgeeker iPhone Data Transfer provides you with a more efficient solution. With iPhone Data Transfer, you can quickly transfer music library from iTunes to your iPhone without syncing in just one click, which makes it easier to manage your music files.
This software breaks the limitations of iTunes by enabling two-way transfer, allowing you to transfer music between iTunes and iPhone. And it does not need to sync your iTunes library, letting you get iTunes music without worrying about the risk of deleting existing content.
Key features:
Here's how to transfer your music to iPhone from iTunes library via iPhone Data Transfer:
1. Use a USB cable to connect your computer and iPhone and launch iPhone Data Transfer.
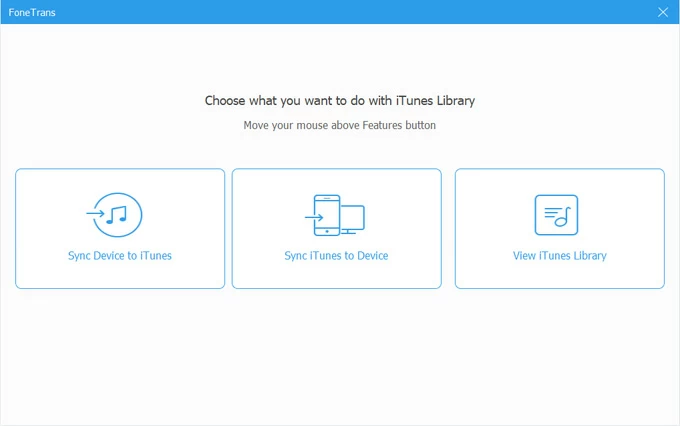
2. Select the iTunes Library shortcut at the bottom of the One-click operation.

3. Click Sync iTunes to Device in the pop-up window and select music-related items to transfer, such as Music, Playlists and other items you need.

4. Hit the One-Click to Device button to start adding iTunes music files to your iPhone.

With this powerful data transfer software, you can also transfer music from iPhone to iTunes or transfer music from computer to iPhone without iTunes.
When you transfer songs to iPhone using iTunes, you may run into the problem of transferring music. We have listed the common reasons why you fail to transfer music from iTunes to the iPhone so that you can fix the problem.
1. iTunes is not up to date: For Windows PC, head to Help > Check for Updates on iTunes to check for updates; for Mac users, go to App Store > Updates in the toolbar and look for any available iTunes updates.
2. Storage issue: Go to Settings > General > iPhone Storage to ensure that your iPhone has enough storage space to accommodate the music you want to import.
3. Transfer mode: If you don't have "Manually manage music and videos" enabled in the Summary tab of iTunes, you can't manually move music to iPhone.
4. USB connection or network issue: If there is a problem with the USB connection between your computer and iPhone, or if your network is unstable, transferring songs will fail.
5. Apple Music or iTunes Match is not turned off: If you have a subscription to Apple Music or iTunes Match, you can't use iTunes to sync music to your iPhone.
6. Music format issue: The music files you are trying to transfer from iTunes may not be in a compatible format with your iPhone.
7. Copyright issues: DRM-protected songs may not be transferred from iTunes to an iPhone.
How to transfer songs from iTunes to iPhone via Wi-Fi?
To move music from iTunes to an iPhone wirelessly, you need to enable Wi-Fi syncing:
This way, when your iPhone and computer are connected to the same Wi-Fi network and iTunes is open, your iTunes music library will automatically sync to your iPhone over Wi-Fi.
How to add music from computer to iPhone using iTunes?
You should add the music files to iTunes library first, and then manually move the music to iPhone through iTunes.
1. Open the iTunes app and click File > Add File to iTunes Library.
2. Browse and pick the music or audio you need to add to the iTunes music library.
3. Build connection between your iPhone to your compute via a USB data cable, and you will see your iPhone appear in the Devices section on the left panel of iTunes.
4. After selecting Music in the upper left corner, click Library and locate the Songs tab.
5. Use the Ctrl key to choose your songs, then right-click the mouse and select Add to Device > [your iPhone name] to move computer songs to iPhone through iTunes
How to prevent music from automatically syncing from iTunes to the iPhone?
To avoid iTunes automatically syncing all music to iPhone and taking up too much memory, you can sync only checked songs from iTunes to iPhone.
After that, you can choose the songs you want in the music library, then go back to the Summary page and click Sync to sync the checked audio from the iTunes library to the iOS device instead of the entire music library.