
How to transfer videos to iPhone 16 – from iOS, PC, or Mac
Don't panic. Before you resort to the photo recovery software, Mac gives you options of recovering deleted photos. We walk you through every Apple's routes.
To recover a photo from Mac:
Your deleted photos can't be retrievable from Time Machine, Photos app, Trash, or iCloud? Try Mac Data Recovery to scan the hard drive deeply and thoroughly for photo recovery.
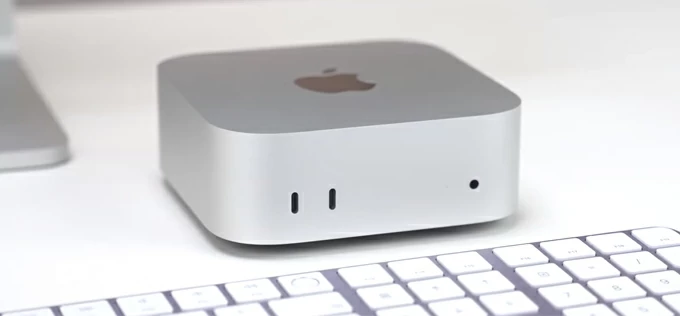
You can recover a recently deleted photo or a permanently deleted photo from Photos app, Trash, or Mac backup.
It is a horrible feeling when you realize that you delete a photo on your Mac that are very important to you. You don't know where it goes. Or, perhaps worse still, you accidentally empty the Trash when trying to recover your deleted photos. Now, the question is that is there a way to restore those deleted photos in your Mac? Are they permanently gone?
The good news is that even if you accidentally delete your photos permanently, there are a few ways to get them back. In this guide, we'll cover everything you need to know if you want to successfully recover permanently deleted photos on Mac. It's a similar story to that of file recovery of photos disappeared from iPhone.
Table of contents
You should always make regular backups of your most important files, including photos, on your Mac so you can restore your data at any time if something goes wrong by accident.
If you're not uncertain whether you've permanently deleted a photo, make sure to search for it thoroughly first.
1. You may look in Recently Deleted folder: sometimes, recently erased image can be found in this dedicated folder.
2. You then can check your Trash Bin to see if the deleted photos are kept there
3. Or, search your Mac hard drive with the Spotlight or the Finder to look for the photo
4. If you have used cloud service or enabled Time Machine, your deleted photos might be backed up there. You can restore Mac photos from backup file.
5. There are also Mac photo recovery software applications available in the market as your last resort when all else fails. STOP using the Mac, and take a dedicated recovery tool to recover your photos from the hard drive as soon as possible.
So we're going to go through all those routes in details to help get the deleted photos back on a Mac, regardless of an iMac, MacBook or Mac Mini.
When you accidentally delete a photo from Photos app, it's sent to the dedicated Recently Deleted folder, where you can restore it to your photo library if you need to. The Photos App will keep your deleted photos (and videos) in the Recently Deleted folder where you can view any time. After 30 days, they are gone forever and can't be restored.
Here's how to recover the deleted photos from the Photos App on macOS.
1. Open Photos app on your Mac.
2. Click Utilities in the sidebar, then click Recently Deleted. This dedicated album only appears when you have items deleted from your photo library.
3. Enter your Mac password when prompted to unlock Recently Deleted folder.
4. Select the photos.
5. Click Recover. The button is located in the upper right corner.
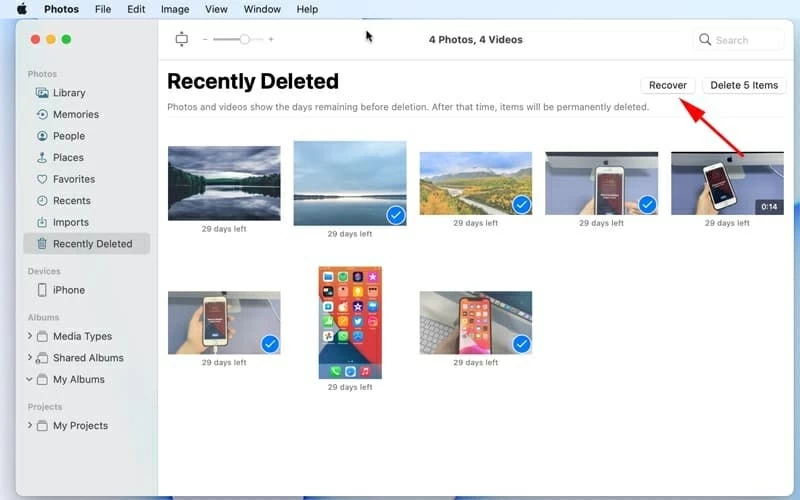
Photos don't exist in the Recently Deleted folder to recover? Check Trash bin.
The Trash Bin should be the place you should always check when you need to recover some important photos and files erased from your Mac hard drive. Just like a Recycle Bin for Windows, Trash Bin can temporarily hold recently deleted files
1. Open the Trash.
2. Select the photos you want to restore. If you have a lot of deleted items in Trash, use the Search function at the top right corner to look for the image by name.
3. Right-click or control-click on the selected items.
4. Select Put Back to retrieve deleted photos from Trash to their original location.
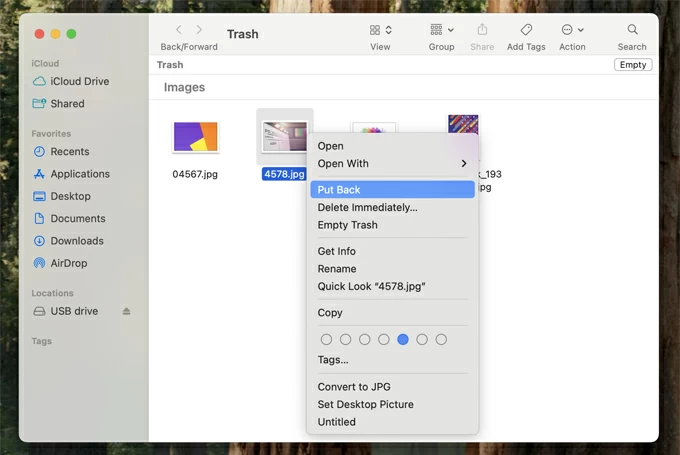
The bigger problem is, if your deleted photos aren't just in the Trash, or they have been emptied from it that makes things seemingly irrecoverable, how can you get your permanently deleted photos back? Keep reading.
Nothing found in Mac Trash or Photos Recently Deleted folder? Third-party file recovery app may be able to help you retrieve photos if you act quickly. After you delete a photo from Mac, it takes a little while for macOS to permanently delete it.
Our favorite is Mac Data Recovery, a very easy to use file undelete utility that can recover files from almost any storage media, be it hard drive, flash drive, SD card, Trash/ Recycle Bin, memory sticks. In addition to recovering photos in various image formats (JPEG, JPG, PNG, GIF, TIFF/TIF, BMP, RAW, ORF, PSD, MRW, RAF, etc.), the tool also supports recovery of other types of files, ranging from videos, audios, to documents and emails.
Scenarios: accidental deletion, formatting, virus attack, device corruption, etc
Let's have a look at how to use Mac Data Recovery to recover a photo that seems to be permanently gone in macOS.
Step 1: Run Data Recovery and select data type
To recover a deleted photo on Mac, open the software from your desktop after installation.
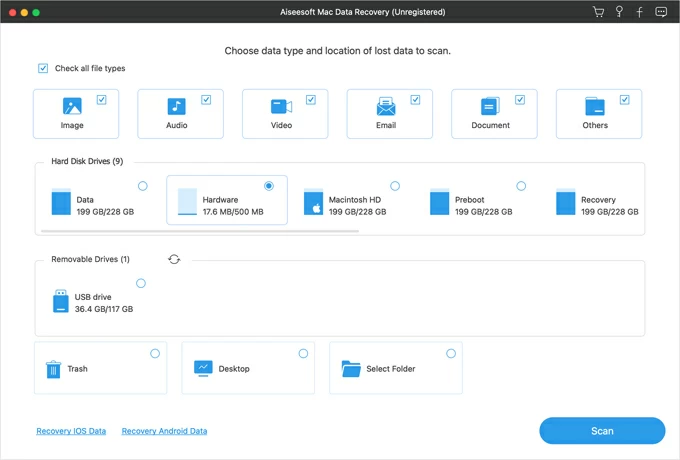
You will get a simple interface that's easy to navigate. Check the box next to "Image" type to proceed.
Next, select where to look for the deleted images. For example, we know that the deleted photos were stored in Trash but you accidently empty it. In this case, check the circle next to "Trash" in the interface. When you do not know, you can choose any of locations and repeat the scan and recovery process. But you have to realize that the recovery process takes a lot longer.
Also see: How to recover emptied Trash on Mac
Step 3: Scan for deleted photos
Click the "Scan" button at the bottom right corner of the interface to scan the drive deeply. Sit back to watch the magic happen.
When the scan process is complete, it returns results sorted by file types and tell you what's recoverable, as you see the screenshot below.

In Image category, all found pictures will be divided into different image formats, such as JP2, JPEG, JPG, MDL, PAT, PW, PNG, BMP, PSD, RAW, RELS, etc.
You may double click the photo for preview before recovering it.

Step 4: Recover deleted photos on Mac
Select the photos you want to retrieve and then press the "Recover" button to begin performing a photo recovery for Mac. When a dialog box opens, specify a local place where to save the recovered files.
When you have got all your Mac photos recovered, open the folder you indicated, they should now be available there.
Apple provides the iCloud service included with macOS. If you've signed in to your iCloud account and toggled the Photos switch there before you deleted the photos, you can log into iCloud website, and find Recently Deleted folder to recover your Mac photos.
Just follow these steps to use iCloud to recover photos deleted from Mac.
1. Go to icloud.com/photos in any web browser, sign in with your Apple account and password.
2. Click the Recently Deleted album in the sidebar. The dedicated album holds deleted photos and videos for 30 days before that are permanently deleted.
3. If you see the photo you want to get back, click the photo. You may select multiple photos at once and recover them all.
Tip: You'll see the number of days remaining for every recent deleted photo to restore if required.
4. Click Recover at the top of the window.
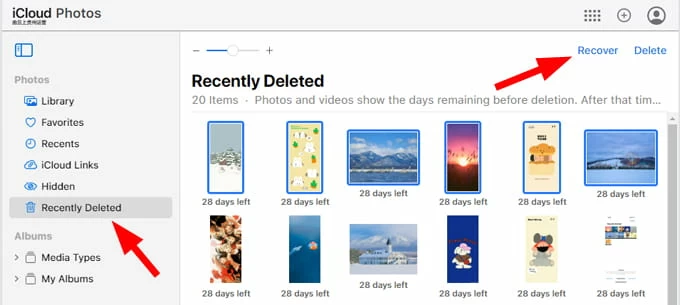
Wait a while, your photos should be back to your Photos library.
Did you create Time Machine backups in the past before a photo was deleted? If you've set up your Mac to save your photos library on the Time Machine, you may be able to recover deleted Mac photos from a recent backup in Time Machine. This can restore your photo library to the previous backup where still contains your deleted photos. With this restore process, you may recover your photos, but you'll likely lose other newly added photos since the backup.
To recover deleted photos from Time Machine backup, be sure to connect the backup disk to your Mac.
1. First of all, close Photos app on your Mac if it's already open.
2. Click Apple icon in the menu bar, select System Settings, and then General in the sidebar.
3. Scroll down the page until you find Time Machine, click it. Alternatively, if you've ticked "Show Time Machine in menu bar" option, you can also click the Time Machine icon in the menu bar and choose Enter Time Machine.
4. You will get a Time Machine screen with available backups.
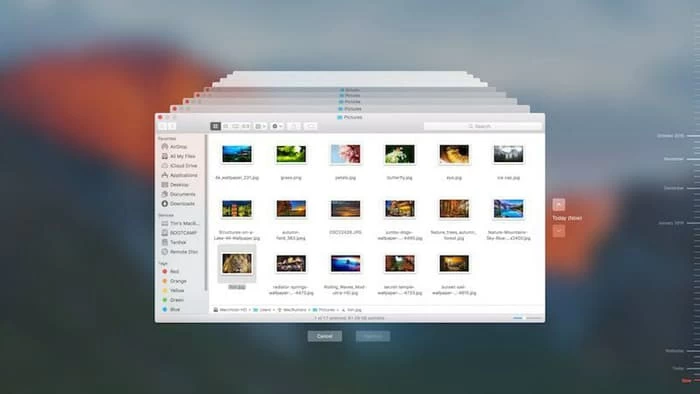
5. Click the date of the backup, select the most relevant backup of your photo library before you deleted the photos to recover them.
6. Click Restore. Wait for photo library to be restored.
7. Open Photos app, your deleted photos should reappear again.
Even if your Time Machine backup isn't available, you may also open it to try restoring photos from local snapshots on your Mac if the deletion is within the last 24 hours.
Let's say your photos are saved in a SD card rather than a Mac hard drive. If that's the case, you simply plug the SD card into your computer and use the recovery software to retrieve your photos.
What you'll need:
Follow these steps to recover the lost photos from erased or formatted SD card on Mac.
1. Launch this photo recovery software in Mac. Then insert your SD card into your computer's card reader. You can buy an external card reader if you don't have one.
2. On the main interface, select "Image" file type and choose your SD card from the list of Removable Drives.

Image formats that you're able to recover:
3. Click the "Scan" button to scan the storage location for all deleted images on the SD card.
4. When the scan is complete, it will show you all found photos that are recoverable from the SD card. You have a preview on a specific photo if you want.
5. Select the photo(s) and click the "Recover" button.
As a versatile file recovery app, you may use it to recover other deleted files from SD card on your Mac or Windows computer, it's cross-platform.