
How to get into unavailable iPhone 15 in 4 easy ways
If you accidentally delete a file from your Mac, there're ways to recover it. You should already have a Time Machine backup. If not, you have other options in an emergency.
To retrieve lost files in Mac, you can start with simply double check the Trash, check iCloud, use Time Machine backups. If all else fails, try Mac Data Recovery, an efficient and file recovery tool carrying a deep and thorough scan functionality on computer hard drive.
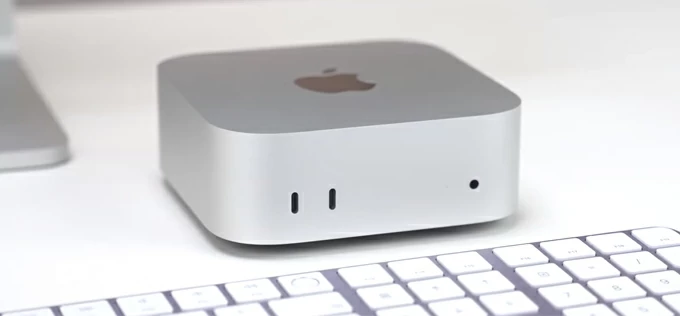
Time Machine allows you to restore deleted files from a backup or snapshot on a Mac.
Unabling to transfer your photos from iPhone to your Mac is frustrating, but the panic of deleting some files you don't mean to by accident is far worse. If you can't find your files anywhere and have no clue on how to recover the deleted files on a Mac, don't freak out just yet; this post will walk you through every possible option.
Let's say you're on the way of cleaning and optimizing your MacBook Pro storage, but accidentally deleted important files from Trash folder permanently; or you're copying files from your Mac to an external hard drive and then deleted them from your machine after you thought they had been copied, only realized there is nothing copied in the external HDD. Is there any way to recover your deleted files in Mac?
Depending on the type of the file, how thoroughly you deleted it, whether you have backups, here are a few different methods to retrieve deleted files from Mac.
Table of contents
Data files: photos, videos, contacts, calendars, documents (PDF, word, Excel, etc.), notes, personal information, email, texts, presentations, etc.
Mac models: iMac, MacBook Pro, MacBook Air, MacBook, Mac Mini, Mac Pro.
When you lose a file or some files, the first place you should go is look in the Trash. macOS devotes a small percentage of your hard drive space to a dedicated folder known as the Mac Trash, where retains your deleted files to recover within 30 days before you permanently delete them or empty the Trash on your Mac.
If you simply delete the file recently from Macintosh hard drive and don't touch the Trash, you may be able to find and restore the file from Trash instantly.
1. Open the Trash to view your deleted files. The most recently deleted files should appear at the top of the list if you don't make change of your preferences.
2. Select the deleted files or folders you want to restore
3. Right-click, and select Put back. You can also drag the files or folders to your desktop or your desired location.
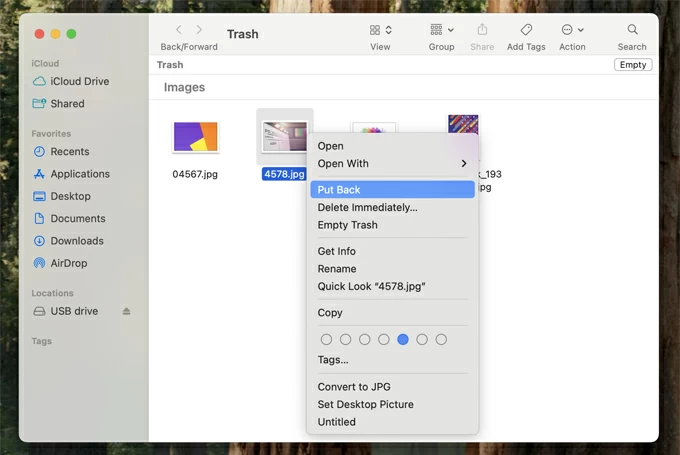
Supported recovery of files: videos, photos, documents, music, text, PDF, presentations, etc.
Drawbacks: Only keep 30 days for file recovery, after that, they are gone forever.
If you empty the Trash or do an immediate delete rather than moving files to the Trash, you won't restore them from Trash, instead, try using Time Machine in the below part.
Need to recover deleted photos on Mac? If your pictures are originally reserved in Photos app, they should not be actually deleted but kept in Recently Deleted album. As long as you have not emptied it, with a quick search, your lost files can easily be selected and restored to your Photos library.
1. Open Photos app.
2. Click Utilities in the sidebar, then select Recently Deleted.
3. Enter your password to unlock the album.
4. Select the photos you want there.
5. Click Recover.
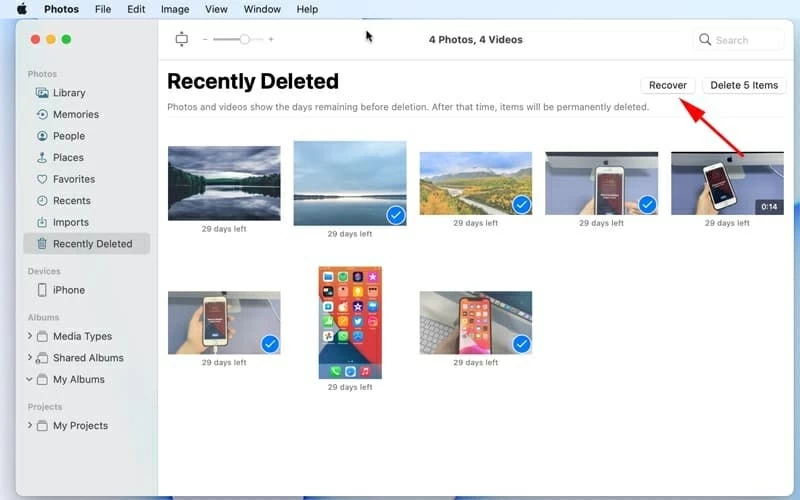
Supported recovery of files: videos, and photos (including images downloaded from web)
Drawbacks: Automatically deleted after 30-day period permanently
Can't find your deleted files form Recently Deleted album? Don't fret, keep reading.
Also: Photos disappeared from iPhone
If you accidentally empty the Trash Bin or the Recently Deleted album doesn't show what you need, your files may be gone forever. Luckily, with Apple's Time Machine, you still have a chance of retrieving permanently deleted files from Mac, as long as you have set it up before deletion.
Here's everything you need to know about Time Machine restore.
The Time Machine is a built-in backup tool on Mac that helps users automatically back up data and files to an external hard disk, including apps, music, photos, and documents, allowing you to restore individual files or folders later, and even restore your Mac to an earlier version
When you enable Time Machine backup and connect the external hard disk, Time Machine will create hourly backup for the past 24 hours, daily backup for the past month, and weekly backups for older data.
In the event of insufficient storage capacity on the backup disk, the oldest weekly backups will be deleted automatically to optimize storage. When your backup disk isn't connected to your Mac or isn't available, Time Machine stores some of the backups as snapshots automatically to help you restore files as needed.
Also: How to factory reset iPhone without passcode
Time Machine won't back up the same files or folders every time, instead, it starts with a full initial backup and then track and back up changes only to files and folders regularly. In order to recover deleted files on Mac, you can navigate through its timeline of all your backups until you find the one containing your deleted files.
To restore files from Time Machine backup, make sure you have had it configurated on your Mac before your files are lost. Keep in mind, if for some reason, your backup disk isn't available while connecting to your Mac, you can still try accessing your local snapshots to retrieve files.
If you accidentally deleted files, here's how to restore them from Time Machine.
Step 1. Make sure the external hard disk you use for Time Machine backups is connected to your Mac before trying to restore deleted files.
Step 2. Open Time Machine. If you have the Time Machine icon in your menu bar, click on it and select "Enter Time Machine." Alternatively, click the Apple logo, select System Settings > General > Time Machine to open it.
Step 3. Navigate through Backups: When you're presented with a Finder-like window showing current Time Machine backups, use the timeline and arrows on the right side to browse the local snapshots and backups. You'll see your files and folders as they were at each point in time.
Step 4. Locate and select files you want to restore. You can preview files by selecting them and using the Space bar.
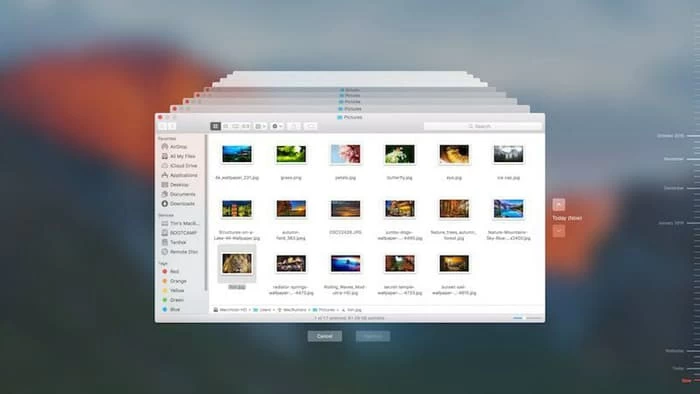
Step 5. Click the Restore button to recover your deleted files on your Mac. Time Machine will do the remaining things.
Supported recovery of files: almost everything can be recovered except for files you have synced to iCloud
Drawbacks: you will have to turn on Time Machine prior to the deletion of the files
Restoring from Time Machine should be the most reliable way to recover the recent deleted files. If you don't have a backup available, it's time to file recovery program.
Even you still can't find the deleted files after try Apple's built-in Time Machine, your deleted files may be hidden in a corner of your Mac storage that're full intact and recoverable. That's where file recovery program comes in to play. The sooner you act, the greater chances of fully recovering them.
We have had succeed with Mac Data Recovery, which employs powerful algorithms that scan your Mac hard drive on a sector-by-sector basis to search for deleted files. It can recover all file types including photos, videos, emails, documents, audios, and other files; and also retrieve files from all storage devices such as HDD, SSD, USB Drive, flash drive, memory stick, and other storage media.
The software is cross-platform. Download the Mac version on your computer and begin your Mac file recovery.
Step 1: Run Mac Data Recovery on your Mac
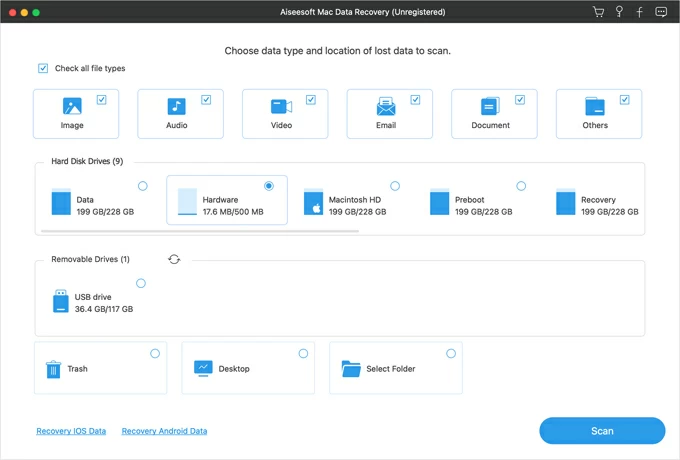
After launching the software, you will be greeted with a simple interface, as the image shown below. You may take one minute to grasp it.
Step 2: Select your file type and drive
From there, you need to specify the file type you're trying to recover. For example, if you're searching for some videos that you delete by mistake, here check the box at the upper corner of "Video." You may select multiple files types at once.

Next, specify the location where you delete the files from. The software even support recovery from external SD cards.
Step 3: Perform a deep scan
Press the "Scan" button at the bottom right to begin scanning the location you specify.
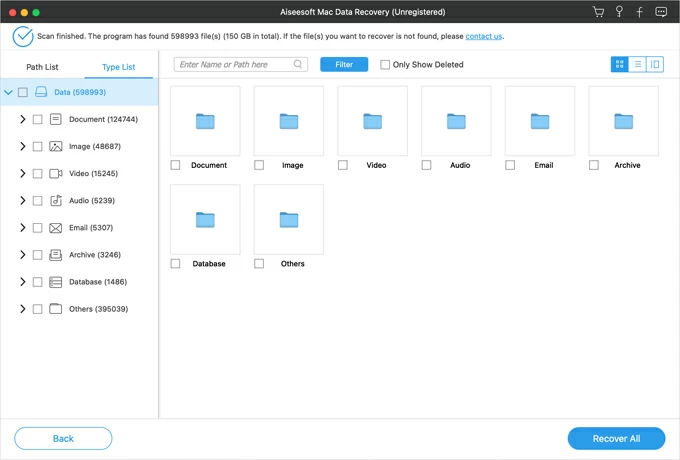
Once the scan is complete, you may open the folder where your found files are sorted and check the results by name, size, date.
For photos, you may double click any item to preview.

Step 4: Recover your deleted Mac files
Select the files by clicking on the check boxes next to their respective files names, followed by "Recover" button. When a dialog opens, select a local place to save. Your files will be retrieved quickly.
Mac Data Recovery is one of the best recovery tools for Mac users in terms of recovery consistency and time it takes—not to mention the fact that it's easy to use.
Supported recovery of files: videos, photos, audios, archies, documents, email, and other files.
Drawbacks: It won't recover files that have been overwritten by macOS
Do you know if these deleted files were ever syncing with iCloud Drive? If you have toggled on "iCloud Drive" option in your Mac preferences, and check the "Desktop & Documents Folders" box, Apple has files in your Desktop and Documents folders stored in iCloud Drive automatically. And when you lost files, you may go to iCloud to restore them.
Here's how to retrieve files deleted on Mac from iCloud Drive or iWork apps
1. Open Safari or any other web browser, type in icloud.com/iclouddrive site.
2. Sign in with your Apple ID and password.
3. Click Recently Deleted in the sidebar.
4. Select each file you want to recover, then select Recover.
5. If you want to bring all of them back, click Recover All.
If your deleted files can't be found from Recently Deleted, try iCloud's Data Recovery tool. It can restore iCloud Drive files, Contacts, Bookmarks, and Calendars.
Here's how to recover files deleted from other apps
1. Open Safari or any other web browser, type in icloud.com/recovery site.
2. Sign in with your iCloud account information.
3. Click Restore Files.
4. Select files you want to restore.
5. Click Restore.
iCloud will restore your deleted files immediately to their original location.
If you accidentally erase a document, email or presentation, you may try browsing through your Time Machine backups to find and restore older versions and best of all, you can do this directly within the app, such as Mail, iWork, TextEdit and Pages.
1. On your Mac, open the app, or your document.
2. Choose File > Revert To > Browse All Versions.
3. Click tick marks along the timeline to browse versions.
4. Select the version you want, click Restore.
One of the above methods should help you recover deleted files on your MacBook Air, MacBook Pro, or iMac, but preventing this from happening again should be a priority.
If you frequently delete files or clear up your Mac storage, consider performing regular backups of your Mac with your iCloud Drive or Time Machine. Also make sure you've signed in with your Apple credentials and have enabled iCloud to sync your files across over all of your Apple devices.