
How to unlock iPhone 16 without passcode
New to Mac? Accidentally deleted the Trash icon from your desktop? No clue on recovering an emptied Trash? Here's everything you need to know about Trash folder on Mac.
If you've permanently deleted files mistakenly by emptying the Trash, you'll want to a used a file recovery tool, something like Mac Data Recovery to get them back. It a highly reliable utility that recovers various types of files from virtually any drive that Mac can read.
You'll know about where's the Trash, how to recover Trash icon when missing, and recover files from an empty Trash
So you've got a new iMac or MacBook. Awesome! There is a lot more involved to get grasp of macOS and new machine for the first time. Don't know where is the Trash on Mac? Accidentally delete the icon for Trash from the dock? Or even empty the Trash without realizing that there are important files you need back? No worries.
The Trash, equivalent of the Windows Recycle Bin, is one of the most recognizable programs on your Mac machine. If you're a beginner for Mac and don't where is Mac Trash, this guide will help you get up and running in no time.
Our popular iPhone tutorial: How to transfer photos from iPhone to Mac
Everything about Trash on Mac
Whenever you delete a file on your computer the normal way, the Trash folder on macOS serves as a temporary storage area to keep the deleted file for a certain amount of time, allowing users who may have inadvertently deleted a file to recover it to original place before it's removed from your computer memory forever.
By default, a Recycle Bin icon resides on your Mac desktop out of the box — if you haven't moved it, you should see it appear at the bottom right corner of the Dock.
![]()
If the Trash folder in macOS is missing because you accidentally removed the Trash icon from the Dock entirely, where can you find the Trash to put back on the Dock? Don't worry, it's probably just hidden. If you check the reset of your desktop and still can't see it, follow those instructions to Restore the Trash bin on a Mac.
Step 1. Open Trash on your Mac. You can do this with either of following ways.
Step 2. The Trash will appear in the Dock again.
Step 3. Control-click the Trash icon, then choose Options > Keep in Dock.
Alternatively, You can regain access the Trash folder by pressing the keyboard shortcut "Command + Shift + G" simultaneously and typing "Trash" in the "Go to Folder" dialog, followed by "Enter."
Also see: Recently Deleted Photos album disappeared from iPhone
Deleting files or emptying Trash is pretty easy and straightforward. Here's how:
Delete files from Mac Trash
To delete a single item from Trash, open Trash on your Mac, control-click the item you want to delete, choose "Delete Immediately," and then select "Delete" to confirm.
Empty Trash
If you want to empty the entire Trash folder, simply open the app, click the "Empty" button in the upper-right corner of the window (or go to Finder > Empty Trash). In the warning message, click "Empty Trash" to confirm.

Note, it will automatically empty the Trash after 30 days of deletion if you've enabled "Remove items from the Trash after 30 days" option in Finder settings.
Also see: What can I do if I forgot iPad passcode
Similarly to Windows Recycle Bin, Mac Trash will temporarily save deleted items for 30 days before they're gone forever.
To recover files from Trash on your Mac that was recently deleted, you will go through a few clicks.
1. Open the Trash app. It will prioritize the most recently deleted files.
2. Scroll and find the file or folder you want to recover.
3. Right-click (or Control-click) on the item, and click the "Put back" to recover it.
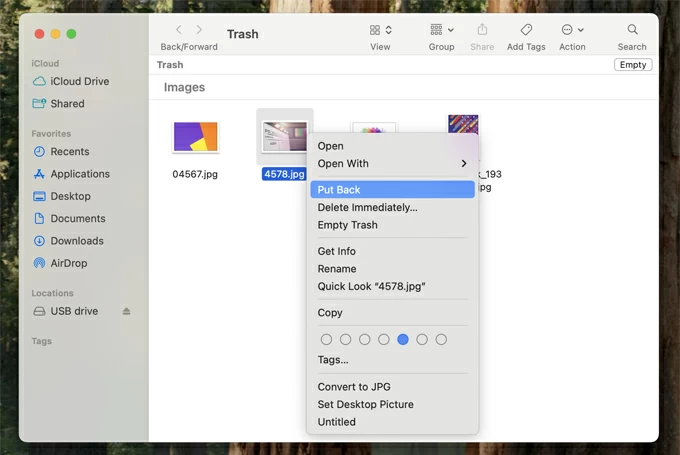
To select multiple files, command-clicking each one you want to recover; to select a continuous range of files, click the first file, hold Shift, then click the last file.
Also see: How to add music to iPhone without Finder or iTunes
What to do when the files are no longer available in the Trash? It's likely because they are deleted using "Option + Command + Delete" which bypasses the Trash and permanently deletes them, the Trash empties itself after 30 days have passed, or you clear Mac storage but empty the Trash folder by mistake.
Whatever the reason, you still have chances of recovering files from emptied Trash.
We recommend Mac Data Recovery as a good place to start. Even if you accidentally empty the Trash and all things gone there, there is still hope. That's because macOS will not erase the deleted files immediately from the drive. Instead, it just removes their directory entries, marking the space as available for reuse. If you act quickly, you may get your files back.
What's praiseworthy about the Mac Data Recovery application is that you can run a deep scan on the Mac internal drive on sector-by-sector basic to find your different types of lost files. It recovers far more than just Mac drives. It works with a wide range of storage media, from internal and external hard drive to SD cards, USB flash drives, memory cards and cameras,
The application is cross-platform, giving you flexibility to recover deleted files from both Mac and Windows computer if necessary.
If you need to recover files and folders from emptied Trash on Mac, download its macOS version on your computer and install it.
Step 1: Run and select data types
Run Mac Data Recovery on your machine, and select what types of data to be recovered by checking the boxes beside the file type.
It supports recovery of hundreds of file formats across all content categories, including videos, photos, audios and music, documents, emails, file archives, and more.
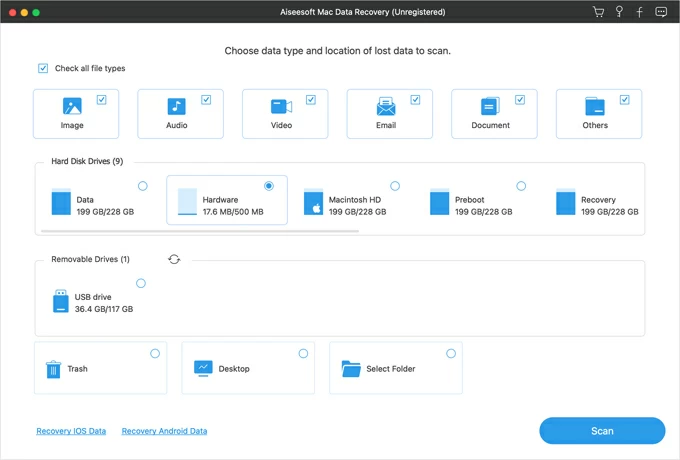
Step 2: Select your drive to be scan
Here, you will want to choose which location you want to let the application scan and find your lost files to recover. In this example, you're going to recover Trash data on Mac, so check "Trash" option at the lower left corner of the screen.
Step 3: Scan the Mac Trash folder
Press "Scan" button at the bottom and the application will begin searching for files. It may take a few minutes depending on how many file types you've selected.
During the process, the interface provides real-time feedback with a progress bar, an estimated time remaining for completion, and a constantly refreshed list of found files.
You can even preview photos while scanning is in progress.
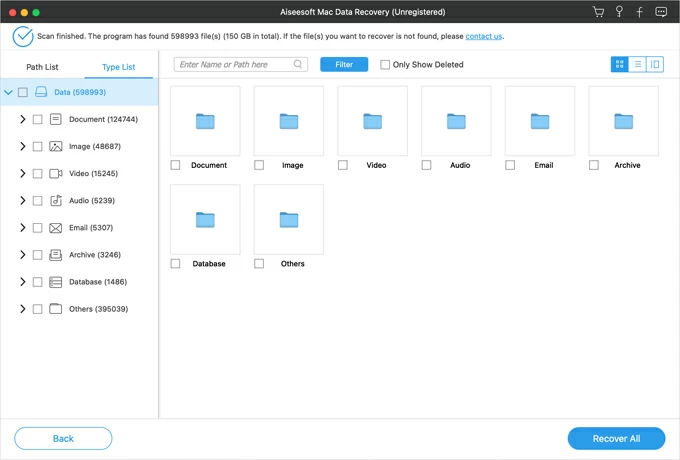
Step 4: Recovering files from Trash bin on Mac
Great! So we're ready to let the application restore deleted files for us.
Select the files from the list, and then click "Recover" button at the bottom. You'll see a popup asking you to specify a store folder for the recovered files. Make sure to save the recovered file in a place different from where it was deleted.
Again, click the "Recover" button and you're good to go.
Your recovered files will be found in the folder you previously specified.
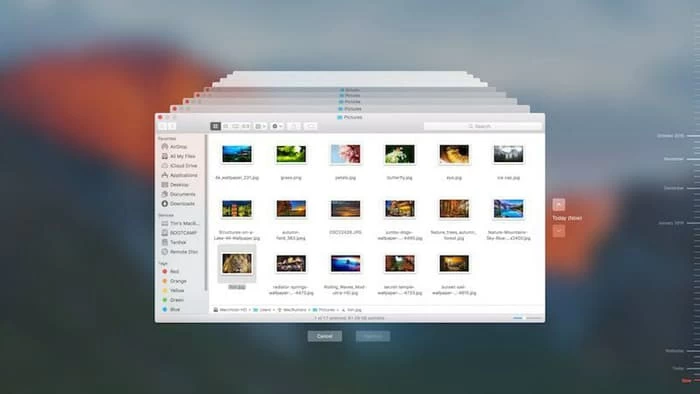
You may also go to confirm if you have enabled the automatic backup of your files via Mac's Time Machine tool. Even if you have emptied the Trash, they may still remain in the Time Machine backup or snapshot.
To find and restore files from an emptied Trash folder on Mac with Time Machine backup, follow these steps:
1. Open the Time Machine icon in your menu bar and then "Enter Time Machine."
2. Navigate to the desired backup date on the timeline.
3. Use the Spacebar on your keyboard to preview files. If your lost files are contained in this backup file, you're ready to recover them.
4. Select the files or folders you need back, and click "Restore."
Also: How to recover deleted photos on Mac
Unfortunately, there is never a guarantee to retrieve files and folders from Mac Trash after emptying. Losing files is a deeply frustrating experience, but don't let emotions dictate your actions. It's time to perform regular backups.
Even just enabling the Time Machine or iCloud Drive functionality in your Mac will give you some peace of mind. Read more about how to back up Mac files on Apple's support document here.
Q1- Where is my Trash folder on Mac?
On macOS, the Trash folder is typically represented by a trash can icon in the Dock. If you can't find your Trash, you may open Launchpad and select the Trash icon from there to access it. Or press Command + Shift + G combo on your keyboard. When "Go to Folder" dialog appears, type "Trash" and press Enter.
Q2- How can I empty Trash on a schedule?
If you prefer to automatically clean out your Trash, there is a Finder setting available for you to enable: select Finder > Settings > Advanced, then turn on "Remove items from the Trash after 30 days" option. Once enabled, a file removed to Trash will be emptied after 30 days passes.
Q3- How can I restore Trash icon to Dock after I removed it by mistake?
If you accidentally deleted Trash icon from your desktop, you may enter "Trash" in Spotlight in the menu bar, followed by " Return." When Trash opens, right-click the Trash icon, then select Options > Keep in Dock from its context menu.
Q4- Can I recover deleted Trash files from iCloud drive?
To perform Mac Trash recovery using iCloud Drive,
1. Sign in to icloud.com/recovery with your Apple Account
2. Click Restore Files.
3. Select any files you want to restore from the list.
4. Press Restore.
If you need to recover photos and videos from iCloud, you may go to iCloud's Recently Deleted in the sidebar.