
Text Messages Disappeared from an iPhone
If you accidentally deleted an iMessage from iPhone 12, hopefully these tips will help you recover the deleted iMessages with or without backup.
So you've accidentally deleted the iMessages when doing a clean-up in your iPhone storage, or iMessages disappeared after updating iOS or restoring device, and now, come right here to find a way to recover deleted iMessages on iPhone 12 (iPhone 12 Pro, Pro Max, Mini are covered.)
Whether by using Apple's Recently Deleted folder, restoring from a backup via iCloud or iTunes, or utilizing a third-party tool, you have options to get deleted iMessages back on the iPhone 12 to restore your message or conversation.
In this guide, we'll gather five useful routes on how to check recently deleted iMessages in the device itself, as well as how to recover deleted iMessages even you don't have a backup.
It's possible to retrieve the iMessages that you've deleted on an iPhone 12, and it's easy.
It would be a wise option of using the reliable & efficient iPhone Data Recovery tool for this iMessages recovery task. It's capable of undeleting trashed iMessage conversations from iPhone 12 without backup or data loss.
Table of Content:
Can you recover recently deleted iMessages? The answer is YES. iPhones running with iOS 16 or higher are built with a Recently Deleted folder within Messages app, letting you retrieve iMessages deleted in the last 30 days back to the main inbox, or delete them permanently.
If you mistakenly deleted an iMessages on your iPhone 12, you can first check the Recently Deleted folder for Messages and locate your deleted iMessages easily. The deleted items are recoverable for up to 30 to 40 days, and after the period, they remove from the device permanently.
To find your recently deleted iMessages on iPhone 12 with iOS 16 or later:
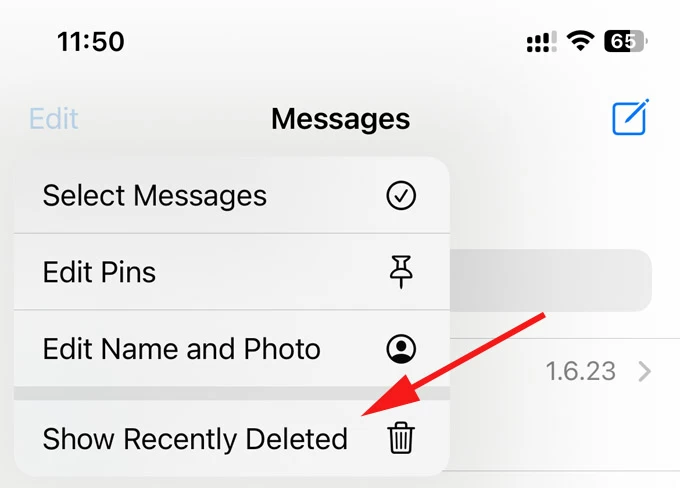
When you access the Recently Deleted folder, you're able to see all your SMS and iMessages you trashed within the last month. However, you can't actually view the deleted texts until you recover them to the conversation.
Once you find the deleted iMessages you want to restore through Recently Deleted, you can retrieve them this way:
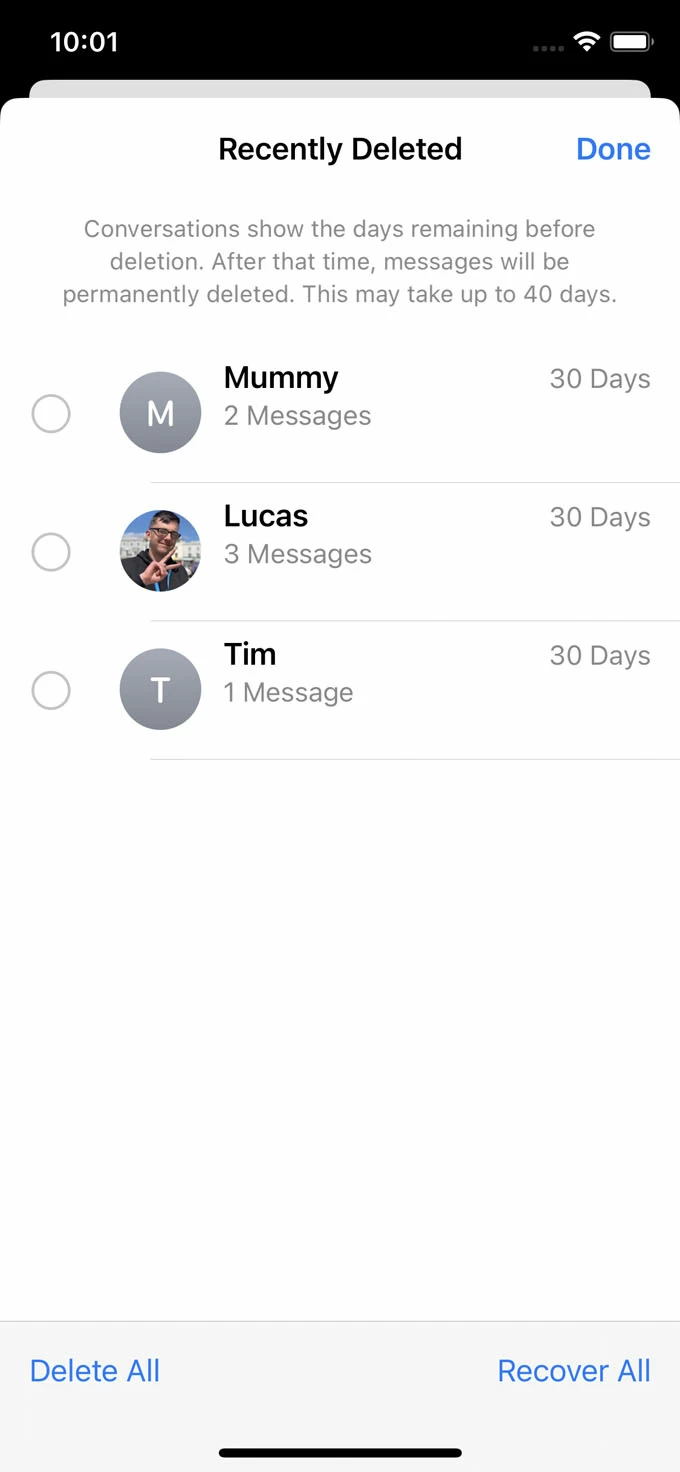
That's it. If you're planning to recover all recent iMessages that were deleted, you can choose Recover All to swiftly get them back to the main message inbox.
Chances are your iMessages are no longer available in Recently Deleted folder, or you deleted the iMessages before updating to iOS 16. Is it possible to retrieve permanently deleted iMessages on your iPhone? Well, whether you got your iPhone 12 backed up or not, there's a chance to recover deleted iMessages effortlessly.
With a backup: An iTunes backup or iCloud backup offers the most effective and easy way of recovering iPhone 12 deleted iMessages. So make sure that you've backed up the data before iMessages were deleted or lost.
Without a backup: You need to stop using your iPhone 12 to avoid overwriting the iMessages that remain in the internal memory and use a third-party utility to get the job done.
iPhone Data Recovery is your one-stop shop for retrieving permanently deleted iMessages from the iPhone 12 storage. It can make the recovery process relatively straightforward, as it automates the process of accessing the internal storage and scanning around it to find the iMessages that are available to restore, after which you're able to preview messages and choose whatever you want to get back. The process will not restore your phone or delete any data inside.
Plus, the software provides Recover from iTunes Backup File mode and Recover from iCloud mode to get back your lost data using a backup.
Important Note: To enhance the success rate of iMessage recovery, you need to stop using your iPhone 12 to ensure that the device is not overwritten with new data. The deleted iMessages are still in the memory and can be found by iPhone Data Recovery tool unless any new data write to the phone.
Follow the steps below to recover deleted iMessages on an iPhone 12 without a backup.
Step 1: Download the application on PC or Mac and install it. Then launch it.
Step 2: Choose "Recover from iOS Device" shortcut on the left, and plug your iPhone 12 to your computer via a lightning cable.
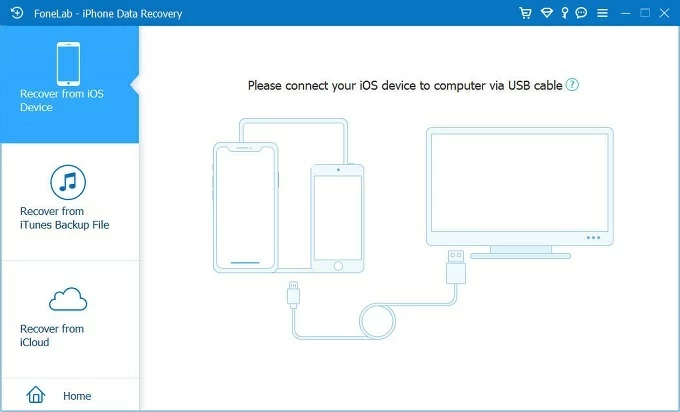
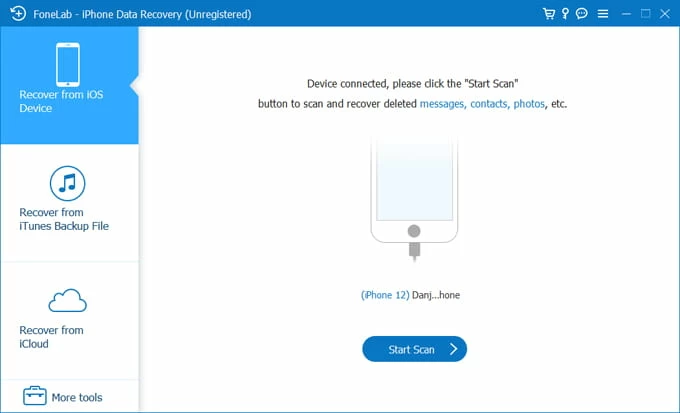
Step 3: When it's connected, hit Start Scan button to initiate a thorough scan in your phone storage for the deleted iMessages on iPhone 12.
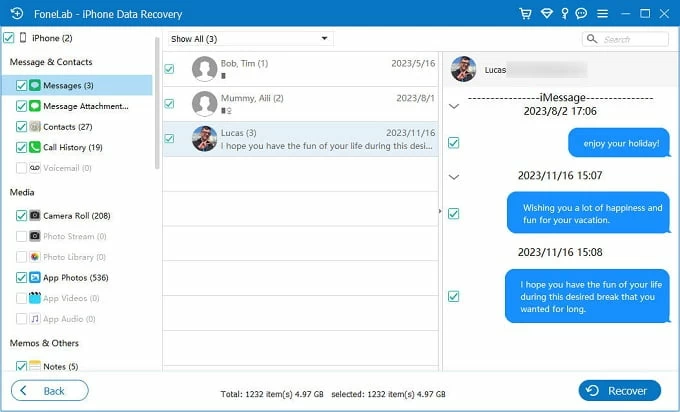
Step 4: Preview deleted iMessage conversations. After the scan, click "Messages" option from the left column, and a list of your messages will appear, showing contact's name or phone number, and number of messages in the thread. You're able to click on a thread to see the individual texts in an iMessage conversation, including text history, images, videos, stickers, emojis, and other attachments.
Step 5: Locate and recover deleted iMessages. Select the entire message threads or individual texts in a conversation, and click Recover button in the bottom right of the window to restore them to your computer.
[Don't Miss: How to Recover iPhone Contacts without Backup]
If you're looking for a way to recover your deleted iMessages without linking to a computer, then you need to rely on your iCloud backup.
Restoring an iCloud backup essentially erase your iPhone 12 and rolls anything back to the date when that backup was created. Any changes you made or any data you added to the iPhone since the backup will be lost.
If you're sure that your iPhone 12 has been backed up over to iCloud, use these steps to restore the backup and you'll retrieve the iMessages (and other data) that were archived in the backup.
1. In iPhone 12, tap Settings > General > Transfer or Reset iPhone.
2. Choose Erase All Content and Settings. This will erase the device and take a few minutes to finish.
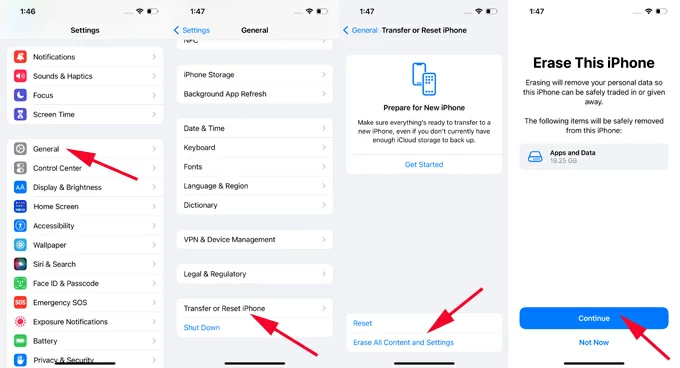
3. When you iPhone restarts, set it up using the on-screen instructions.
4. In the Transfer Your Apps & Data screen, tap on From iCloud Backup.
5. Enter your Apple ID password for your Apple ID so you can access your iCloud backups.
6. Choose your most recent backup containing deleted iMessages and the recovery process begins automatically.
Let your phone do its business and restore old deleted iMessages from iCloud backup.

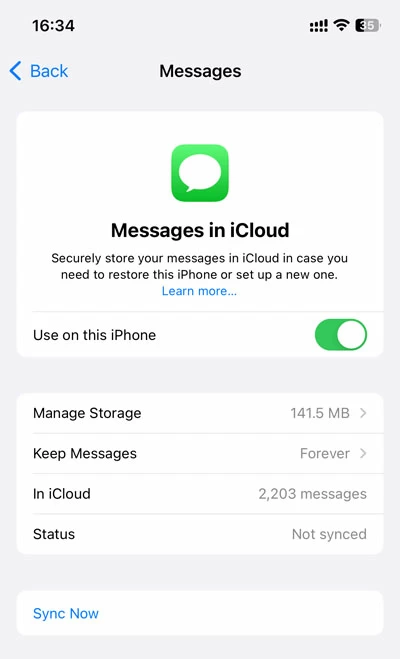
If iCloud Messages is toggling on, iMessages could sync a ross all Apple devices shared the same Apple ID. When your iMessages get deleted, you can try restore them from iCloud Messages by turning Messages in iCloud off and back on.
Go back to Messages app and you should find your lost iMessages reappear.
If you recently backed up your iPhone 12 to computer before the deletion or loss of iMessages, you can get back old iMessage history by restoring your device from iTunes/ Finder backup.
According to iTunes, restoring a backup will erase your iPhone 12 to factory settings and extract anything that was present when the backup was made to the device, not only the iMessages. But luckily, with iPhone Data Recovery program, you don't have to factory reset your iPhone. It grants you to preview what's in the backup file and selectively retrieve iMessages you deleted on the iPhone 12.
1- Run iPhone Data Recovery application, and choose Recover from iTunes Backup File.
2- A list of available backups on your computer will show up. Choose the one that includes your deleted iMessages and click Start button to let the software analyze your backup.
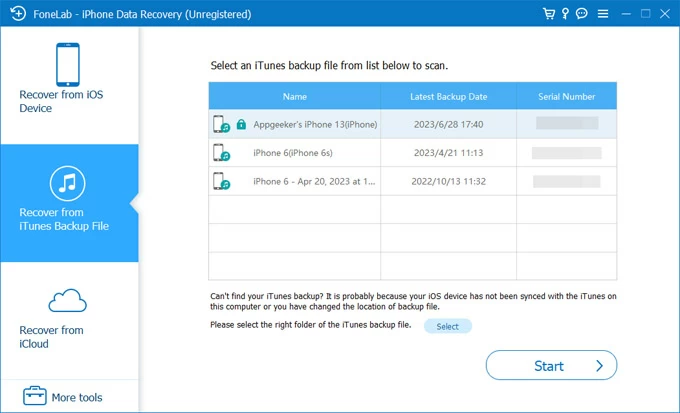
3. After scanning, click "Messages" category in the left side to see your iMessage threads and individual text history.
4. Select the iMessages you wish to restore, and finally click the Recover button to retrieve them to your computer and save as a printable CSV or HTML file. Done!

Assuming you are an Apple fan and don't mind resetting your iPhone 12 or losing anything currently in the device while restoring iTunes backup, do the following with iTunes or Finder.
1. Plug your iPhone 12 to PC or Mac where you backed up with.
2. Open iTunes. If you're using MacOS Catalina or above, launch Finder on your Mac.
3. In iTunes, click Device icon on the upper-left corner of the screen and choose Summary on the left. In Finder, choose your phone under Devices from the left list and then click General tab at the top.
4. Click Restore Backup.
5. Pick the most recent backup that may contain your deleted iMessages to recover.
6. Hit Restore button. Wait for iTunes/ Finder app to restore anything like photos, contacts, messages, notes from backup to your phone. Your iMessages that have been deleted should return to Messages app.
