
How to transfer photos from iPhone to Windows 7 PC
Have too many photos on your iPhone 16 and want to transfer them to your computer? Explore these 7 excellent ways to transfer iPhone photos with or without USB cable!
When it's comes to photo transfer from iPhone 16 to computer, here are a few helpful ways:
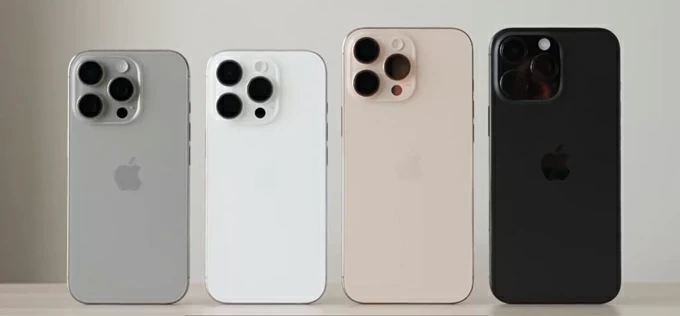
There are multiple ways to transfer photos from iPhone 16 to a Windows computer or a Mac with ease.
Transferring photos from your iPhone 16 to computer can be a straightforward process. Whether you're looking to free up iPhone space, organize your memories, create backups, or simply edit your pictures on a larger screen, this guide will walk you through various methods on how to transfer photos from iPhone 16 to computer, ensuring you can easily move your previous iPhone photos to your Windows PC or Mac with simple steps.
Table of contents:
A Windows PC provides a simple method to import photos from your iPhone 16 using a USB cable. With a physical connection, both the Windows Photos app and File Explorer enable you to transfer iPhone photos to computer effortlessly.
Built in to Windows computer, the Photos app is designed to manage all your pictures and videos in one place. If you have iTunes, it also allows you to import photos from external iOS devices, including your iPhone 16, iPhone 16 Plus, iPhone 16 Pro, or iPhone 16 Pro Max.
To import photos from your iPhone to Windows 11 / Windows 10 computer, you will need a suitable USB cable. Here's how to transfer photos from iPhone 16 to PC via Windows Photos:
1. On Windows computer, click the Start button and open Photos app from the start menu.
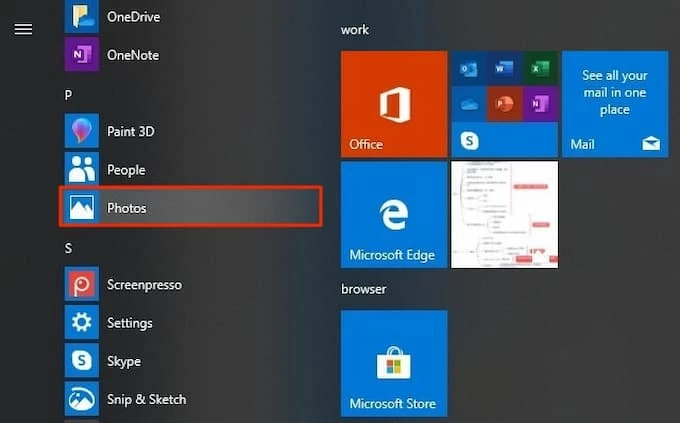
2. Connect your iPhone 16 via a USB data cable. Make sure to turn on your device and unlock it.
3. Click the Import button and select From a USB device or From a connected device in the top right corner. It will automatically detect your iPhone and load all available photos.

4. Select the photos for transfer and pick a local folder where you want to save them. Optional: You can decide whether to keep or delete original pictures after import.
5. Click Import button to start iPhone photo transferring.
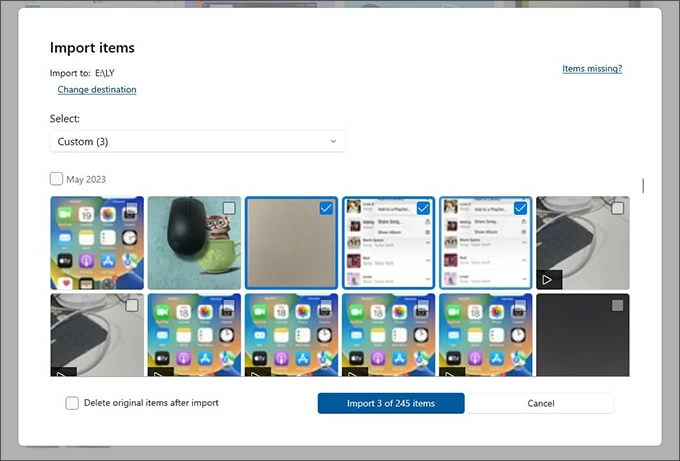
Don't unplug the device until the process is complete. Once your iPhone photos are imported, navigate to the computer folder to access them.
Alternatively, you can open a File Explorer window on your PC and connect your iPhone 16 to transfer photos and videos. The process is relatively easy, but be aware that the iPhone photos will be organized by month rather than by your original albums, which may make it more time-consuming to locate the pictures you want to transfer.
To transfer iPhone 16 photos to Windows computer using File Explorer:
1. Plug in your iPhone 16 via a USB cable. If asked, unlock your device and trust your computer.
2. Open a File Explorer window and move to This Computer.

3. Under Devices and drives, select Apple iPhone > Internal Storage > DCIM.
4. Select your desired photos and right-click on them > choose Copy from the expanded options.

The iPhone photos are stored in different folders, sorted by month.
5. Paste the copied photos to a different or new folder on your computer.
After that, you can open the computer folder to view all transferred iPhone photos as you want. Get more tips if you'd like to transfer your iPhone photos to a USB drive for backup.
Whether you're using a Windows PC or macOS computer, the all-in-one iPhone Data Transfer tool makes it easy to transfer photos from your iPhone to your computer seamlessly or vice versa, including your camera roll, live photos, app images, videos, and more.
With simple clicks, you're able to move a large number of photos from an iPhone 16 to computer without quality loss. It can also convert HEIC images to JPG for better compatibility.
In addition to iPhone photo transfer to computer, this tool supports various file transfers across iOS and Windows/macOS/iPadOS, such as music, videos, contacts, messages, and more. Follow these steps to quickly transfer photos from iPhone 16 to PC or Mac:
Step 1. Open iPhone Data Transfer and connect your iPhone 16 to computer.
Run this iOS photo transfer tool on your Windows 11, Windows 10 PC or Mac; then link your iPhone with a USB cable. Make sure to unlock the device and allow it to trust your computer.

Step 2. Preview and select the iPhone photos you want to export.
Once it reads your iPhone successfully, all your current photos will load on the screen. Click the Photos tab to view your photo library and albums, then select the pictures for transfer.
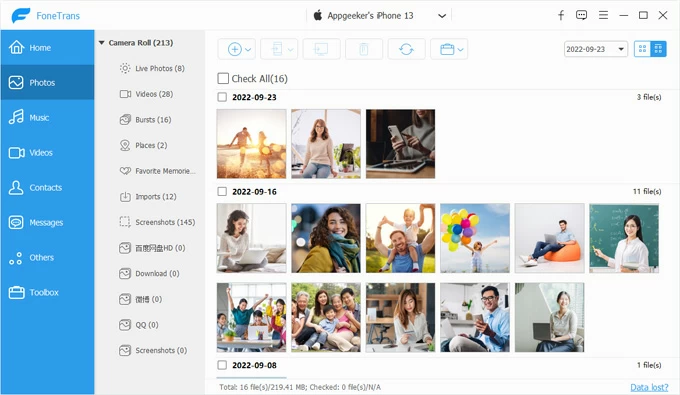
Step 3. Transfer photos from your iPhone 16 to computer.
Click the computer icon at the top toolbar, and choose Export to PC. In the pop-up window, specify a computer folder to save your iPhone photos.
If you're transferring a single album, simply right-click on it and choose Export to PC to move iPhone album individually.
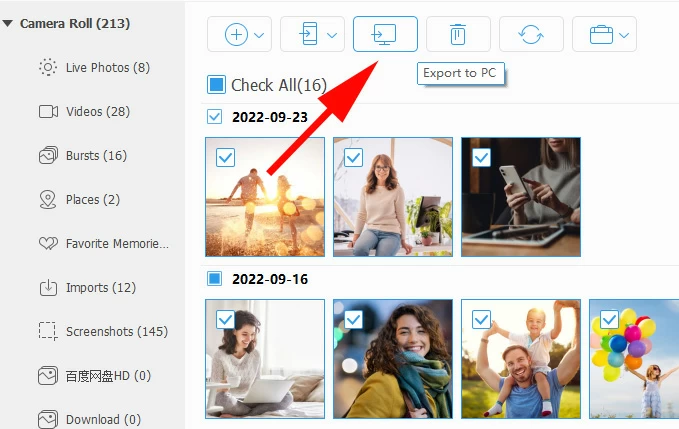
Afterward, the iPhone photos will be transferred to your computer all at once. Alternatively, you can drag photos from your computer into this window to transfer photos from PC to iPhone.
To transfer entire Photo Library from your iPhone 16 to your computer, simply use the one-click feature of iPhone Data Transfer. This allows you to transfer all your current iPhone photos to your computer with a single click, whether you're looking to free up space or create a backup.


Keep the device connected until all photos on your iPhone 16 move to your computer.
If you're in need of transferring iPhone photos to an external hard drive, simply plug in the drive to your computer and select it as the location storage before the transfer.
While cable-based methods make transferring iOS photos to computer easy, some wireless options like iCloud Photos, AirDrop, and email empower you to make photo transfer from iPhone 16 to computer without a USB cable, especially if you don't have one available.
For wirelessly transferring iPhone 16 photos to computer, iCloud Photos is your best option. With 5 GB of free cloud storage, it syncs your photos across devices and keeps them updated. If you've enabled iCloud Photos on your iPhone 16, your entire photo library will be uploaded and stored in iCloud, allowing you to download them to your PC or Mac without a USB cable.
Note: Ensure there's enough iCloud storage for the photos you want to move. If you have a huge photo library to transfer, update to iCloud + for more available storage space.
See how to download photos from iPhone 16 to computer via iCloud Photos:
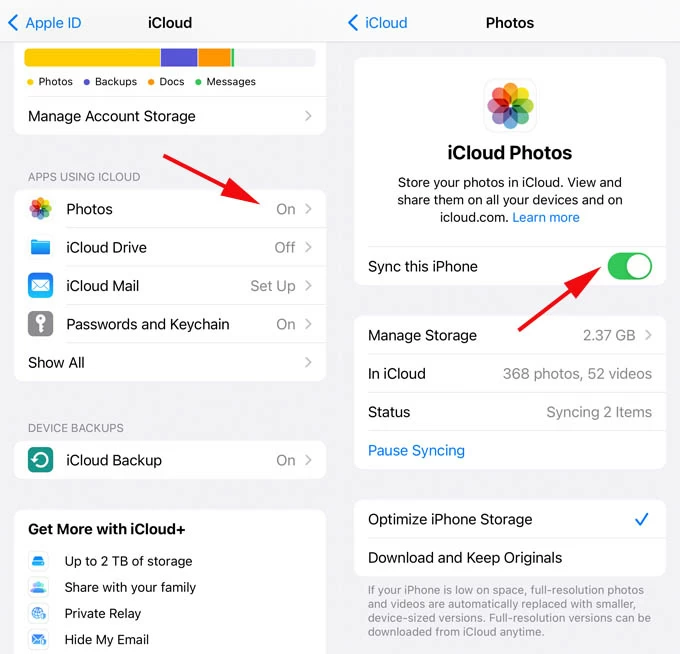
Step 1. Enable iCloud Photos on iPhone 16.
Go to Settings > your Apple ID > iCloud > Photos; turn on Sync this iPhone option. This will upload your cameral roll photos and videos to iCloud storage once you're connected to Wi-Fi.
Step 2. Sign to iCloud.com on computer.
Open a browser on your PC or Mac and visit iCloud.com. Log in with the same Apple ID and password associated with your iPhone.
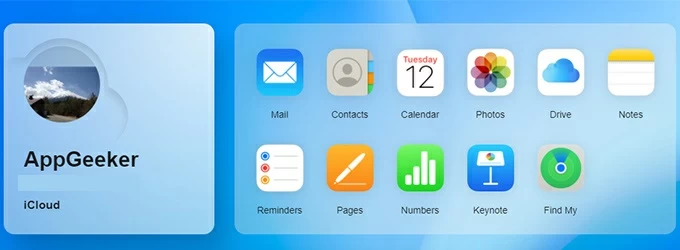
Step 3. Download iPhone photos to computer.
When you're in, choose Photos from iCloud menu; then select the photos and videos, and click the Download button at the top right corner to get them onto your computer.

This way, you can easily access iPhone photos on your PC or Mac and download anything you need. If your iPhone photos disappeared due to unknown reasons, click to find more fixes.
In case you're running out of iCloud storage, other cloud services like Google Photos, OneDrive, Dropbox can provide more free cloud storage for iPhone photo transfer to computer.
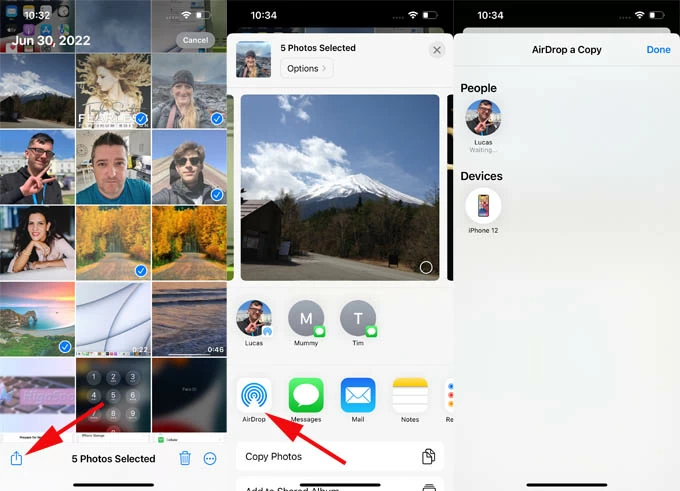
Pre-installed in Apple devices, AirDrop is undoubtedly a fast way to transfer photos from an iPhone 16 to a nearby Mac or MacBook. If you only need to move a few pictures or videos, simply place your iPhone and Mac within Wi-Fi and Bluetooth range, and do the following to wirelessly transfer photos from iPhone 16 to Mac via AirDrop:
1. Turn on AirDrop on your iPhone through Settings > General > AirDrop > set it to Everyone.
2. Open Finder on your Mac and select AirDrop in the left menu, then allow your Mac to be discovered by Everyone.

3. Access Photos app on your iPhone 16 and tap to select the pictures you want to transfer.
4. Tap the Share button at the bottom and choose AirDrop from the options.
5. Wait till your iPhone detects your Mac.
6. Tap on your Mac to share the photos from your iPhone.
7. On Mac screen, click Accept when a pop-up window asks you whether to accept the files.
Another way for wireless transfer of iPhone photos to computer is to email the photos to yourself. It works when you only have a few photos to move. Simply attach the iPhone photos in an email and send it to yourself, then download the photos onto your computer.

By following the above methods, you can transfer photos on iPhone 16 to a Windows PC or Mac computer easily, with or without USB cable. If you have more questions on getting photos from iPhone to computer, check out these FAQs:
1. Why can't I transfer my photos from iPhone to computer?
If you can't import iPhone photos to a Windows computer when using the Photos app or File Explorer, check if your iPhone is firmly connected by a suitable USB cable.
Alternatively, when using iCloud Photos or other cloud storage services to sync iPhone photos with computer, make sure you have enough cloud storage and connect to a stable Wi-Fi network. For AirDrop sharing, ensure your Mac and iPhone have both enabled AirDrop and are placed near each other.
If none of these works, try the iPhone Data Transfer software that moves pictures and videos from iPhone/iPad to PC/Mac via a USB cable in clicks.
2. Can I transfer all my iPhone photos to my computer?
Yes. If you have a large number of iPhone photos and need to transfer them all to your computer, here are a couple of ways to do it:
3. How to transfer photos from an iPhone to a Windows PC without iCloud?
The most common way to transfer iPhone photos to PC without iCloud is using the Photos app on Windows 11/Windows 10:
Once the transfer is complete, you can access your imported photos on computer and safely disconnect your device.
4. Is it possible to transfer photos from my computer to my iPhone?
Yes. Whether you're looking to transfer photos to your iPhone from a Mac or Windows PC, the cross-platform data transfer tool - iPhone Data Transfer supports seamless photo and video transfer from or to an iPhone.