How to Transfer Music to iPhone without Syncing
Bring your songs over! Here's how to sync music from iPhone to (new) iPad - with iTunes, without iTunes, wirelessly, AirDrop, Bluetooth, iPhone music to iPad transfer tool.
Wondering how to transfer or sync music from iPhone to iPad without iTunes or computer, or without Apple Music subscription? Take a close look at iPhone Data Transfer. The app enables transferring music from one iOS device to another directly over a USB cable, and getting your own music on your iPhone - ripped CDs music or MP3's from other sources, onto iPad effortlessly.

Transferring your songs - Apple Music, iTunes purchases, or music from other sources, over from iPhone to iPad is pretty easy.
So you've got yourself an iPhone and an iPad, and decide to sync iPad to have the same music and the same playlist, or to have some of your favorite songs, as on iPhone. Transferring music from iPhone to iPad doesn't have to be a daunting task, and here we'll show you how to move music from iPhone to iPad, especially you're switching to a shiny new iPad.
Apple offers no direct way to sync the music from iPhone to iPad. iTunes can only transfer purchased songs to iTunes library and then add to the iPad; Or perhaps you joined Apple Music, you can use Sync Library to access your music and playlists across iOS devices linked to the same Apple ID by sharing the music which is on your iPhone to your iPad.
So what about your MP3 music collection? So does the music you ripped off a CD and then synced onto your iPhone? Don't worry. Get the right way below to make the music transfer from iPhone to iPad with ease.
The article offers a few ways to transfer music from your iPhone to iPad. Pick the most suitable one to put the songs onto iPad, depending on the sources of the music on your iPhone.
If you have music, playlist, or album on your iPhone you bought from iTunes, simply apply iTunes to transfer the music from your phone into iTunes library and then sync the iPad to transfer the songs. Or you can re-download the purchases in iTunes Store on iPad without needing to go via a computer.
Bear in mind that music purchased under one Apple ID will need to be purchased again using a different Apple ID. Now, make an attempt to transfer purchased songs from your iPhone to your iPad using iTunes.
1. Open iTunes on your computer. Make sure it's running the latest version by going to Help > Check for Updates.
2. Connect your iPhone to iTunes.
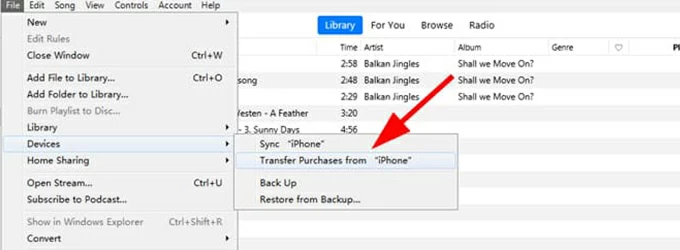
3. On the iTunes toolbar, click Files.
4. Choose Devices > Transfer Purchases from [your iPhone]. Wait for a while to let iTunes transfer your purchased music to the library. When finished, unplug your phone.

5. Now plug your iPad to iTunes.
6. Click Songs under Library on the sidebar to access your iTunes library with all the music you just synced from iPhone.
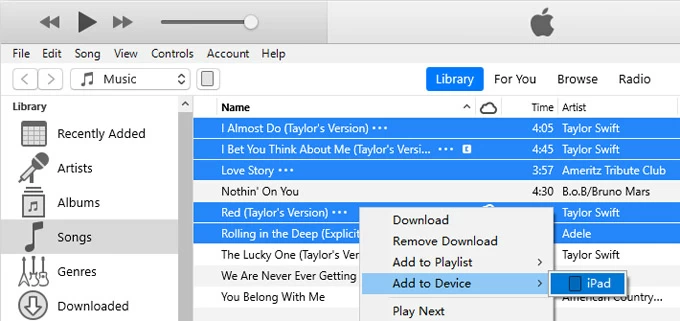
7. Select the songs you'd like to transfer to your iPad.
8. Right click on the selections and choose Add to Device > [your iPad].

If you don't prefer the two-step route of first syncing songs from iPhone to the iTunes library and then transferring the synced songs in iTunes to your iPad, then get ready to download previous iTunes music purchases onto the iPad. To transfer purchased songs without iTunes, simply redownload music that you purchased in the iTunes Store app with your Apple ID via the Purchased tab on iPad.
Chances are that you already synced the music to iPhone using iTunes. This means all the music physically on your computer has been added to your iTunes library to be synced to your phone via USB cable.
If this is your case, you can sync your iPad with the same iTunes library to get the music on it, the same way you sync your iPhone. Syncing with iTunes can only transfer non-purchased music in your personal iTunes library to the iPad, like your personal songs that you had previously recorded from CD's. Take these steps to transfer music from iPhone to iPad through iTunes.
Since the music is in the iTunes library on your computer that you used to sync to your iPhone, now, it's easy to transfer music from between iPhone and iPad by a synchronization:

iTunes tends to delete any existing tracks on your iPad if you ever synced to a different library - during the transfer of music from the iPhone to the iPad. But you don't have to worry about this kind of data loss if you got a brand new iPad.
BONUS: If you have collections of CDs and want to get the music onto your computer and then put into your iTunes library or onto your smartphone or elsewhere, a way easier than ripping is to record. With AppGeeker Audio Recorder, you could record the sound while you're playing the CD on the computer. Also Read: How to Record MP3 Audio on Windows 10 Computer
If you'd like to get an approach to transfer music that you have on iPhone to iPad wirelessly, you need to be a subscriber to Apple Music. The service will allow you to get your whole library on your iPad and other iOS devices you use with the same Apple ID. The same would be true if you happen to subscribe to iTunes match, which syncs your iPhone music to iCloud and share the same music library with the iPad signed in to your Apple account.
To wirelessly move music from an iPhone to an iPad and get access to your music library, make sure that you are using the same Apple ID on both your devices and have the Sync Library turned on for Apple Music or iTunes Match.
To enable Sync Library feature on both iPhone and iPad to sync the music between them over the internet, go to Settings > Music, then tap the toggle for Sync Library to make it turn green meaning that it's ON.
You may want to transfer music straight from the iPhone to the iPad, as:
To get around this, you may need to use iPhone Data Transfer software which offers advanced option for enabling direct device to device transfer. You can transfer music from an iPhone and put that music onto an iPad without having to go back to your computer, or having to transfer via iTunes.
Whether you're transferring the songs from your old iPhone to your new iPad, or moving the songs, playlists, music albums between your iPhone and one other person's iPad if they have different Apple account, you're able to complete this with this iPhone to iPad music transfer tool, and mostly important, you won't lose any music accumulated on your phone over time.
The software also works for transferring iTunes U, podcasts, ringtones, audio books, photos, videos, contacts, messages, etc. across iPhone, iPad, and computer.
Now that iPhone Data Transfer program is the way of transferring playlist and music from iPhone to iPad other than using iTunes from your computer again, let's see how it works.
Step 1: Fire up the application on your computer once you get it installed properly.
Step 2: Connect both your source iPhone and your target iPad to the computer via USB cables for a direct transfer. You could then see both devices are in the "Connected" status at the top middle bar. Make sure your source iPhone is checked so you can get songs to your iPad.

Step 3: Click Music tab from the sidebar on the left. This displays all of your songs and playlists on your iPhone.

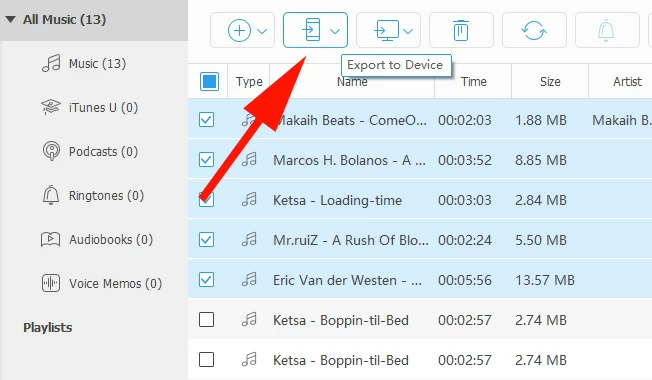
Step 4: Select your desired songs to sync from iPhone to the iPad by checking each checkbox for the music.
Step 5: When you're ready, hit the Export to Device icon on the toolbar and select your iPad from the pull-down list. All selected songs on your iPhone are now moving to your iPad seamlessly.

That's done. The transferred music will be living in the Music app of iPad, which looks the same on your iPhone.
Don't Miss: How to Add Music to iPhone without iTunes
It's also possible to transfer the music from iPhone directly to iPad without using iTunes or computer.
Apple's AirDrop grants users to wirelessly get the music that is on an iPhone onto an iPad nearby. However, AirDrop limits itself to share an iTunes Store link for the song, not the song itself. If you have Apple Music subscription, you could add the song to your iPad's music library quickly and play it offline; otherwise, you can only listen to that music for a limited time.
Note that you can AirDrop one song at a time. So if you have multiple songs to transfer over to iPad, repeat Step 2 - 7 below.
1. Make sure AirDrop is enabled on both the iPhone and the iPad.
2. Open Music app on your iPhone to copy the music from.
3. Navigate to the song you want to share, then tap the three-dot next to it to open a menu.
4. Tap Share Song.
5. From the Share options, choose AirDrop and tap on your iPad to transfer a song to.
6. When transferred, you will see the AirDrop prompt saying "May Would like to share an iTunes Store link."
7. Tap on View. This will guide you to the song link, and you can add the song to library or playlist if you have a subscription to Music app.

Another feasible option is to use Email in a way to transfer your favorite songs from iPhone to iPad without iTunes and a computer involved. To transfer Apple Music on iPhone to iPad you own, do the following:
Just make sure you're using the same Apple ID you used to subscribe to Apple Music on your iPhone and iPad. If you intend to transfer the whole list music on the Music app between the devices, use Sync Library instead.
Transferring music from (previous) iPhone to (new) iPad via Bluetooth is not possible. On iOS, iPadOS and macOS, Apple doesn't generally allow Bluetooth data transfers. Instead, it uses AirDrop for wireless file transfers, which uses Bluetooth and Wi-Fi. Other wireless transfer options are Sync Library for Apple Music or iTunes Watch, and email.
To get music off iPhone, which you've imported to a computer from your CDs, and put onto an iPad without an Apple music subscription, sync the iPad with the computer which the music resides on.
For a straightforward iPhone-to-iPad music transfer without iTunes - perhaps your computer that had all your music on it crashed, but your iPhone still has all of the original music - arm yourself with AppGeeker iPhone Data Transfer. You will get an amazing experience when copying the music and the playlists contained in your iPhone to your iPad.
Read Next: How to Copy Video from Windows PC to iPhone