How to Unlock iPhone 15 Forgotten Passcode

If you're looking for fast and convenient ways to transfer your videos from your iPhone to a Windows 11 computer, this guide will provide you with effective solutions.

![]()
Carefully read this article to get the solutions to transfer videos from iPhone to Windows 11 without stress.
Transferring videos from your iPhone to a Windows 11 PC or laptop doesn't have to be a hassle. Whether you're freeing up space, editing footage, or simply backing up memories, Windows 11 offers tools and methods to make the process smooth and efficient. But with so many options—wired, wireless, or cloud-based—how do you choose the best one?
This guide cuts through the confusion, providing step-by-step methods tailored to your needs to transfer iPhone videos to Windows 11. From using Windows 11's built-in app to leveraging iCloud or third-party tool like iPhone Data Transfer, we not only show you how to transfer videos from iPhone to Windows 11 quickly and reliably, but also address issues related to format compatibility and transfer speed during the process.
Table of Contents
When you're looking for the most straightforward way to transfer videos from your iPhone to Windows 11 using a USB cable, the built-in Microsoft Photos App in Windows 11 is a reliable choice. As a pre-installed app in Windows, it can manage and import videos from external connected devices like your iPhone to local storage without additional software.
1. Unlock your iPhone and connect it to your Windows 11 PC using a compatible USB cable.
2. If a prompt appears on your iPhone, tap Trust and enter your passcode to allow Windows 11 to access your device.
3. Open the Microsoft Photos app from the Start menu. Or in the AutoPlay window that pops up, if available, click the Import photos and videos option.
4. Click Import in the upper-right corner and select your connected iPhone. Alternatively, you can locate your Apple iPhone under External Devices on the left sidebar.
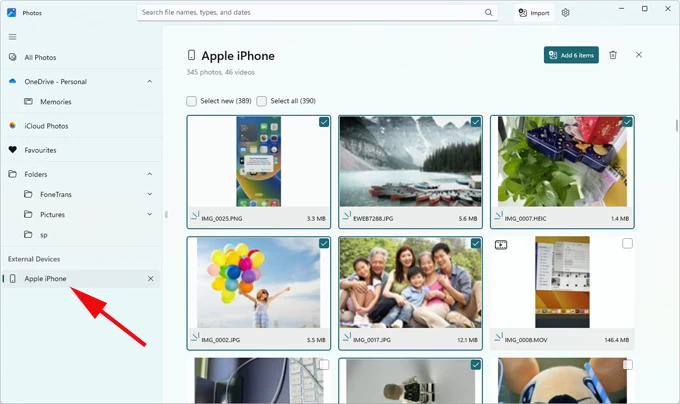
5. Select your iPhone videos. Wait for the Photos app to load the photos and videos from your iPhone's photo library, then select the videos you want one by one.
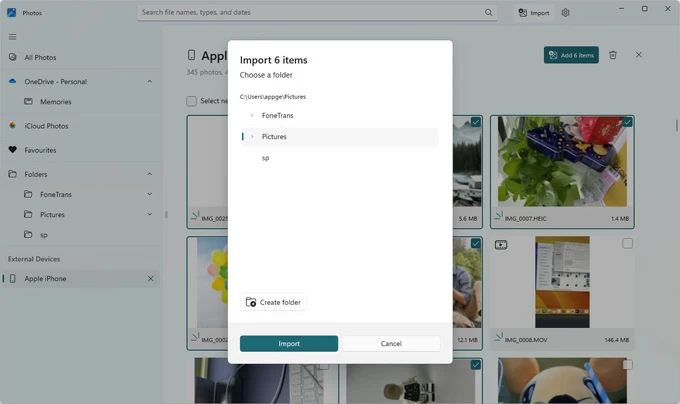
6. Import videos to Windows 11. Once selected, click Import [Number] items in the top-right corner and choose a destination folder to get videos transferred from iPhone on your Windows 11 PC.
If you have iCloud Photos enabled, you must ensure that the videos are downloaded to your iPhone in their original high-resolution format rather than stored only in the cloud. Otherwise, the Windows Photos app won't be able to detect them, resulting in transfer failures. You can refer to How to download photos from iCloud to iPhone.
Note:
To avoid video format compatibility issues or to transfer high-quality 4K videos from your iPhone to a Windows 11 PC without losing quality, iPhone Data Transfer offers advanced control over iPhone video library on Windows 11.
It can batch process large video files, quickly and efficiently transferring numerous videos from your iPhone to your computer while preserving their original quality. Besides, it supports multiple video formats and can convert videos into formats compatible with Windows 11 before the transfer, allowing you to freely view and play iPhone videos on your PC.
If you want a time- and effort-saving way to transfer various multimedia files—including videos, photos, music, messages, and more—between your iPhone and Windows, the all-in-one iPhone Data Transfer tool will not let you down. Here's how to use this software to transfer iPhone videos to a Windows 11 computer.
1. Plug your iPhone into your Windows 11 using a data cable and launch iPhone Data Transfer.

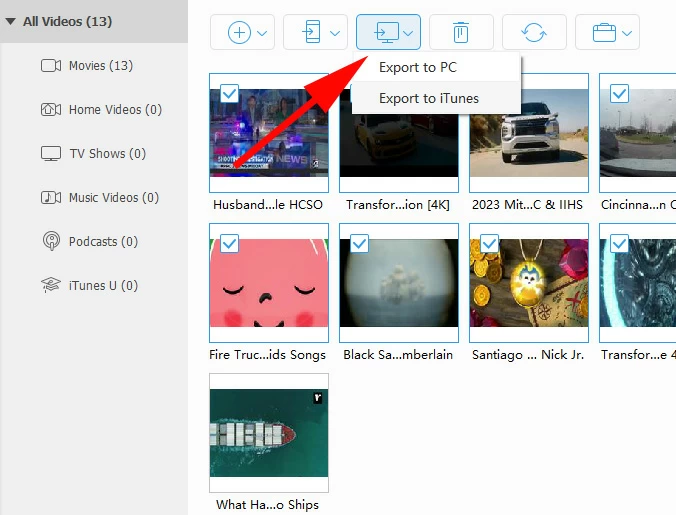
2. Locate Videos in the left menu to preview the videos from your iPhone. All videos will be categorized in Movies, Music Videos, Home Videos, TV Shows, iTunes U, Podcasts or other tabs.
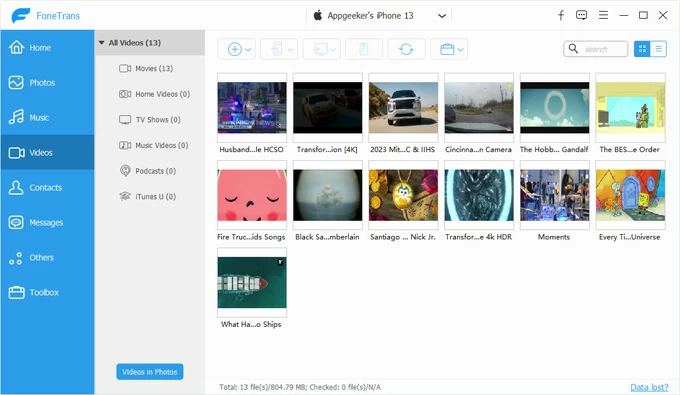
3. Choose the videos you want to transfer. Scroll through the thumbnails and check the boxes next to your desired videos.
4. Move videos from your iPhone to the Windows 11. After making your selections, click the computer icon in the top taskbar, select Export to PC, and then choose a target folder in the opened window to save the videos on your computer.
If you are using a Mac computer, you can check How to transfer videos from iPhone to Mac.
File Explorer, as a built-in file management tool that comes with Windows, can interact seamlessly with your attached iPhone. Through File Explorer, you can access the DCIM folder in your iPhone's internal storage—the standard location where iPhone saves Camera Roll photos and videos—allowing you to manually copy specific videos to your Windows 11 in their native quality and format. This also applies to transferring photos from iPhone to Windows 11.
1. Use the original data cable to connect your unlocked iPhone with your Windows 11 PC. If prompted, remember to trust your computer.
2. Press Win + E to open File Explorer and navigate to your iPhone, typically labeled as Apple iPhone, under This PC section.
3. Click Internal Storage, then select DCIM to browse each subfolder.

4. Find the video you want to transfer (Ctrl + click for multiples), right-click, and select Copy.

5. Go to any local folder on the computer, right-click, and hit Paste to move the iPhone video to your Windows 11.
Note:
With iCloud Photos enabled on your iPhone, you can wirelessly sync videos and photos from your iPhone to your computer using iCloud. You can access and download videos from iPhone to Windows 11 through the iCloud for Windows app or the iCloud official website without a physical cable connection.
But this method requires that you have enough iCloud space to accommodate your video files and make sure that the video transfer is done in a stable network environment.
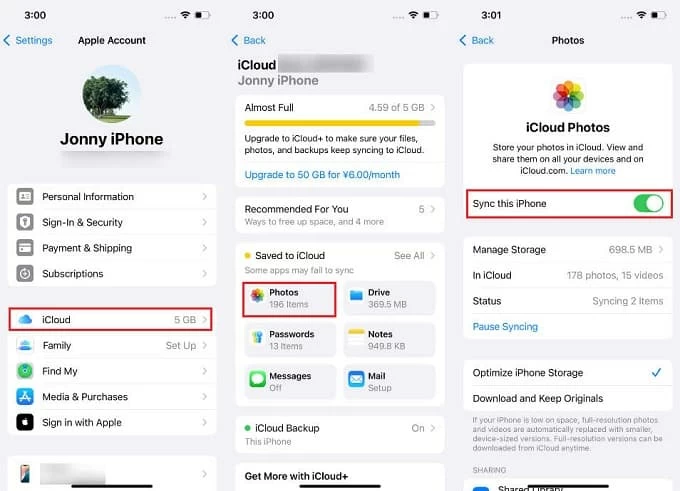
1. Ensure iCloud Photos is enabled on your iPhone. Go to Settings > [Your Name] > iCloud > Photos, and toggle on Sync this iPhone.
2. On your Windows 11 PC, download and install the iCloud for Windows app from the Microsoft Store.
3. Launch iCloud for Windows, sign in with the same Apple account as your iPhone.
4. Click the arrow next to iCloud Photos, and then switch iCloud Photos to On.
5. Depending on your needs, you can check "Download High-Efficiency format photos and videos" or "Download HDR videos."
6. Click Done, and the iPhone videos stored in iCloud will be automatically synced to your Windows 11.

After a short wait, you can go to File Explorer > iCloud Photos or Pictures > iCloud Photos in the Navigation pane to view the videos you transferred. Double-click the thumbnails to download them to your Windows computer locally for permanent storage.
Read more: How to transfer music from iPhone to PC without iTunes
For users who wish to share or transfer small video clips from iPhone to Windows 11 anytime and anywhere, using cloud services such as Google Drive is a simple and effective way. By uploading your videos to the cloud, you can access them from any device, including your Windows 11 PC.
1. On your iPhone, download the Google Drive app from the App Store, install it, and sign in with your Google account information.
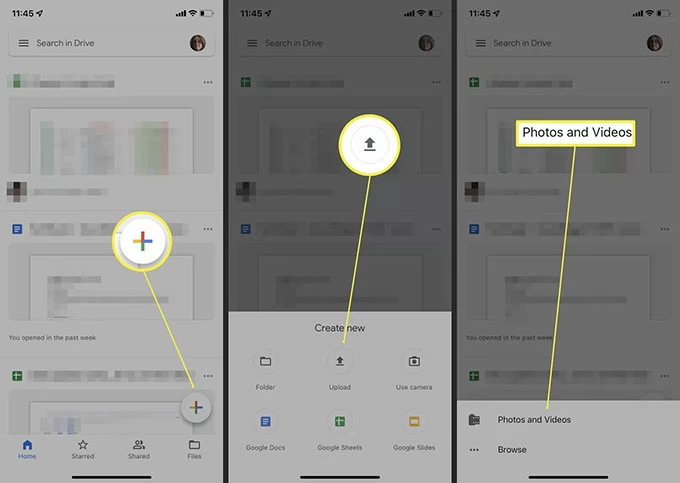
2. Open the app, tap the + button in the bottom-right corner, and select Upload.
3. Choose Photos and Videos, navigate to your Camera Roll, tap the videos you want, and hit Upload to start the process.
4. On your Windows 11 PC, visit drive.google.com on a web browser, and log in with the same Google account.
5. Locate your uploaded videos in the My Drive section or a specific folder if you organized them on the iPhone app.
6. Select the videos, click the three dots icon and then select Download to get transferred iPhone videos on Windows 11 wirelessly.
Tip: Other cloud-based services like OneDrive, Dropbox, and similar options work in the same way, but you should note whether their limited free storage space is sufficient and that video transfer speed depends on your network speed and stability.
You can categorize the methods into wired transfers (Microsoft Photos App, File Explorer, iPhone Data Transfer) and wireless transfers (iCloud, other cloud services), then choose the best method for transferring videos from your iPhone to your Windows 11 PC based on specific transfer needs, preferences and technical requirements.
Speed: Wired transfers are faster and more stable. With a physical USB cable connection, transfer speeds can reach up to 10 Gbit/s. In contrast, wireless transfers are heavily affected by network speed and signal strength, potentially extending to several hours, especially when transferring large video files.
Convenience: Wireless transfers are more convenient as they can be done anytime, anywhere, while wired transfers require you to have a compatible USB cable ready.
Video Quality: Wired transfers are better suited for transferring large numbers of files or big video files from an iPhone to a Windows 11 computer, maximizing the preservation of lossless video quality. Wireless transfers, on the other hand, are ideal for transferring video clips but are prone to external interference, which may degrade video quality.
You can also choose the most suitable method by briefly summarizing it below: