
Move Music from iPhone to PC without iTunes
Transferring photos from laptop to iPhone lets you access your precious pictures anytime, anywhere. Check out these 6 efficient ways to transfer your photos easily!
While laptops are great for editing and managing photos in one place, you may want to transfer photos to your iPhone for easy access and sharing on the go. Fortunately, there are several methods available to help you transfer photos from laptop to iPhone effortlessly.

Transferring pictures on laptop to iPhone is straightforward with right tools, whether using iTunes or not.
In this guide, we'll show you how to transfer photos from laptop to iPhone in various ways. Whether you prefer using a USB cable or wireless cloud services, you'll find the best solutions for photo transfer from your laptop to iPhone.
These methods are compatible with almost all laptop brands, including HP, Dell, Lenovo, Acer, Asus, Apple, Samsung, Microsoft, and more. Let's dive into the step-by-step instructions!
Compatible with a wide range of laptop brands, iPhone Data Transfer enables efficient photo transfer between iPhone and laptop without losing any quality, all in a few clicks.
TIP: Before transferring photos to iPhone, make sure the pictures on your laptop are saved in a format compatible with iOS, such as JPEG, PNG, HEIC, etc.
Transferring photos from laptop to iPhone can be easy if you have iTunes installed. Supported by Apple official, iTunes allows you to sync photos from a specific folder on your laptop to your iPhone's Photos Library directly. With a USB cable connection, here's how to transfer laptop photos to iPhone with iTunes:
TIP: Using iTunes for laptop to iPhone photo transfer will overwrite your existing Photos Library. To avoid data loss, ensure there's a separate backup of your current pictures.
Step 1. Install and open iTunes on your desktop. If you're using a laptop with macOS 10.15 or later, open the default app Finder.
Step 2. Connect your iPhone to laptop via a USB cable. When asked, unlock your iPhone and tap Trust in Trust This Computer prompt. Get help if you forget your iPhone passcode.
Step 3. Click the device icon in the top-left corner of iTunes window. It shows up when the iOS device is truly connected.
Step 4. Head to Photos tab on the left sidebar and select Sync Photos checkbox.
Step 5. In the drop-down menu, choose a source folder on your laptop, where your desired photos are stored. You can choose to include videos or not.
Step 6. Click the Apply button to start syncing photos to iPhone.
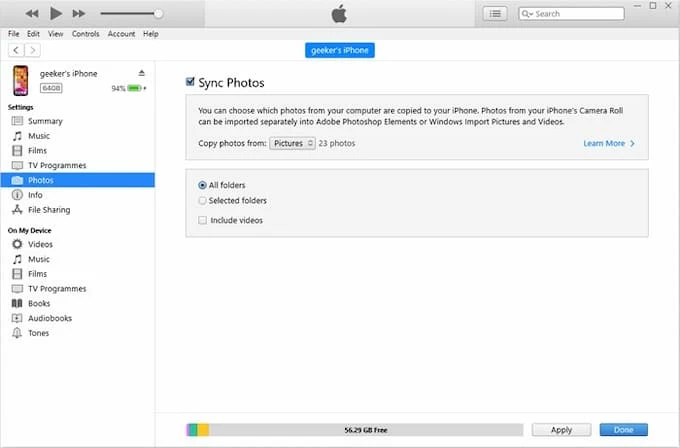
Once done, the selected laptop photos are moved directly to your iPhone's Photos Library for local viewing, editing, and sharing. The original iPhone photos and videos will be replaced. If you have a previous backup in iCloud, try restoring your photos from a recent iCloud Backup.
If you're looking to transfer photos from your laptop to your iPhone while preserving your current Photos Library, iPhone Data Transfer can be a lifesaver. Compatible with both Windows and macOS laptops, this tool allows you to directly import unlimited pictures and videos from a laptop to iPhone or vice versa, without losing any quality.
When transferring photos on your laptop to iPhone, it can automatically detect any incompatible images and convert them into iOS-friendly formats like JPEG, PNG, or HEIC. Plus, it works seamlessly with almost all laptop brands, including Lenovo, HP, Dell, Acer, Asus, Sony, Toshiba, Microsoft, IBM, Samsung, etc.
Whether you're moving specific photos or performing a bulk transfer of entire folders, this method provides a straightforward way to transfer photos from laptop to iPhone without iTunes:
Step 1: Run iPhone Data Transfer on laptop and connect your iPhone via a suitable USB cable.
It works for both Windows and macOS laptops. To ensure your iPhone is well-connected, enter your iPhone passcode and allow it to trust the laptop you're using.

Step 2: Select Photos tab on the left sidebar to access your iPhone Photos Library.
Here, you're able to view all media content in your iPhone's Photos Library, including albums and Camera Roll. You can delete unwanted items or create a new album to add laptop photos.
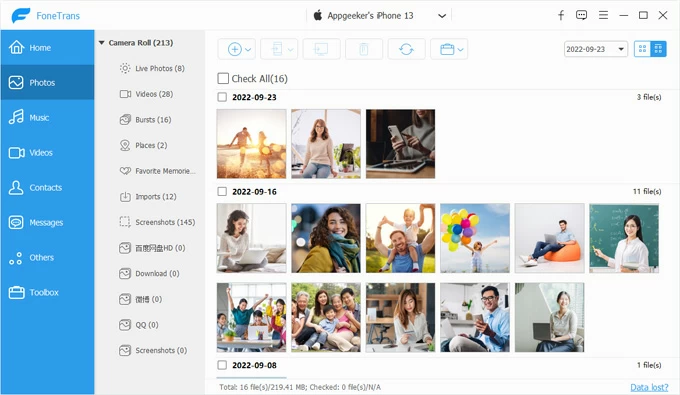
Step 3: Select and transfer photos from laptop to iPhone.
Click add + button at the top toolbar and choose Add File(s) or Add Folder; a sub-window will open up, letting you choose multiple photos or an entire picture folder to import to iPhone.

Keep your device connected; the laptop pictures will transfer to your iPhone's Photos Library directly, without using iTunes or overwriting any current data. Moreover, this tool also supports transferring videos, music, messages, and contacts between iPhone and laptop seamlessly.
In addition to using a wired connection, there are alternative options for photo transfer from laptop to iPhone wirelessly — whether using cloud-based services, email, or AirDrop.
Built into Apple ecosystem, iCloud Photos allows you to transfer photos to iPhone from laptop wirelessly. By uploading your laptop pictures and videos to the cloud storage, iCloud Photos will automatically sync them across all devices linked to the same Apple ID, including your iPhone.
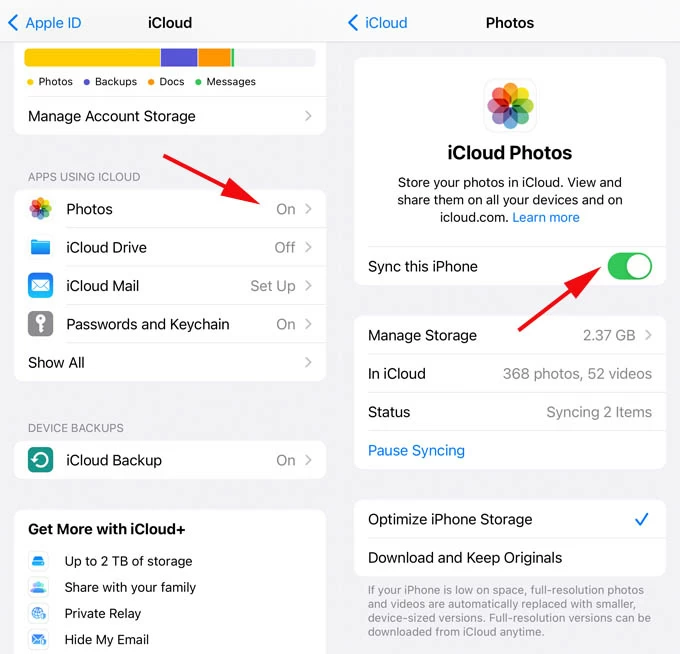
To get started, ensure the iCloud Photos is enabled on your iPhone and there's enough cloud storage to sync all your desired photos. Follow the steps below for photo transfer to iPhone from laptop without iTunes by using iCloud Photos:
iCloud offers 5 GB of free cloud storage for each Apple account. If the pictures on your laptop are over 5 GB, consider upgrading to iCloud + for additional cloud space.
Step 1. Enable iCloud Photos on iPhone.
Step 2. Upload photos from laptop to iCloud Photos.
After uploading, iCloud automatically syncs the laptop photos with your iPhone over the network.
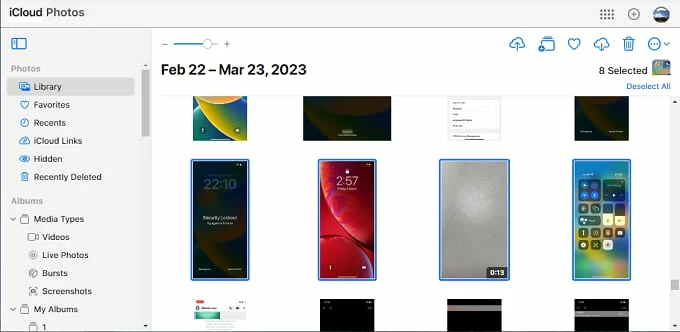
Step 3. Download laptop photos to iPhone from iCloud.
You have the options to save these laptop photos on your iPhone in Unmodified Originals (format as imported), Highest Resolution (typically HEIC or H.265), or Most Compatible (JPEG or MP4/H.264). Once done, the new photos and videos will be accessible in Photos app.
If your iCloud account is short of storage due to too many photos and videos, Google Photos is a great alternative to help sync laptop photos with your iPhone wirelessly. If you have a Google account, you're given 15 GB of free cloud storage automatically. This enables you to transfer more photos from your laptop to iPhone at a time. Here's how:
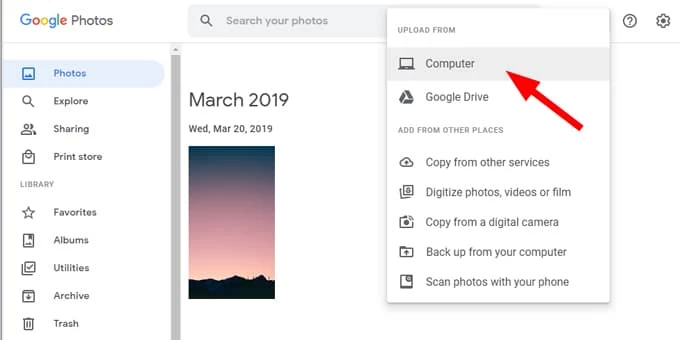
After that, the laptop pictures will be downloaded to your iPhone for local access and sharing.
Using email is also a simple and quick way to move photos from laptop to iPhone without iTunes. You can simply attach your laptop pictures within an email and send it to your iPhone. Note that email can only transfer a limited number of photos, and make sure the images are in iOS-compatible formats.
If you're using a macOS laptop, AirDrop is another quick way to share photos between your Apple laptop and iOS device wirelessly, especially if there's only a few pictures you wish to transfer. Make sure to put your MacBook and iDevice within Bluetooth and Wi-Fi range, then follow these steps to AirDrop your photos from laptop to iPhone without iTunes:
If you can't transfer your photos from Mac to iPhone, try turning off the Personal Hotspot and transfer the photos again.
By exploring these step-by-steps methods, you'll be able to get photos from laptop to iPhone with ease. To ensure you can open and view your laptop pictures on your iPhone after the transfer, make sure they are saved in iOS-compatible formats. Here are some common FAQs if you still have trouble in adding photos from desktop to your iPhone:
Q1 - Can I transfer photos from laptop to iPhone with USB cable?
Yes, tools like iTunes, Finder, and iPhone Data Transfer let you import photos on laptop to iPhone using USB cable:
Q2 - How do I transfer pictures on my laptop to my iPhone without iTunes?
There are several methods allowing for non-iTunes transfer of photos from a laptop to an iPhone:
Q3 - How can I transfer my photos from laptop to iPhone without losing quality?
To perform photo transfer without losing quality, the iPhone Data Transfer is what you need. It supports all-iOS compatible formats and enables bulk transfer of pictures to iPhone Photos Library directly without any quality loss:
Q4 - Why can't I transfer photos from my laptop to my iPhone?
When transferring photos with USB cable, ensure your iPhone is connected correctly via a compatible USB or Lightning cable. If you see a Trust This Computer prompt, tap Trust and enter your passcode for access permission.
Alternatively, if you're moving photos with cloud-based services, such as iCloud Photos or Google Photos, make sure your devices are signed in with the same account and connected to an active Wi-Fi network. If the photos still fail to transfer, check whether there's sufficient cloud storage in your account.